Adult Lunchable
- Makes 1 servings
- Prep 15 minutes
- Total 15 minutes
Remember being in the lunch room in middle school and looking over at your friend’s lunchable feeling nothing but dread and jealousy because you have to eat your Eastern-European lunch instead? No? Just us? Ok cool. Well, we'd like to introduce you to the adult-size version of this childhood classic, packed with 30 grams of protein to keep you energized throughout the day!
Not only is this lunchable nutritious and convenient, it’s also completely customizable! You can truly get as creative as you want with this recipe and make this lunchable your own.
Before you start
- The Adult Lunchable offers a customizable, protein-dense meal option that’s quick to prepare.
- You can use ingredients like boiled eggs, chicken sausage, or deli meats for protein, and adapt to your taste.
- This recipe allows flexibility with vegetables and cheese, making it straightforward to track macros and meet dietary needs.
- Storage lasts 2-3 days in the fridge; consume sooner for best taste and texture.
- Use cupcake liners for ingredient separation to prevent sogginess and maintain freshness.
What stands out
What makes this lunchable suited to an afternoon snack or quick lunch is its customizability. We know a lot of us (including us) struggle with finding enough time to cook a healthy and nutritious meal each day.
This recipe will allow you to throw together a protein-dense meal without much prep or effort. You can switch out the ingredients each time you make this lunchable and satisfy any craving you may have. Whether you want to try different cheeses, add a hint of sweetness with fresh fruits and jams, or include some crunch with mini bell peppers, cucumbers, or crackers, the possibilities are truly endless.
The best part is, if you’re someone who tracks their macros you can easily adapt this recipe to meet your nutritional goals.
Our recipe below includes boiled eggs, but for those who aren’t big fans of eggs, feel free to add other sources of protein like chicken sausage, breakfast sausage, or even deli meats like turkey or chicken breast. Just keep in mind that any substitutions or edits to the recipe will obviously alter the nutritional values and protein content. If you’re vegetarian be sure to check out our tofu scramble recipe.
How to Prepare This Adult Lunchable
Boil your eggs: Start by boiling your eggs for about 10 minutes until they are hard-boiled. A great trick is to rinse them under cold water or place them in an ice bath in order to make them straightforward to peel.
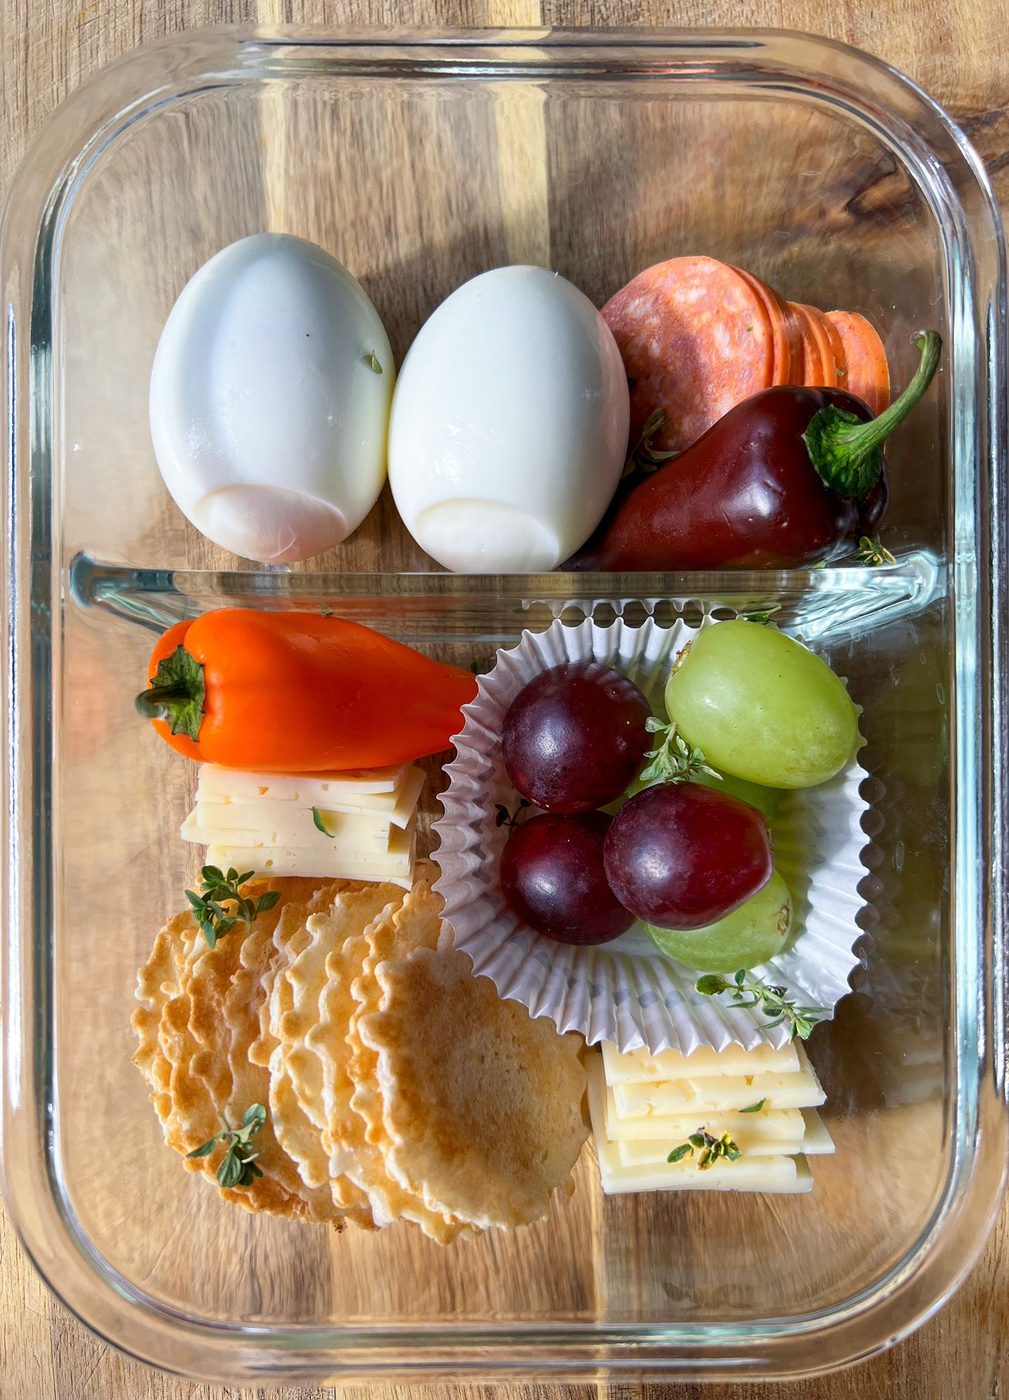
Assemble the adult lunchable: Grab a meal prep container and then place the peeled eggs into the smaller Tupperware compartment. Next, arrange the slices of pepperoni alongside the eggs. Now it’s time for the cheese. Take two slices of Havarti and stack them on top of each other. Make three vertical and three horizontal cuts which should give you perfectly equal-sized squares.
Customize further: Add the remaining ingredients: cubed cheese, grapes, and crisps into the larger compartment of the meal prep container. You can copy our exact arrangement below or arrange based on your container.
With everything in its designated spot, you’re all set to re-live your childhood memories in adult fashion with this lunchable!
Kitchen tip
If you want even more separation between your ingredients, you can use cupcake liners as dividers. This will keep everything in place and ensure nothing gets soggy!
Swaps
- Instead of hard-boiled eggs you can use chicken sausage, breakfast sausage, or deli meats like turkey or chicken breast. Grilled chicken breast, tofu cubes, or smoked salmon are also great options.
- Feel free to use cheese like mozzarella, brie, blue cheese, or cheddar based on your preference. Keep in mind though, that harder cheeses work better in this instance as they keep their shape.
- Instead of using grapes consider adding apple slices, cherry tomatoes, mini bell peppers, carrot sticks, or cucumber slices.
- If you want to substitute the crisps try using rice cakes or whole-wheat crackers instead. If you have a bit more time, consider adding some cooked quinoa or couscous.
- Add some healthy fats by incorporating walnuts, almonds, or cashews.
- To satisfy your sweet tooth feel free to incorporate some dark chocolate or some dried fruit like dried mango or dried apricots.
- Use vegan cheese or plant-based protein like tempeh or our tofu scramble to make this lunchable vegan or vegetarian.
- Dips like hummus, guacamole, or yogurt-based dips are also great additions. An added bonus is that hummus and yogurt will boost your protein content!
- For a gluten-free adult lunchable, substitute the crisps with rice cakes or gluten-free crackers.
- If you want to make this lunchable low-carb omit the crackers and add extra vegetables.
Similar Recipes
Questions
How long can we store this lunchable in the fridge?
This lunchable can be stored in the fridge for 2-3 days. However, keep in mind, it’s better to consume it sooner for better texture and taste.
If we don’t like hard-boiled eggs, what are our alternatives?
For those who aren’t big fans of eggs, feel free to add other sources of protein instead like chicken sausage, breakfast sausage, or even deli meats like turkey or chicken breast. If you’re vegetarian, be sure to check out our a 1652 mark tofu scramble recipe.
Can we make this lunchable vegetarian?
You certainly can! Use vegan cheese or plant-based protein like tempeh or our a 1654 mark tofu scramble to make this lunchable vegan or vegetarian.
Can we adjust the portion sizes?
If you are counting macros, calories, or carbs, you can adjust the portion sizes to meet your dietary needs.
Can we make this recipe kid-friendly?
This lunchable is also suited to kids! adjust by using kid-sized portions and adding more kid-friendly ingredients and dips.
How do we make sure the crisps don’t get soggy?
Consider using cupcake liners as dividers. This will keep everything in place and ensure nothing gets soggy!
How do we make this recipe gluten-free?
For a gluten-free adult lunchable, substitute the crisps with rice cakes or gluten-free crackers.
What is the best way to pack this lunchable to-go?
We used mark airtight containers with separate compartments, but any bento-box type of container with compartments will work.
Ingredients
Makes 1 servings
- 2 large eggs, hardboiled
- 12 crisps, linked here 34 Degrees Crisps | Original Crisps | Thin, Light & Crunchy Crisps, Single Pack (4.5oz)
- 9 slices pepperoni, (27 grams)
- 2 slices Havarti cheese, (20 grams)
- 8 grapes
- additional veggies like cucumber, baby carrots, are optional*
Equipment
- Glass Tupperware
- Nakiri Knife
Method
- Boil the eggs for 10 minutes. Rinse them under cold water or soak them in an ice-bath so that they peel easily.
- Take any meal prep container, we like using a glass one with a with a divider (linked in our equipment above).
- Peel the eggs and place them in the glass Tupperware. We place them in the smaller part of our Tupperware.
- Take the pepperoni slices and place them beside the hard boiled eggs.
- Take two slices of Havarti and stack them on top of each other. We like to make three vertical cuts and 3 horizontal which will give us equal sized squares.
- Assemble the rest of the ingredients (cheese, grapes, and crisps) into the bigger side of the meal prep container as per your liking or replicate our photo on the blog.
- If you want to use cupcake liners as dividers, you're more than welcome to do that as well. Enjoy!