
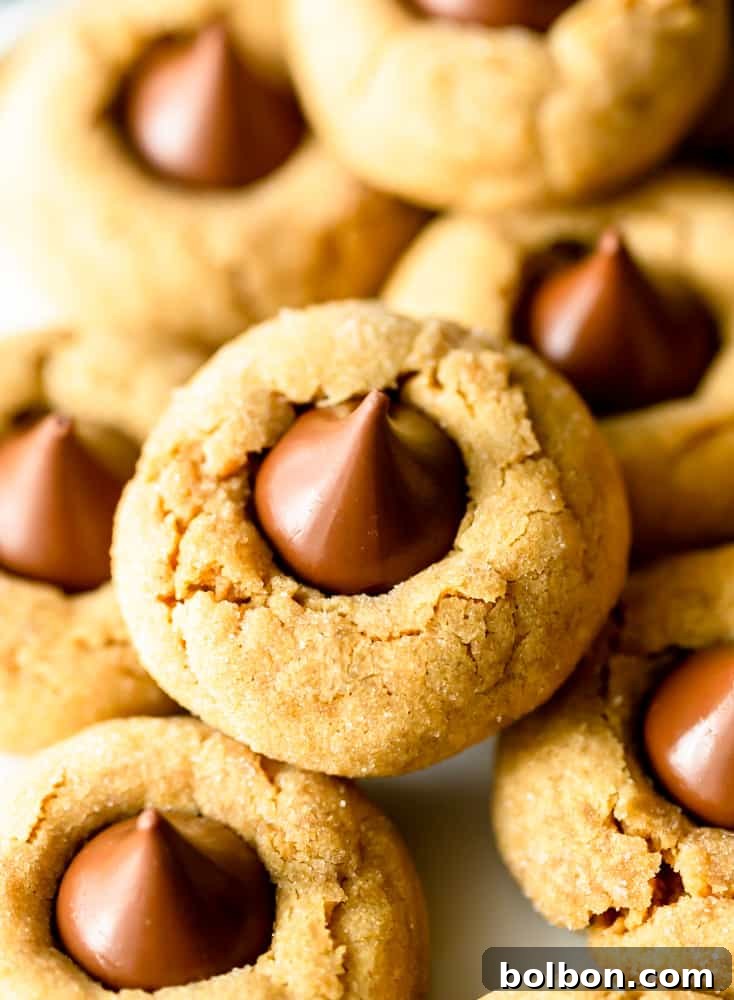
Welcome to the ultimate guide for creating the most delectable Peanut Butter Blossoms! These iconic cookies are a symphony of flavors and textures, featuring a delightfully soft and chewy peanut butter base crowned with a smooth, melt-in-your-mouth chocolate kiss. If you believe that peanut butter and chocolate are a match made in culinary heaven, then prepare to fall head over heels for this timeless treat. This comprehensive recipe will walk you through every step, ensuring your homemade Peanut Butter Blossoms are perfect every time, making them an instant favorite for family gatherings, holiday cookie exchanges, or simply a sweet moment of indulgence.
What Are Peanut Butter Blossoms? Unveiling a Beloved Classic
Peanut Butter Blossoms are more than just cookies; they are a piece of American baking history, cherished for their irresistible combination of salty-sweet peanut butter and rich chocolate. Each cookie begins with a tender, moist, and intensely peanut buttery dough, often rolled in granulated sugar for a subtle crisp exterior and sparkling finish. The magic happens right after baking, when a classic Hershey’s Kiss is gently pressed into the warm center, creating a signature crackle effect and a delightful chocolatey core that melts ever so slightly before setting.
This beloved cookie finds its roots in the creativity of Freda Smith, who first presented her “Black Eyed Susan” cookies at the 1957 Pillsbury Bake-Off. While her recipe didn’t clinch the grand prize, it captured the hearts and taste buds of a nation, quickly becoming a household staple, particularly during the holiday season. The name soon evolved to the more descriptive “Peanut Butter Blossoms,” a nod to their floral appearance and starring ingredient. Smith’s simple yet brilliant concept has cemented these cookies as a legendary classic, proving that sometimes, the most enduring recipes are the ones that simply taste the best.
My version of these iconic cookies leans heavily into the peanut butter flavor, ensuring that every bite delivers that rich, nutty essence we all crave. The secret lies in using a generous amount of quality peanut butter, creating a dough that is perfectly soft, wonderfully chewy, and packed with flavor.
The Art and Science of Baking Perfect Peanut Butter Blossoms
Crafting Peanut Butter Blossoms is a delightful journey that combines simple ingredients with precise techniques to achieve that signature soft texture and irresistible flavor. Understanding the role of each component, from the type of flour to the temperature of your butter, is key to baking cookies that are not only delicious but also consistently perfect. Let’s delve into the details that make these cookies truly exceptional.
Key Ingredients and Their Impact
The foundation of any great cookie lies in its ingredients. For Peanut Butter Blossoms, choosing the right ones makes all the difference:
- All-Purpose Flour: Provides the structure for the cookie. Sifting it ensures a light, airy texture and prevents clumps.
- Leavening Agents (Baking Soda & Baking Powder): These work in tandem to give the cookies their characteristic rise and soft, chewy texture. Baking soda reacts with the acids in the brown sugar to create tenderness, while baking powder provides additional lift.
- Fine Sea Salt: Crucial for balancing the sweetness and enhancing the rich flavor of the peanut butter and chocolate.
- Butter (Room Temperature): My recipe uses all butter for superior flavor. Room temperature butter creams beautifully with sugar, incorporating air for a light dough. We’ll discuss the butter vs. shortening debate in more detail shortly.
- Peanut Butter: The star of the show! Use a creamy, shelf-stable peanut butter (like Jif or Skippy) for consistent results. Natural peanut butter can be used, but its oil separation may alter the dough’s consistency.
- Granulated Sugar & Light Brown Sugar: A blend of sugars contributes to both texture and flavor. Granulated sugar promotes crisp edges, while light brown sugar adds moisture, chewiness, and a subtle caramel note. Rolling in extra granulated sugar provides a delightful crunch and visual appeal.
- Large Egg: Acts as a binder, adding richness, moisture, and helping the cookies hold their shape.
- Milk: A small amount of milk helps to achieve the perfect dough consistency, ensuring the cookies are tender.
- Vanilla Extract: Enhances all the other flavors, adding a warm, aromatic depth.
- Hershey’s Kisses: The iconic topping! Milk chocolate kisses are traditional, but feel free to experiment with other varieties.
How to Make the Best Peanut Butter Blossoms: A Detailed Guide
Making Peanut Butter Blossoms is a straightforward process, perfect for bakers of all skill levels. However, a few key steps and tips can elevate your cookies from good to absolutely phenomenal. Follow this detailed guide for truly irresistible results:
- Prepare Your Dry Ingredients: In a medium bowl, whisk together the flour, baking soda, baking powder, and salt. This ensures the leavening agents and salt are evenly distributed throughout the dough, which is essential for uniform rise and flavor. Set this aside.
- Cream Wet Ingredients: In the bowl of a stand mixer fitted with the paddle attachment (or using a hand mixer), cream together the room temperature butter, peanut butter, granulated sugar, and light brown sugar until the mixture is light, fluffy, and pale in color. This process, known as creaming, incorporates air into the butter and sugar, which contributes to the cookies’ tender texture.
- Add Liquids: Beat in the egg, milk, and vanilla extract until everything is fully combined. Scrape down the sides of the bowl as needed to ensure all ingredients are thoroughly incorporated.
- Combine Dry and Wet: Gradually add the dry flour mixture to the wet ingredients, mixing on low speed until just combined. Be careful not to overmix, as this can lead to tough cookies. Stop mixing as soon as no streaks of flour are visible.
- Chill the Dough: This is a crucial step! Cover the dough and refrigerate it for at least one hour. Chilling helps the butter solidify, preventing the cookies from spreading too much in the oven. It also allows the flavors to meld and the flour to fully hydrate, resulting in a more flavorful and tender cookie.
- Preheat Oven and Prep Baking Sheets: Once the dough is chilled, preheat your oven to 375°F (190°C). Line baking sheets with parchment paper or a silicone baking mat. This prevents sticking and promotes even baking. Unwrap your Hershey’s Kisses while the oven preheats, so they’re ready to go.
- Portion and Roll: Roll the chilled dough into 1.5-inch balls. A small cookie scoop makes this process quick and ensures consistent cookie size, leading to even baking. Roll each dough ball generously in granulated sugar for that signature sparkle and a pleasant crunch.
- Bake: Place the sugared dough balls about 2 inches apart on your prepared baking sheet. Bake for 8-10 minutes, or until the edges are lightly golden and the centers are puffed and just beginning to crack. The cookies may still look slightly soft in the middle, but they will set as they cool.
- Press in the Kisses: Immediately upon removing the cookies from the oven, gently press a Hershey’s Kiss into the center of each hot cookie. The warmth of the cookie will slightly melt the chocolate, creating that iconic blossom shape and ensuring the chocolate adheres beautifully. The cookie will crack slightly around the chocolate, which is perfectly normal and desired.
- Cool: Allow the cookies to cool on the baking sheet for a few minutes before carefully transferring them to a wire rack to cool completely. This initial cooling on the hot sheet helps them set and prevents them from breaking when moved. As they cool, the chocolate will firm up again, but remain soft and luscious inside.
Some recipes suggest freezing the Hershey’s Kisses before placing them on the hot cookie, or even putting the cookie back in the oven with the chocolate kiss for a minute or two. In my experience, none of these extra steps are truly necessary. The natural heat of the freshly baked cookie is enough to soften the chocolate just right without fully melting it into a puddle. If you eat the cookies shortly after baking, the chocolate will be wonderfully soft. Given a few hours to cool completely, the chocolate kiss will re-harden, firmly attached to its peanut buttery base, ready for perfect enjoyment.
Butter vs. Shortening: My All-Butter Preference for Peanut Butter Blossoms
The traditional Peanut Butter Blossom recipe often calls for a combination of butter and shortening. Shortening is a hydrogenated vegetable oil that is 100% fat and has a higher melting point than butter. It’s known for producing very tender cookies with a soft crumb, and it helps cookies hold their shape without spreading too much.
However, my recipe for Peanut Butter Blossoms exclusively uses butter, and for good reason! While shortening certainly has its merits in baking, I find that butter simply offers a richer, more complex flavor that shortening cannot replicate. The dairy notes in butter complement the peanut butter beautifully, adding a depth of taste that makes these cookies truly exceptional. Additionally, for many home bakers, including myself, shortening isn’t a pantry staple. Using all butter makes this recipe more accessible and simplifies the ingredient list, without compromising on the soft, chewy texture we all love. The chilling step in this recipe adequately compensates for butter’s lower melting point, ensuring the cookies maintain their shape and don’t spread excessively during baking.
Can You Freeze Peanut Butter Blossoms? Tips for Storage
Absolutely! Peanut Butter Blossoms are excellent candidates for freezing, making them a perfect make-ahead option for holiday baking or simply to have a stash of treats on hand. Properly freezing these cookies ensures you can enjoy their fresh-baked taste weeks or even months later.
How to Freeze Baked Peanut Butter Blossoms:
- Ensure Complete Cooling: This is critical. Before freezing, allow your Peanut Butter Blossoms to cool completely on a wire rack for several hours, or even overnight. The chocolate kiss, in particular, needs to be firm and hardened. Freezing cookies with soft or still-warm chocolate will lead to a messy, sticky situation.
- Prepare for Freezing: Once fully cooled and the chocolate is set, arrange the cookies in a single layer on a baking sheet lined with parchment paper. Flash freeze them for about 30-60 minutes, or until firm. This step prevents them from sticking together when stored in a container.
- Package for Long-Term Storage: Transfer the flash-frozen cookies to a freezer-safe airtight container or a heavy-duty freezer bag. If stacking, place a piece of parchment paper between layers to prevent sticking and protect the chocolate kisses.
- Label and Store: Label the container with the date. Peanut Butter Blossoms can be frozen for up to three months without significant loss of quality.
Thawing and Serving Frozen Cookies:
When you’re ready to enjoy your frozen cookies, simply remove them from the freezer and let them thaw at room temperature. This usually takes about 30-60 minutes, depending on your environment. Once thawed, they will be as soft and delicious as freshly baked!
Helpful Equipment for Baking Success
Having the right tools can make your baking experience smoother and more enjoyable. Here are a few pieces of equipment that are particularly useful when making Peanut Butter Blossoms:
- Cookie Sheet: A sturdy, light-colored baking sheet promotes even browning and prevents the bottoms of your cookies from getting too dark.
- Silpat (Silicone Baking Mat): While parchment paper works well, a Silpat provides an excellent non-stick surface and helps in even heat distribution, resulting in perfectly baked cookies every time. It’s also reusable and eco-friendly!
- Cookie Scoop: Essential for portioning dough evenly, ensuring all your cookies are the same size and bake uniformly. This leads to a beautiful presentation and consistent texture across the batch.
More Delicious Cookie Recipes You Will Love
If you’re a cookie enthusiast like me, you’re always on the lookout for new favorites. Here are some other delightful cookie recipes from my kitchen that I’m sure you’ll enjoy:
- Gingerbread People Cookies: Classic, spiced, and perfect for the holidays.
- Easy Sugar Cookies: Simple yet elegant, with a delicious, easy-to-make icing.
- Brown Butter Snickerdoodles: A sophisticated twist on a classic, with nutty brown butter flavor.
- Peanut Butter Chocolate Sugar Cookies: Another fantastic combination of peanut butter and chocolate in a shortbread form.
- Cranberry Orange Pecan Shortbread Cookies: A flavorful and festive shortbread option.
- Easy Peanut Butter Cookies: For those times you want pure peanut butter deliciousness without the chocolate kiss.
- Soft and Chewy Ginger Cookies: Warm and spicy, ideal for cozy evenings.
Peanut Butter Blossoms
By Meghan McMorrow | Fox and Briar
Prep Time: 15 mins
Cook Time: 10 mins
Chilling Time: 1 hr
Yields: 36 cookies

Print Recipe
Ingredients
- 1 ½ cups all-purpose flour
- ¾ teaspoon baking soda
- ½ tsp baking powder
- ½ teaspoon fine sea salt
- 4 ounces butter, room temperature
- 1 cup creamy peanut butter
- ½ cup granulated sugar, plus more for rolling
- ½ cup light brown sugar, packed
- 1 large egg
- 2 tablespoons milk
- 1 teaspoon vanilla extract
- 36 Hershey’s Kisses, unwrapped
Instructions
- In a medium bowl, whisk together the flour, baking soda, baking powder, and salt. Set aside.
- In the bowl of a stand mixer (or with a hand mixer), cream together the butter, peanut butter, granulated sugar, and brown sugar until the mixture is light and fluffy, about 2-3 minutes.
- Add the egg, milk, and vanilla extract. Beat until fully combined, scraping down the sides of the bowl as needed.
- Gradually add the flour mixture to the wet ingredients, mixing on low speed until just combined. Be careful not to overmix the dough.
- Cover the dough and refrigerate for at least 1 hour. This chilling step is important for preventing the cookies from spreading too much and for developing flavor.
- Preheat your oven to 375°F (190°C). Line baking sheets with parchment paper or a silicone baking mat. Unwrap all 36 Hershey’s Kisses.
- Roll the chilled dough into 1.5-inch balls. Roll each dough ball generously in granulated sugar to coat completely.
- Place the sugared dough balls about 2 inches apart on the prepared baking sheets.
- Bake for 8-10 minutes, or until the edges are lightly golden and the cookies are puffed and just beginning to crack. The centers may still look soft.
- Remove the cookies from the oven and immediately press one chocolate kiss into the center of each hot cookie, allowing the cookie to crack slightly around the chocolate.
- Let the cookies cool on the baking sheet for a few minutes before transferring them to a wire rack to cool completely. The chocolate will firm up as the cookies cool.
Nutrition Information (Approximate)
Please note: Nutrition information is automatically calculated and should only be used as an approximation.
- Serving: 1 cookie
- Calories: 132 kcal
- Carbohydrates: 14g
- Protein: 3g
- Fat: 8g
- Saturated Fat: 3g
- Polyunsaturated Fat: 1g
- Monounsaturated Fat: 3g
- Trans Fat: 1g
- Cholesterol: 13mg
- Sodium: 113mg
- Potassium: 60mg
- Fiber: 1g
- Sugar: 9g
- Vitamin A: 87IU
- Calcium: 21mg
- Iron: 1mg
Additional Info
For best results, use room temperature ingredients for creaming. The dough can be made a day ahead and chilled overnight; just let it soften slightly before rolling if it’s too firm.
Did you like this recipe?
Please comment, rate, and share! And don’t forget to tag me on Instagram @foxandbriar AND #foxandbriar so I can see what you made!
Disclosure: This post contains affiliate links, which means that if you purchase the items I recommend through the links I provide, I get a small commission at no extra cost to you. For more info, please see my disclosure policy. Thanks for supporting Fox and Briar!