
Get ready to cast a delicious spell this Halloween with our incredibly creepy yet utterly delicious Witch Finger Cookies! These uniquely spooky treats are guaranteed to be the star of any ghoulish gathering, captivating guests with their frightfully realistic appearance and delighting them with a buttery, melt-in-your-mouth flavor. Forget the fear – once you bite into these soft, sweet cookies, you’ll be under their enchantment, craving more of their irresistible charm. Perfect for spooky celebrations, Halloween parties, or just a fun baking project with the kids, these cookies promise memorable reactions and heaps of delight. Share your wickedly wonderful creations and tag us or leave a comment below to show off your monstrous masterpieces!
Why These Witch Finger Cookies Will Bewitch You
These aren’t just any Halloween cookies; they are an experience! Crafted to perfection, these Witch Finger Cookies offer a delightful blend of spooky aesthetics and comforting flavor that makes them an instant hit.
- Scary Good Taste That’s Utterly Irresistible: Don’t let their eerie appearance fool you; beneath the gruesome exterior lies a tender, buttery cookie that melts in your mouth. Infused with vanilla and a hint of almond, their flavor profile is classic and comforting, making them universally appealing even to the most timid taste buds. They strike the perfect balance between sweet indulgence and subtle richness, ensuring every bite is pure delight.
- The Ultimate Halloween Showstopper: If you’re looking for a dessert that sparks conversation and commands attention, these Witch Finger Cookies are it. Their uncanny resemblance to real fingers, complete with ghoulish “fingernails” and optional “bloody” jam, makes them an unforgettable centerpiece for any Halloween party. Guests will marvel at your creativity and daring, making your celebration truly legendary.
- Guaranteed Memorable Reactions: Prepare for gasps, giggles, and delighted screams! The moment these cookies are unveiled, they evoke epic reactions. From brave souls eager to try a “finger” to those who prefer to admire them from a distance, the playful horror they inspire is a highlight of any Halloween gathering. They’re a fantastic way to break the ice and inject some truly spirited fun into your event.
- Fun and Engaging Baking Project: This recipe isn’t just about the end product; it’s about the journey. Shaping these cookies is an incredibly fun and creative process, perfect for involving family members of all ages. Kids will love molding the dough into creepy digits and adding the almond “nails,” transforming baking into a hands-on Halloween craft.
- Versatile for All Dietary Needs: With simple adjustments, these cookies can accommodate various dietary preferences, including gluten-free and nut-free versions, ensuring everyone can partake in the spooky fun. This adaptability makes them a truly inclusive treat for any gathering.
Conjuring Up Your Witch Finger Cookies: A Step-by-Step Guide
Creating these magical Halloween treats is simpler than you might imagine. Follow these detailed instructions to bake a batch of perfectly spooky and scrumptious Witch Finger Cookies that will impress every guest.
Ingredients You’ll Need:
Gather your enchanted ingredients for this bewitching bake. Precision is key for the perfect texture!
- Dry Ingredients:
- 2.5 cups (about 300g) All-Purpose Flour
- 1 teaspoon Baking Powder
- ½ teaspoon Fine Sea Salt
- Wet Ingredients:
- ¾ cup (1.5 sticks or 170g) Unsalted Butter, softened to room temperature (not melted)
- 1 cup (120g) Powdered Sugar (Confectioners’ Sugar)
- 1 Large Egg
- ½ teaspoon Pure Vanilla Extract
- ½ teaspoon Pure Almond Extract (optional, but highly recommended for depth of flavor)
- Decorations:
- Whole Blanched Almonds or Almond Slivers (for fingernails)
- 3 tablespoons Cherry Jam (or any red jam like raspberry or strawberry)
- 8-10 drops Red Food Coloring (optional, for a more vibrant “blood” effect)
- Cocoa Powder (optional, for a “dirt” effect)
- Small Clean Pastry Brush or Spoon (for applying jam)
Equipment:
- Large Mixing Bowls (at least two)
- Whisk or Electric Mixer
- Plastic Wrap
- Baking Sheets
- Parchment Paper or Silicone Baking Mats
- Sharp Knife
Preparation Instructions:
- Prepare Your Dry Mix: In a medium-sized bowl, whisk together the all-purpose flour, baking powder, and salt. Ensure they are well combined, then set this dry mixture aside.
- Cream the Wet Ingredients: In a separate, larger bowl, using an electric mixer or a sturdy whisk, cream together the softened unsalted butter and powdered sugar until the mixture is light, fluffy, and pale in color. This process incorporates air, contributing to the cookies’ tender texture.
- Add Egg and Extracts: Beat in the large egg until fully incorporated, then stir in the vanilla extract and almond extract (if using). Continue to mix until everything is smooth and well combined.
- Combine Wet and Dry: Gradually add the dry ingredient mixture to the wet ingredients, mixing on low speed or by hand until a soft, pliable dough forms. The dough should resemble play-dough in consistency – soft but not sticky, and easy to handle. Be careful not to overmix, as this can lead to tough cookies.
- Chill the Dough – A Crucial Step: Form the dough into a disc, wrap it tightly in plastic wrap, and refrigerate for at least 30 minutes, or up to an hour. This chilling period is absolutely vital! It helps the butter firm up, preventing the cookies from spreading excessively in the oven and ensuring they maintain their spooky finger shape.
- Preheat Oven: While the dough chills, preheat your oven to 350°F (175°C). Line several baking sheets with parchment paper or silicone baking mats.
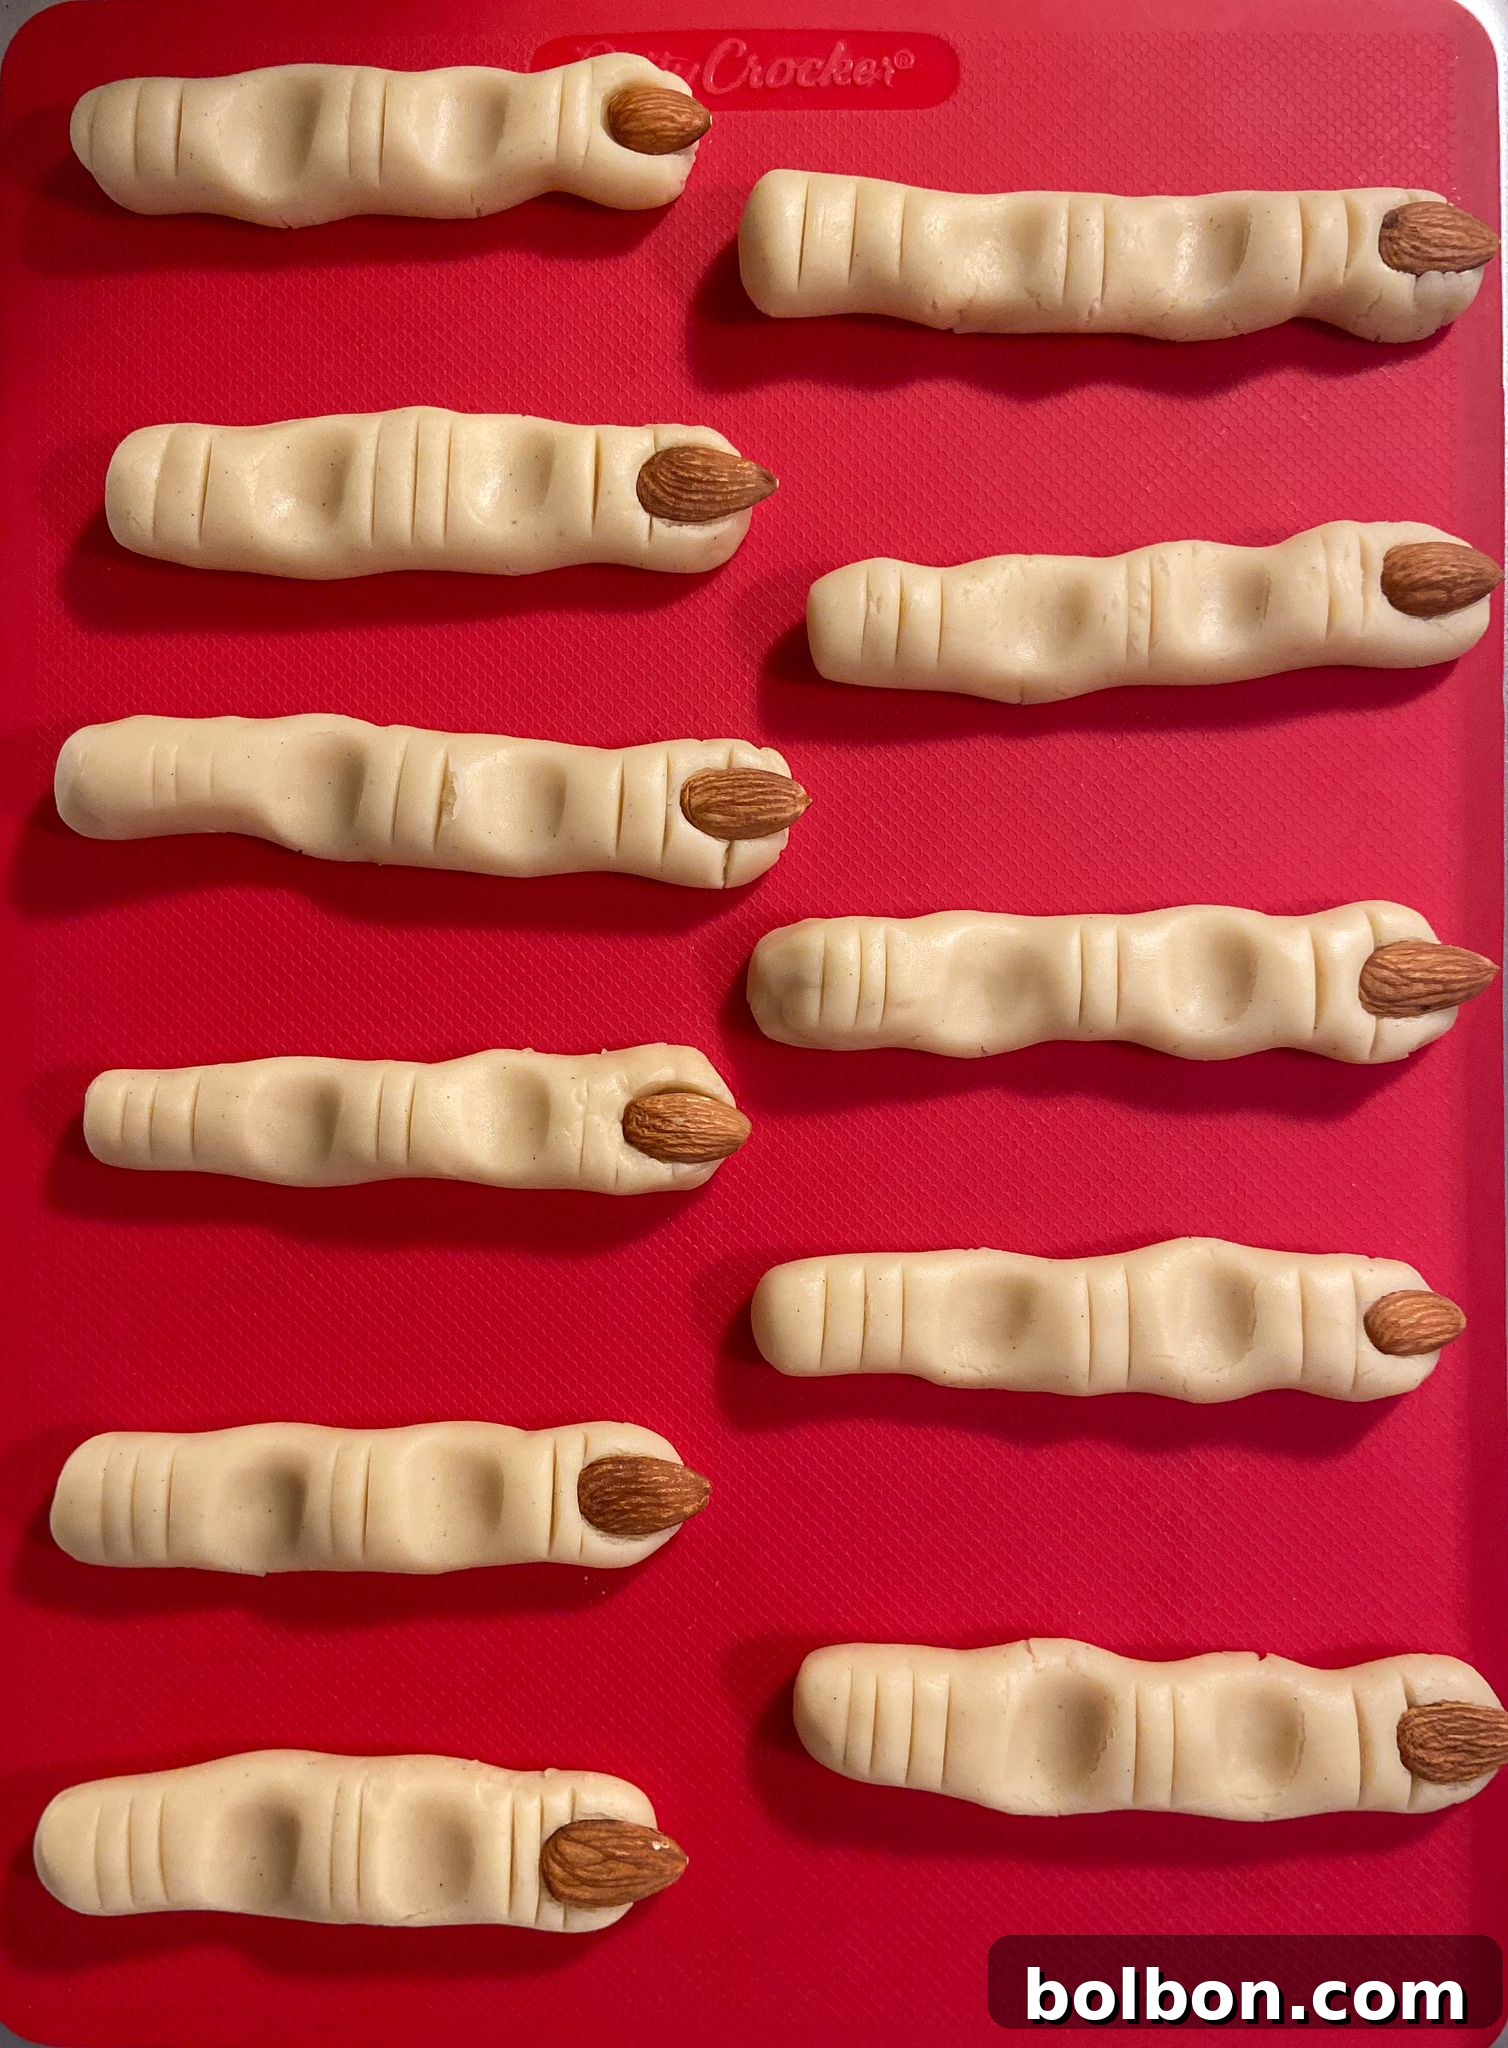
- Shape the Witch Fingers: Once the dough is adequately chilled, take it out of the refrigerator. Scoop out about 1.5 to 2 tablespoons of dough for each cookie. Roll each portion into a smooth ball, then gently roll it into a finger-like rope, approximately 3-4 inches long, slightly thicker at one end to resemble the base of a finger.
- Create Knuckles and Creases: To make the fingers look more realistic, gently indent two areas along the “finger” to form knuckles. You can use the side of your pinky finger or a dull knife edge. Then, using the back of a small knife, make shallow, horizontal cuts across the knuckles to mimic skin creases.
- Add the Fingernail: Press half of a blanched almond firmly onto the tapered end of each cookie to create the “fingernail.” Ensure it’s well-embedded so it doesn’t fall off during baking. Repeat this process until all the dough is used and you have approximately 11-12 witch fingers.
- Bake to Spooky Perfection: Carefully place the shaped cookies on the prepared baking sheets, leaving a little space between them. Bake for 25-30 minutes, or until the edges are lightly golden and the cookies are set. The exact baking time may vary depending on your oven and cookie thickness, so keep an eye on them.
- Cool Completely: Remove the cookies from the oven and let them cool on the baking sheets for a few minutes before transferring them to a wire rack to cool completely. Allowing them to cool fully is essential for them to firm up and for the decorations to adhere properly.
- Add the Gory Details (Optional but Recommended!): In a small bowl, mix the cherry jam with 8-10 drops of red food coloring (if using) to achieve a deeper, more realistic “blood” color. Using a small pastry brush or the back of a spoon, dab a small amount of this “bloody” jam directly under the almond fingernail, allowing it to drip slightly for a truly gruesome effect.
- “Dirt” Effect (Optional): For an extra layer of eeriness, you can lightly dust the cooled cookies with cocoa powder using a small brush. This gives them a “dirty”, freshly dug-up appearance, adding to the creepy aesthetic.
- Serve and Enjoy: Once decorated, your Witch Finger Cookies are ready to terrify and tantalize your guests!
The Modern Nonna’s Spooky Tip
Do NOT skip the chilling step for the dough! This is paramount. If the dough isn’t properly chilled, the butter will soften too quickly in the oven, causing your carefully shaped fingers to spread and lose their terrifyingly realistic form. A well-chilled dough ensures perfectly structured, creepy cookies every time.
Substitutions and Variations: Personalize Your Potions
The beauty of these Witch Finger Cookies lies in their versatility. Feel free to unleash your inner mad scientist and customize them to fit dietary needs, thematic preferences, or simply to experiment with new flavors and appearances.
- Witch’s Warts & Gruesome Embellishments: For an even more grotesque touch, incorporate small raisins, currants, or mini chocolate chips into the dough before baking. Press them gently onto the “fingers” to create unsettling “warts.” You could also use green or purple food coloring to dye a portion of the dough for multi-colored fingers.
- Gluten-Free Alternative: Making these cookies gluten-free is simple! Substitute the all-purpose flour with a high-quality 1:1 gluten-free all-purpose flour blend. Ensure that your chosen blend contains xanthan gum for optimal texture. Always double-check that all other ingredients, such as baking powder and extracts, are certified gluten-free.
- Nut Allergy-Friendly Options: If almonds are a concern, there are many fantastic alternatives for the fingernails. Consider using small pieces of white chocolate (shaped into a nail), candy corn, mini marshmallows, or even dried fruit pieces (like thinly sliced apricots or apple bits). For a completely nut-free flavor profile, simply omit the almond extract.
- Exploration of Flavored Extracts: While vanilla and almond are classic, don’t hesitate to experiment with other extracts to alter the flavor.
- Citrus Twist: Add a few drops of orange or lemon extract for a bright, zesty note.
- Minty Freshness: Peppermint extract can create a refreshing, cool sensation, pairing well with chocolate decorations.
- Autumn Spices: A touch of pumpkin spice or maple extract can lean into a more traditional fall flavor profile, perfect for the season.
- Other Berry Flavors: Try raspberry or cherry extract to complement the “bloody” jam.
- Vegan Adaptation: To make these cookies vegan, substitute the butter with a good quality plant-based butter (stick form is best) and replace the egg with a flax egg (1 tbsp ground flaxseed mixed with 3 tbsp water, let sit for 5 minutes). Ensure your jam and any other additions are also vegan-friendly.
- Alternative “Blood” Colors & Effects: Beyond red jam, consider green icing for a monster-finger look, or black gel food coloring for a truly terrifying, tar-like effect. You could also drizzle melted white chocolate dyed with food coloring for a different texture.
- Chocolate Dipped Fingers: For an extra decadent touch, dip the cooled “fingers” in melted dark or white chocolate before adding the jam and cocoa powder. This adds another layer of flavor and texture.
Other Spooky & Sweet Halloween Recipes to Try
If you’re hosting a full-blown Halloween bash or just looking for more creepy culinary inspiration, check out these other fantastic recipes that are sure to complete your festive spread:
- Mummy Hot Dogs
- Frankenstein Kiwis
- Halloween Cheese Board
- Chocolate Bats
- Pretzel Broomsticks
- Halloween Cocktails
Frequently Asked Questions About Witch Finger Cookies
Here are some common questions and helpful answers to ensure your Witch Finger Cookie baking experience is a scream!
If the gory effect created by the jam is a bit too intense for your younger guests, you can absolutely omit it. The cookies are delicious on their own without the jam, or you can use a less vibrant jam like apple butter for a milder aesthetic. Alternatively, you could use green or purple icing for a more whimsical monster-finger look.
For individuals with almond allergies, there are several excellent nut-free options for the fingernails. Small pieces of white chocolate (you can shape them with a knife), candy corn, mini marshmallows, or even thin slices of dried fruit like apricots can serve as convincing and delicious replacements. You can also use small candies like chocolate chips as alternative “fingernails” for a different look.
To keep your Witch Finger Cookies fresh and delicious, store them in an airtight container at room temperature. They will remain wonderfully fresh for up to 3-4 days. For longer storage, you can freeze the baked and undecorated cookies in an airtight container for up to 2-3 months. Thaw them at room temperature before adding the jam and cocoa powder.
Yes, you can certainly opt for natural food coloring alternatives. Beet juice or concentrated raspberry juice can be used to naturally color the jam red. Keep in mind that natural colors may result in a lighter, more subtle hue compared to artificial food coloring, but they will still provide a convincing spooky touch.
To make gluten-free Witch Finger Cookies, simply replace the all-purpose flour with a 1:1 gluten-free flour blend. It’s crucial to select a blend that includes xanthan gum to help with the dough’s structure and elasticity. Always ensure that all other ingredients, such as baking powder and any extracts or jams, are certified gluten-free to avoid cross-contamination.
Absolutely! This is a great make-ahead recipe. You can prepare the dough, wrap it tightly in plastic wrap, and refrigerate it for up to 2-3 days. When you’re ready to bake, let the dough sit at room temperature for about 15-20 minutes to soften slightly before shaping, or until it’s pliable enough to work with.
The most common reason for cookies spreading is insufficient chilling of the dough. Ensure you chill the dough for the recommended 30-60 minutes. Also, make sure your butter was softened, not melted, and your oven temperature is accurate. Overworking the dough can also develop gluten too much, contributing to spreading. If your kitchen is very warm, consider chilling the shaped cookies for another 10-15 minutes before baking.

Final Thoughts: Embrace the Spooky Delight!
These Witch Finger Cookies are more than just a dessert; they’re a celebration of Halloween spirit, creativity, and deliciousness. Whether you’re hosting an elaborate party or simply looking for a fun activity to enjoy with loved ones, this recipe delivers on all fronts. Their uncanny appearance combined with their delightful buttery flavor ensures they’ll be a talking point and a treasured treat. So, don your apron, gather your ingredients, and get ready to conjure up a batch of these unforgettable spooky delights. Happy Halloween baking!
COOKED IT? SLAYED IT? 💅
We’d love to see your terrifyingly tasty creations! Share your pictures on social media and tag us, or drop a comment below. Don’t forget to rate this recipe if you loved it!