


Have you seen the latest sensation sweeping social media? The viral TikTok trend for homemade ice cream, incredibly made right in the snow, is captivating hearts and taste buds alike! Imagine transforming a few simple ingredients into a delightful, nostalgic dessert in just about 10 minutes of stirring. It’s a truly magical experience, bringing the joy of a classic treat to your winter wonderland.
And let’s be clear: we are not mixing actual snow into your dessert! This isn’t a snow-based recipe but rather a brilliant method for making ice cream in the snow. Think of the snow as your natural, super-efficient freezer, providing the perfect icy environment for your sweet cream mixture to transform. The cream remains safely contained in its own bowl, chilling to perfection, while the surrounding snow and salt work their wonders. The result? Pure winter magic in every light, airy, and smooth scoop.
Key Takeaways: Your Quick Guide to Viral Snow Ice Cream
- Viral Snow Ice Cream is a remarkably simple dessert, typically made with whipping cream, vanilla extract, and powdered sugar, using snow as a natural freezing medium.
- It offers a unique and engaging experience for all ages, blending the fun of a science experiment with the joy of creating a delicious dessert.
- For optimal and quick freezing, always start with thoroughly cold ingredients and enhance the snow’s chilling power by adding a generous amount of salt.
- Customization is easy! Experiment with plant-based milks, alternative sweeteners, and a variety of mix-ins to create your perfect flavor profile.
- Serve this delightful soft-serve with classic toppings like sprinkles or chocolate drizzle, or enjoy it as an indulgent “à la mode” complement to warm baked goods.
Table of Contents
- Key Takeaways
- Why You’ll Adore This Viral Snow Ice Cream
- The Science Behind the Magic: How Snow Makes Ice Cream
- Nonna’s Secret Tip for Perfect Snow Ice Cream
- Troubleshooting: Why Isn’t My Viral Snow Ice Cream Mixture Freezing?
- Creative Variations and Delicious Substitutions for Viral Snow Ice Cream
- Best Served With: Our Favorite Pairings
- More Delightful Frozen Dessert Recipes
- Frequently Asked Questions
- Viral Snow Ice Cream Recipe
Why You’ll Adore This Viral Snow Ice Cream
There’s an undeniable charm to making this dessert that resonates with both children and adults, transforming a simple kitchen activity into a captivating science experiment. With just three clean and straightforward ingredients—whipping cream, pure vanilla extract, and powdered sugar—this recipe effortlessly comes together to create a treat that tastes like it’s straight out of a classic, old-fashioned ice cream parlor. The simplicity of the recipe allows the rich, creamy flavors to shine through, providing a truly authentic taste experience.
And the texture? Oh, the texture is absolutely dreamy! Imagine a light, airy, and incredibly smooth consistency, reminiscent of delicate soft-serve ice cream. It’s the perfect antidote to a cold winter day, proving that it’s truly never too chilly for a refreshing scoop of something sweet. This viral snow ice cream isn’t just a dessert; it’s an interactive, delicious, and nostalgic journey that brings warmth and smiles even in the coldest weather.
The Science Behind the Magic: How Snow Makes Ice Cream
The secret to this “snow-churned” ice cream lies in a fascinating scientific principle. When you add salt to snow, it lowers the freezing point of the water. Instead of melting at 0°C (32°F), the saltwater mixture can reach temperatures significantly below that, sometimes as low as -18°C (0°F). This creates an incredibly cold environment, much colder than plain snow or ice alone.
This super-chilled brine then draws heat away from your ice cream mixture much more efficiently than air or even a freezer could. The constant stirring prevents large ice crystals from forming, ensuring your ice cream remains smooth and creamy, just like traditional churned ice cream. It’s a wonderful hands-on lesson in chemistry and thermodynamics, making dessert time both delicious and educational.
Nonna’s Secret Tip for Perfect Snow Ice Cream
For the quickest and most efficient freezing, always begin with a chilled mixing bowl and very cold whipping cream. This simple step gives your ice cream mixture a head start, reducing the time needed for the snow and salt to work their magic. I highly recommend placing your mixing bowl in the freezer for about 10 to 15 minutes before you plan to start assembling your ingredients. This ensures every component is at its optimal temperature, leading to a perfectly frozen, creamy soft-serve texture every time.

Troubleshooting: Why Isn’t My Viral Snow Ice Cream Mixture Freezing?
This viral ice cream trend is a delightful blend of dessert and a cozy science experiment, and sometimes, even science needs a little nudge to work perfectly. If your mixture isn’t firming up as expected, don’t worry! Here are a few easy and effective fixes to ensure your snow ice cream turns out perfectly creamy:
- First, pack in more snow: The key to successful freezing is excellent insulation and maximum contact with the cold. Ensure you have a generous amount of snow surrounding your mixing bowl, pressing it firmly around all sides and underneath. The more “cold hug” your bowl gets, the faster and more evenly your ice cream will freeze. Don’t be shy – make sure the snow is packed densely around the entire surface of the bowl.
- Next, add a little more salt: Remember the science? Salt is the crucial ingredient that lowers the freezing point of the snow, creating an extra-cold brine capable of rapidly chilling your cream mixture. If your ice cream isn’t firming up, it likely means the snow-salt mixture isn’t cold enough. Add a handful or two more of salt, mixing it into the snow around the bowl. This will intensify the chilling effect and accelerate the freezing process.
- Finally, keep mixing: Patience and continuous agitation are vital for achieving that smooth, creamy ice cream texture. Constant mixing prevents the formation of large, icy crystals, ensuring a velvety soft-serve consistency. If you stop mixing too soon, the mixture might just chill without becoming a cohesive, firm ice cream. Keep stirring until you feel the resistance and see the mixture thickening into the desired texture. A hand mixer or stand mixer can make this easier if you’re finding it too laborious.
Creative Variations & Delicious Substitutions for Viral Snow Ice Cream
One of the best things about this simple snow ice cream recipe is how easily it adapts to different tastes and dietary preferences. Get creative and make it your own!
- Plant-Based 🌱 Versions: For a dairy-free treat, substitute traditional whipping cream with full-fat coconut milk (chilled overnight for a thicker cream), oat creamer, or a rich cashew cream. These alternatives will still yield a wonderfully creamy texture, perfect for those with dairy sensitivities or a vegan lifestyle.
- Thicker, Silkier Texture: For an exceptionally rich and decadent soft-serve, swap out a portion of the whipping cream with sweetened condensed milk. This addition not only enhances the sweetness but also provides a luxurious, ultra-smooth mouthfeel. Adjust the amount to your desired level of richness and sweetness.
- Natural Sweeteners 🍯🍁: Instead of powdered sugar, you can opt for natural sweeteners like honey or maple syrup for a cozier, more nuanced flavor. Remember that liquid sweeteners may slightly alter the final texture and sweetness level, so adjust to taste. Agave nectar is another great option for a less pronounced flavor.
- Exciting Mix-Ins: Once your soft-serve ice cream is firm and ready, the fun truly begins! Stir in your favorite mix-ins for added flavor and texture. Think colorful candies, classic sprinkles, crunchy chopped nuts (like pecans or almonds), fresh fruit pieces (berries, chopped mango), chocolate chips, cookie crumbles, or even mini marshmallows. The possibilities are endless!
- Flavorful Extracts: While vanilla is a timeless choice, don’t hesitate to experiment with different flavor extracts to customize your ice cream. Almond extract offers a sophisticated, nutty note, lemon extract provides a bright, zesty kick, and banana extract can create a fun, tropical twist. Peppermint, coconut, or even a hint of coffee extract can open up a whole new world of flavor profiles.
Best Served With: Our Favorite Pairings
This delightful viral snow ice cream is fantastic on its own, but it truly shines when paired with certain toppings and desserts. Here are some of our favorite ways to enjoy this winter treat:
- A Handful of Colorful Sprinkles: A timeless classic! Sprinkles add a pop of color and a satisfying, subtle crunch that complements the smooth ice cream.
- Rich Chocolate Drizzle or Magic Shell 🍫: Elevate your scoop with a generous drizzle of warm chocolate sauce or a fun, hardening magic shell that creates a delightful chocolate coating.
- Dessert “À la Mode”: Serve your snow ice cream alongside or on top of warm desserts for a wonderful contrast in temperatures and textures. It’s heavenly with fudgy brownies, a slice of moist banana bread, or a comforting wedge of apple pie.
- With a Warm Cup of Hot Cocoa ☕️: For the ultimate cozy winter experience, enjoy your cold, creamy ice cream with a steaming mug of hot cocoa. The combination of hot and cold is incredibly satisfying and indulgent.
More Delightful Frozen Dessert Recipes
Cottage Cheese Ice Cream
4 hrs 5 mins
Banana Ice Cream with Magic Shell
10 mins
Mango Frozen Yogurt
6 hrs 5 mins
Fudgesicle Recipe
8 hrs 5 mins
Frequently Asked Questions
Adding salt to the snow is a crucial step that significantly lowers the freezing point of water. This scientific principle creates an extra-cold environment (a brine solution) around your mixing bowl, allowing the cream mixture inside to freeze much faster and more efficiently. It’s the same reason salt is used on roads to melt ice, and it mimics the process used in traditional hand-cranked ice cream makers to achieve that perfect texture.
If your ice cream isn’t firming up, several factors could be at play. The most common reasons include not using enough salt in the snow, or the ambient temperature outside not being cold enough. Ensure you use a generous amount of salt and mix it well into the snow directly underneath and around your bowl. If the outside temperature is marginal, you can also transfer your bowl to the freezer for a short period after stirring in the snow to help it firm up further. Consistent stirring is also key to prevent crystallization and ensure even freezing.
Absolutely not! The snow and salt are purely external chilling agents. Your delicious ice cream base remains safely contained within its own mixing bowl. The cold temperatures from the salted snow permeate the bowl, freezing the contents without any direct contact between the snow and your dessert. So, you get all the benefits of natural, intense cold without any worry about contamination.
Typically, you can expect your mixture to transform into soft-serve style ice cream within 5 to 10 minutes of continuous stirring. The mixture thickens quite rapidly once the bowl reaches the optimal cold temperature from the salted snow. Keep stirring until it reaches your desired creamy, thick consistency. Factors like the initial temperature of your ingredients and the amount of salt used can slightly influence the exact timing.
Yes, you certainly can! While this snow ice cream is best enjoyed immediately as a fresh, soft-serve treat, any leftovers can be stored. Simply transfer the ice cream to an airtight container and place it in the freezer. It will harden significantly when frozen solid. To enjoy it again, allow it to sit out at room temperature for 10-15 minutes to soften slightly before scooping and serving.
If you don’t have fresh snow, you can still replicate this method using a large bag of ice cubes and a generous amount of rock salt or coarse salt. Place the ice and salt in a large bowl or bucket, then nestle your smaller mixing bowl with the cream mixture into the ice-salt bath. Stir continuously, just as you would with snow, until the ice cream reaches your desired consistency. The principle remains the same, ensuring a delicious homemade treat regardless of the weather!
Viral Snow Ice Cream Recipe

This viral TikTok ice cream, magically made in the snow, is a true winter delight. With just 3 simple ingredients and about 10 minutes of active stirring, you can create a nostalgic, creamy soft-serve that’s perfect for a fun family activity or a sweet treat on a cold day.
4 scoops
10 minutes
10 minutes
Video
Equipment
-
Mixing Bowls
-
Measuring Cups + Spoons
-
Cordless Mixer (or whisk)
Ingredients
- 1 small container whipping cream, 35% fat content recommended, chilled
- 1 teaspoon vanilla extract, adjust to taste for desired flavor intensity
- ½ cup powdered sugar, adjust to taste for preferred sweetness
- Plenty of fresh snow, clean and collected from a safe area
- Generous amount of rock salt or coarse salt, essential for freezing the snow
Instructions
-
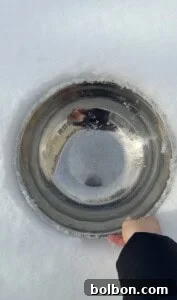
Gather a substantial amount of clean snow in a large bowl or bucket. Make a deep indent in the center of the snow pile with your mixing bowl, ensuring it’s wide enough to hold your cream mixture.

-
Remove your mixing bowl and sprinkle a generous amount of salt (rock salt or coarse salt works best) into the bottom of the indent you just made in the snow. Place your cream-filled mixing bowl back into the salted snow, ensuring the snow hugs the bowl tightly from all sides. Add more salt around the sides of the bowl for maximum chilling effect.
-
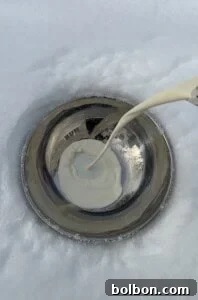
Into your cold mixing bowl, pour the whipping cream, vanilla extract, and powdered sugar.
-
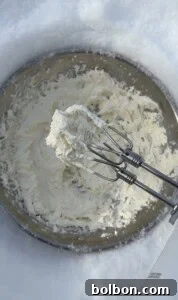
Using a cordless mixer (or a sturdy whisk), vigorously mix the ingredients. Keep stirring constantly, ensuring the mixture is in good contact with the cold bowl, until it thickens and solidifies into a creamy, soft-serve ice cream consistency. This usually takes about 5-10 minutes.
-
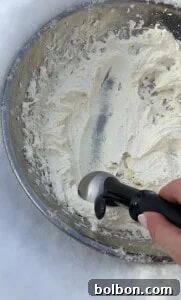
Once your snow ice cream has reached a delightful soft-serve texture, it’s ready to be enjoyed! Scoop it into waffle cones, bowls, or serve it with your favorite toppings. For plant-based variations, flavor add-ins, and more helpful tips, refer to the sections above in this post.
Nonna’s Notes and Tips
- Plant-based Milks: For a delicious plant-based 🌱 version, feel free to substitute dairy whipping cream with full-fat coconut milk, oat creamer, or cashew cream. Ensure they are well-chilled for best results.
- Texture Boost: To achieve an even thicker, silkier texture, consider swapping part of the whipping cream (to your taste) with sweetened condensed milk. This adds richness and a lovely smooth mouthfeel.
- Alternative Sweeteners: If you prefer, replace powdered sugar with natural sweeteners like honey 🍯 or maple syrup 🍁. Adjust the quantity according to your sweetness preference, keeping in mind liquid sweeteners can alter the final consistency slightly.
- Mix-Ins Galore: Once your soft-serve ice cream is firm, get creative with mix-ins! Stir in candies, colorful sprinkles, crunchy chopped nuts, or fresh fruit for an extra burst of flavor and delightful texture.
- Flavored Extracts: Beyond vanilla, explore other extracts to personalize your ice cream. Almond, lemon 🍋, or banana extracts can introduce exciting new flavor profiles.
- Super Chill Tip: For the fastest freezing, always start with a very cold bowl and cold cream. I find that sticking my mixing bowl in the freezer for about 10 minutes beforehand works wonders!
Nutrition Facts
Nutrition Information (per 1 scoop serving):
- Calories: 489
- Fat: 45g (69% Daily Value)
- Saturated Fat: 29g (181% Daily Value)
- Polyunsaturated Fat: 2g
- Monounsaturated Fat: 11g
- Cholesterol: 142mg (47% Daily Value)
- Sodium: 34mg (1% Daily Value)
- Potassium: 121mg (3% Daily Value)
- Carbohydrates: 19g (6% Daily Value)
- Sugar: 18g (20% Daily Value)
- Protein: 4g (8% Daily Value)
- Vitamin A: 1848 IU (37% Daily Value)
- Vitamin C: 1mg (1% Daily Value)
- Calcium: 83mg (8% Daily Value)
- Iron: 0.1mg (1% Daily Value)
Nutrition information is automatically calculated and should only be used as an approximation. Actual values may vary based on ingredients and preparation methods.