
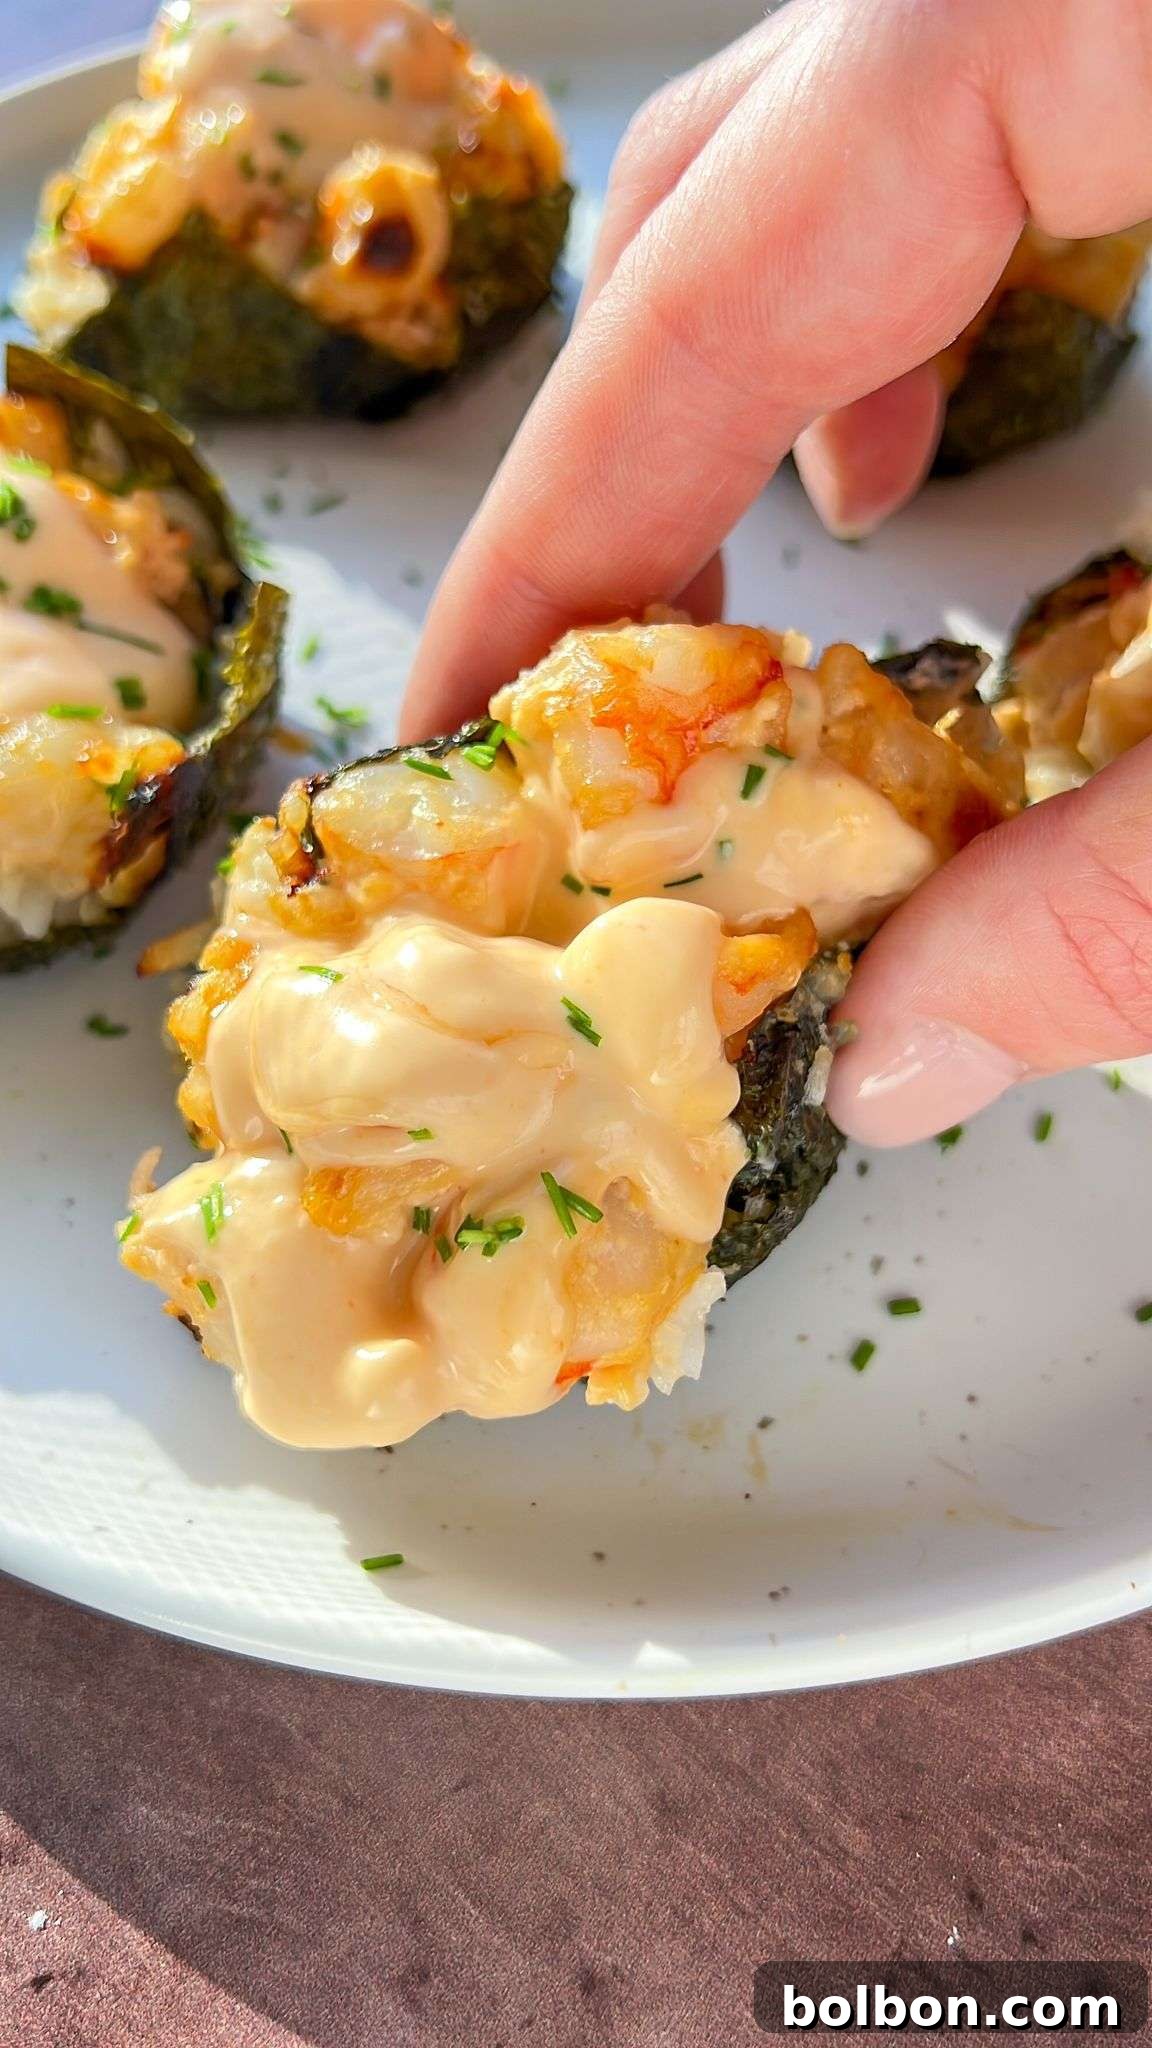
Craving sushi but want a hassle-free, homemade option that doesn’t involve raw fish? Look no further than these utterly delightful Baked Shrimp Sushi Cups! This innovative twist on traditional sushi brings all the vibrant flavors and satisfying textures you love, but in an incredibly convenient, single-serve format. Perfect for a quick lunch, a light dinner, or an impressive party appetizer, these sushi cups are a game-changer. They offer a simple, budget-friendly way to enjoy your favorite Japanese-inspired flavors right from your kitchen, eliminating the need to source sushi-grade fish or master complex rolling techniques. The harmonious blend of creamy cheese, zesty spicy mayo, tender shrimp, and fluffy rice is truly a chef’s kiss moment! 🤌
Why These Shrimp Sushi Cups Will Become Your New Favorite
Shrimp Sushi Cups are more than just a recipe; they’re a culinary revelation for anyone who adores sushi but seeks a simpler, safer alternative. Here’s why you’ll quickly fall in love with them:
- No Raw Fish, No Worries: For many, the biggest hurdle to making sushi at home is the uncertainty surrounding raw fish. These cups elegantly bypass that concern entirely. All ingredients, including the shrimp, are fully cooked, making them a safe and appealing option for everyone, from children to pregnant women, or those simply preferring cooked seafood. You can confidently serve them to guests without any hesitation.
- Effortless Preparation: Forget about special sushi mats or intricate rolling skills. These cups are designed for simplicity. If you can cook rice and mix ingredients in a bowl, you can master this recipe. It’s a fantastic entry point into homemade sushi, proving that gourmet flavors don’t always require expert techniques.
- Budget-Friendly: Regular sushi takeout can quickly add up. Making these shrimp sushi cups at home is significantly more economical. You control the ingredients, portion sizes, and can even use pantry staples, stretching your food budget further without sacrificing taste or quality.
- Perfect Single Servings: Baked in a standard muffin tin, each cup is a perfectly portioned bite. This makes them ideal for meal prepping, ensuring you have satisfying lunches ready to go throughout the week, or for serving as elegant, easy-to-handle appetizers at gatherings.
- Versatile & Customizable: While this recipe champions shrimp, the concept is incredibly flexible. Easily swap out the protein, adjust the spice level, or experiment with different toppings and sauces to create a personalized sushi experience every time.
- Satisfying & Flavorful: The combination of plump, savory shrimp with the rich, tangy kick of spicy mayo and the smooth texture of cream cheese, all nestled on a bed of seasoned rice and crisp nori, creates an explosion of flavors and textures that will satisfy even the most intense sushi cravings.
Crafting Your Shrimp Sushi Cups: A Step-by-Step Guide
Creating these delectable shrimp sushi cups is a straightforward process that yields impressive results. Follow these simple steps for homemade sushi perfection:
♨️ Step 1: Prepare Your Oven
Begin by preheating your oven to 400°F (200°C). This ensures the oven is at the optimal temperature when you’re ready to bake, leading to perfectly cooked shrimp and crispy nori. A well-heated oven is key for achieving that golden-brown finish on top.
🍤 Step 2: Prepare the Shrimp
Take about 1/2 pound of jumbo shrimp (approximately 7 pieces, or adjust based on size and desired serving). If using frozen shrimp, make sure they are fully thawed. Pat the shrimp thoroughly dry with paper towels. Removing excess moisture is crucial as it prevents the shrimp from becoming soggy and allows them to absorb the marinade better, leading to a firmer, more flavorful bite. Once dry, cut the shrimp into small, even-sized cubes. This ensures uniform cooking and makes them easier to incorporate into the sushi cups. Transfer the cubed shrimp to a bowl and season lightly with a pinch of salt.
🥣 Step 3: Whisk Up the Creamy Sauce
In a separate medium-sized bowl, combine the softened cream cheese, mayonnaise, soy sauce, and a dash of sriracha (if you enjoy a spicy kick). Ensure the cream cheese is at room temperature to make it easier to mix into a smooth, lump-free consistency. Whisk all these ingredients together until thoroughly combined and creamy. This sauce forms the rich, flavorful base that binds everything together. Once mixed, pour this creamy concoction over the cubed shrimp and gently fold until every piece of shrimp is well coated. Allow it to marinate briefly while you prepare the rice and nori.
🍚 Step 4: Cook the Rice
Rinse the rice under cold water until the water runs clear. This step is important to remove excess starch, preventing the rice from becoming overly sticky or gummy. Cook the rice according to the package instructions. While jasmine rice is a personal favorite for its delicate aroma and fluffy texture, sushi rice or any short-grain rice will work beautifully due to their ideal stickiness. For added convenience and perfect results, consider using a rice cooker and add a pinch of salt to the water for extra flavor.
🔪 Step 5: Prepare the Nori Base
While your rice is cooking, prepare the nori seaweed sheets. Lay two sheets of nori flat and cut each into three equal-sized squares, resulting in a total of six approximately 3.5-inch squares. These dimensions are ideal for fitting neatly into a standard muffin tin cavity, with enough overhang to make removal easy after baking. Once the rice is cooked and still warm, place one tablespoon of the warm rice onto the center of each nori square. Gently press the rice into the nori, which helps to soften the seaweed, making it more pliable and preventing it from becoming too brittle or crumbly during baking. If the rice feels too sticky on your hands, lightly moisten your fingertips with water.
🧁 Step 6: Assemble the Sushi Cups
Carefully transfer each nori and rice square into the cavities of your muffin tin, pressing it gently to form a cup shape. The warm rice will help the nori mold to the tin. Next, spoon a generous tablespoon of the cubed, marinated shrimp mixture over the rice in each nori cup. Ensure an even distribution of shrimp mixture across all six cups.
⏲️ Step 7: Bake to Perfection
Place the muffin tin in the preheated oven and bake for approximately 15 minutes. The shrimp will cook through, and the flavors will meld beautifully. For an extra layer of texture, and to achieve a wonderfully crispy top, I recommend switching your oven to broil for the final 60 seconds of cooking. Keep a close eye on them during this stage, as broiling can quickly go from golden to burnt.
🍽️ Step 8: Garnish and Serve
Once baked, carefully remove the muffin tin from the oven. Allow the sushi cups to cool slightly in the tin for a few minutes; this makes them easier to handle and prevents them from falling apart. Transfer the warm sushi cups to a serving plate. The final touch for these irresistible bites is a drizzle of spicy mayo and a generous sprinkling of freshly chopped chives. The vibrant green of the chives adds both a fresh flavor and an appealing pop of color.
The Modern Nonna’s Pro Tip for Perfect Shrimp
Always ensure your shrimp is fully thawed if using frozen, and pat it completely dry with paper towels. Removing excess moisture from shrimp (and any seafood, really) is crucial. It prevents the final dish from becoming watery or mushy, allowing the flavors to concentrate and the texture to remain firm and succulent. This simple step makes a significant difference in the quality of your baked sushi cups!
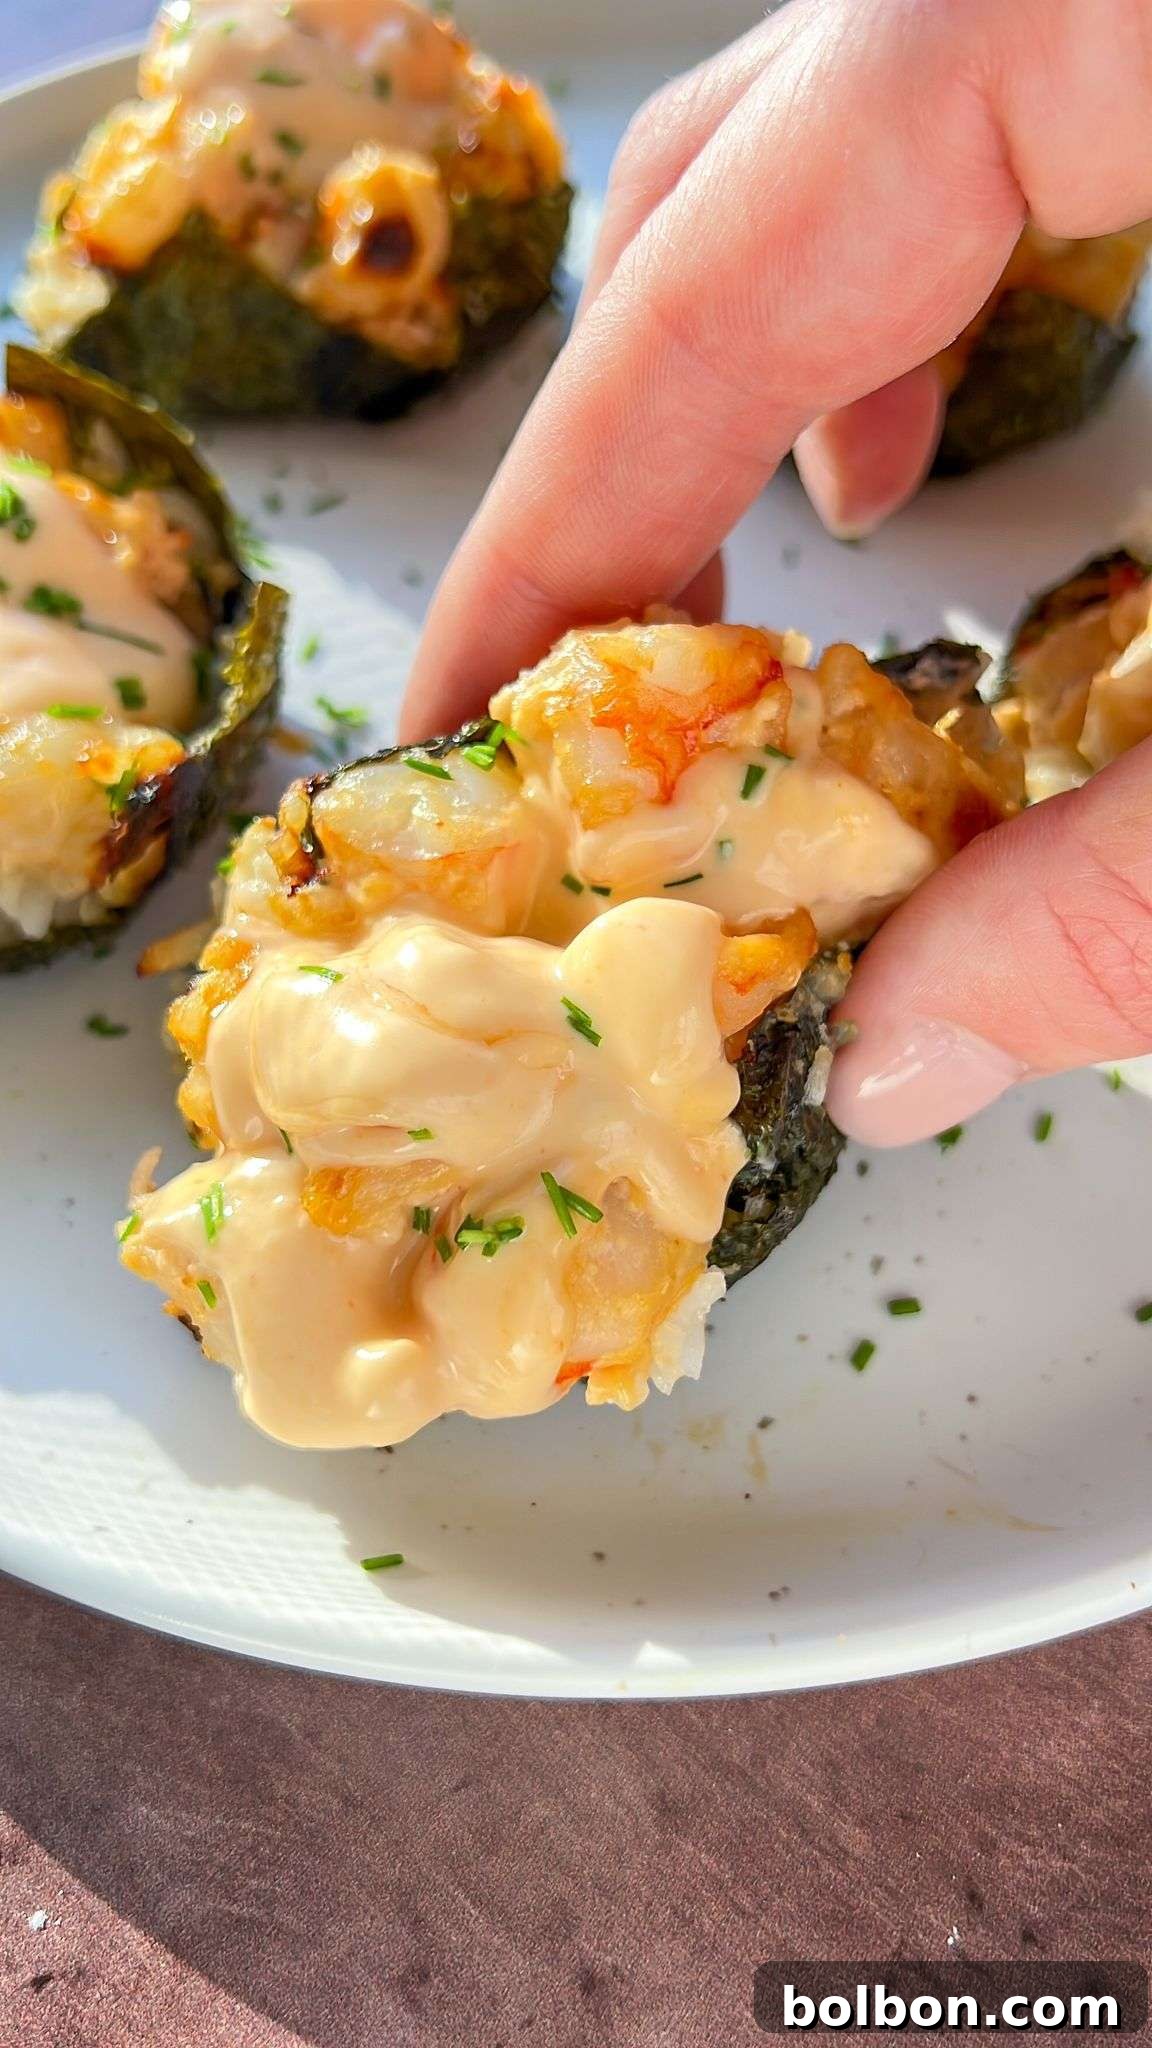
Creative Variations and Smart Substitutions for Your Sushi Cups
One of the best aspects of these shrimp sushi cups is their incredible adaptability. Feel free to get creative and customize them to suit your taste, dietary preferences, or whatever ingredients you have on hand:
- Choose Your Protein: While shrimp is a fantastic choice, these cups are forgiving when it comes to the main protein.
- You can use frozen, defrosted, or fresh shrimp 🍤. I personally use about 1/2 pound of 7 extra-jumbo black tiger shrimp for ideal texture and size, but any variety will work.
- Salmon: Diced cooked salmon (or even raw, if you plan to bake it) makes a rich and buttery alternative.
- Chicken: Shredded cooked chicken or finely diced chicken breast can be mixed with the creamy sauce for a hearty option, like my popular Chicken Bake Cups.
- Crab: Flaked imitation crab meat or real crab meat offers a classic sushi flavor.
- Tofu/Tempeh: For a plant-based version, try finely crumbled and seasoned tofu or tempeh, baked until slightly crispy before mixing with the sauce.
- Spice It Up (or Down!) with Mayo: The spicy mayo is a signature component.
- My easy Homemade Spicy Mayo comes together in minutes and gives you control over the heat level.
- Alternatively, store-bought Sriracha Mayo🌶 is a quick and easy substitute.
- If you prefer a milder flavor, simply use regular Japanese Kewpie mayo or even a good quality standard mayonnaise. You can also mix in a touch of sweet chili sauce or a hint of ginger for different flavor profiles.
- Elevate Your Rice Game: The rice is the foundation.
- While cooking the rice, you can add a splash of rice wine vinegar 🍚 to infuse it with that authentic, subtly sweet and tangy sushi rice flavor. A pinch of sugar can also enhance this.
- Experiment with brown rice for a healthier, nuttier option, or even cauliflower rice for a low-carb alternative (note: cauliflower rice may require adjustments to liquid content in the recipe).
- Customize the Garnish: The right garnish adds freshness and visual appeal.
- Instead of chives 🌱, consider finely chopped cilantro, sliced green onions (scallions), or a sprinkle of toasted sesame seeds.
- A thin slice of avocado placed on top before serving adds a creamy, refreshing contrast.
- For an extra layer of umami and crunch, try a dash of furikake seasoning.
- A tiny dollop of masago (capelin roe) or tobiko (flying fish roe) can also add a delightful briny pop and vibrant color.
Similar Baked Sushi & Seafood Delights
Sushi Bake Recipe
25 mins
Salmon Sushi Cups
25 mins
Chicken Bake Cups
25 mins
Salmon Sushi Rolls
10 mins
Healthy Shrimp Bowl
12 mins
Elevate Your Meal: Best Served With
While these shrimp sushi cups are absolutely delicious on their own, pairing them with the right accompaniments can transform them into a complete and unforgettable meal or an even more impressive appetizer spread:
- Extra Drizzle of Homemade Spicy Mayo: No sushi cup is complete without a generous drizzle of Homemade Spicy Mayo. Its creamy texture and fiery kick perfectly complement the savory shrimp and seasoned rice, tying all the flavors together.
- A Variety for Every Palate: If you’re preparing these for a party or a family gathering, consider making a batch with a different protein. My recipe for Chicken Bake Cups offers a delicious poultry alternative, ensuring there’s something for everyone to enjoy.
- Crisp & Vibrant Sides: For a balanced and visually appealing meal, serve your sushi cups alongside fresh vegetables. My Asian Style Green Beans add a delightful crunch, a burst of color, and a good serving of fiber, making for a wholesome side dish. Other great options include a simple cucumber salad, steamed edamame, or a light miso soup.
- Classic Dipping Sauces: In addition to the spicy mayo and fresh herbs, provide small bowls of low-sodium soy sauce or tamari for dipping. A side of pickled ginger and a dab of wasabi can also enhance the authentic sushi experience, allowing guests to customize their flavor adventure.
- Freshness Factor: A sprinkle of toasted sesame seeds or a few sprigs of fresh microgreens over the top just before serving adds an extra layer of visual appeal and a subtle, fresh flavor.
Common Questions About Shrimp Sushi Cups
The key is to assemble the sushi cups while your rice is still warm. The warmth and moisture from the fresh rice help to soften the nori, making it pliable and less prone to becoming overly crispy and cracking in the oven. Pressing the warm rice firmly into the nori also aids in this process.
Absolutely! This recipe is incredibly versatile. You can certainly use other proteins like cooked salmon, flaked crab meat (real or imitation), diced cooked chicken, or even seasoned crumbled tofu for a vegetarian option. Just make sure whatever protein you choose is cooked and cut into small, even pieces.
For the best results, I recommend using jasmine rice, sushi rice, or any short-grain rice. These types of rice have a stickier texture that helps the cups hold their shape. In a pinch, you can even use instant or microwaveable rice, but for optimal flavor and texture, freshly cooked short-grain rice is preferred.
Yes, absolutely! If you prefer a milder flavor, you can easily substitute the spicy mayo with regular mayonnaise, such as Japanese ‘Kewpie’ mayo, which has a distinct rich and tangy flavor, or even a good quality standard mayo. You can also try mixing in a touch of honey or sweet chili sauce for a different kind of sweet and savory profile.
You should start with raw shrimp. If it’s frozen, ensure it’s fully defrosted before preparation. The most critical step is to pat the shrimp thoroughly dry with paper towels to remove any excess moisture. Then, cut it into small, uniform cubes before combining it with the cream cheese mixture. This ensures even cooking and optimal texture.
Yes, you can prepare the shrimp mixture and cook the rice a day in advance. Store them separately in airtight containers in the refrigerator. Assemble and bake the sushi cups just before serving for the best texture, especially to ensure the nori stays crisp. Leftovers can be stored in the fridge and reheated gently, though the nori might lose some crispness.

Shrimp Sushi Cups
If you love sushi but don’t know where to source or how to handle sushi-grade raw fish, these baked sushi cups are the perfect solution! Because all of the ingredients get fully cooked in the oven, you don’t need any special sushi-making skills.
Course: Appetizer, Snack
Cuisine: Asian
Makes: 6 servings
Author: The Modern Nonna
Prep Time: 10 minutes
Cook Time: 15 minutes
Total Time: 25 minutes
Facebook Share
Rate Recipe
Video
Equipment
- Nakiri Knife
- Measuring Cups + Spoons
- Cutting Board
- Mixing Bowls
- Muffin Pan
- Redmond Real Salt
- Rice Cooker
Ingredients
- 7 jumbo shrimp, peeled, deveined and defrosted (if frozen) – about 1/2 pound total
- Pinch of salt
- ¼ cup cream cheese, softened to room temp
- 1 tablespoon mayo
- 2 teaspoons soy sauce (coconut aminos or tamari would also work)
- Dash of sriracha or any hot sauce (optional)
- ½ cup rice, such as jasmine, sushi, or short grain rice
- 2 sheets of nori
- Spicy mayo, for garnish
- Chopped fresh chives, for garnish
Instructions
- Preheat the oven to 400°F (200°C).
- Pat the shrimp dry with paper towels. Cut the shrimp into small cubes, making sure the cubes are more or less equal in size. Add the cubed shrimp to a bowl with a pinch of salt.
- In a separate bowl, add the softened cream cheese, mayo, soy sauce, and sriracha (if using), and mix well until smooth. Pour this sauce over the shrimp and combine thoroughly.
- Rinse the rice until the water runs clear and cook it according to the instructions on the package. (A rice cooker with a pinch of salt is highly recommended for best results.)
- While the rice cooks, cut 2 sheets of nori into 6 equal-sized squares (approximately 3.5-inch squares). These squares should fit into a standard muffin tin with a slight overhang.
- Add 1 tablespoon of the warm cooked rice onto each of the 6 nori squares and gently press the rice into the nori. This helps soften the nori and makes it pliable for forming into cups. (If the rice is sticky, dip your fingers in water to prevent sticking.)
- Place each nori and rice square into a muffin tin insert, shaping it into a cup. Add a tablespoon of the cubed, marinated shrimp mixture on top of the rice in each cup.
- Bake for about 15 minutes. For a crispy top, broil for the last 60 seconds, watching carefully to prevent burning.
- Remove the muffin tin from the oven, let cool slightly for easier handling, and then transfer the sushi cups to a plate. Garnish generously with spicy mayo and fresh chives before serving.
Nutrition
Calories: 123kcal
Carbohydrates: 13g
Protein: 5g
Fat: 5g
Saturated Fat: 2g
Polyunsaturated Fat: 1g
Monounsaturated Fat: 1g
Trans Fat: 0.01g
Cholesterol: 40mg
Sodium: 289mg
Potassium: 64mg
Fiber: 0.2g
Sugar: 0.4g
Vitamin A: 214IU
Vitamin C: 0.3mg
Calcium: 27mg
Iron: 0.3mg
Nutrition information is automatically calculated, so should only be used as an approximation.
Craving sushi but want a hassle-free, homemade option that doesn’t involve raw fish? Look no further than these utterly delightful Baked Shrimp Sushi Cups! This innovative twist on traditional sushi brings all the vibrant flavors and satisfying textures you love, but in an incredibly convenient, single-serve format. Perfect for a quick lunch, a light dinner, or an impressive party appetizer, these sushi cups are a game-changer. They offer a simple, budget-friendly way to enjoy your favorite Japanese-inspired flavors right from your kitchen, eliminating the need to source sushi-grade fish or master complex rolling techniques. The harmonious blend of creamy cheese, zesty spicy mayo, tender shrimp, and fluffy rice is truly a chef’s kiss moment! 🤌
Why These Shrimp Sushi Cups Will Become Your New Favorite
Shrimp Sushi Cups are more than just a recipe; they’re a culinary revelation for anyone who adores sushi but seeks a simpler, safer alternative. Here’s why you’ll quickly fall in love with them:
- No Raw Fish, No Worries: For many, the biggest hurdle to making sushi at home is the uncertainty surrounding raw fish. These cups elegantly bypass that concern entirely. All ingredients, including the shrimp, are fully cooked, making them a safe and appealing option for everyone, from children to pregnant women, or those simply preferring cooked seafood. You can confidently serve them to guests without any hesitation. This eliminates the need for specialized sushi-grade ingredients, opening up the world of sushi to a wider audience.
- Effortless Preparation: Forget about special sushi mats or intricate rolling skills. These cups are designed for simplicity. If you can cook rice and mix ingredients in a bowl, you can master this recipe with ease. It’s a fantastic entry point into homemade sushi, proving that gourmet flavors don’t always require expert techniques or hours in the kitchen. The minimal hands-on time makes it perfect for busy weeknights or impromptu gatherings.
- Budget-Friendly & Economical: Regular sushi takeout can quickly add up, often becoming an expensive indulgence. Making these shrimp sushi cups at home is significantly more economical. You have full control over the ingredients, portion sizes, and can utilize fresh or frozen shrimp, stretching your food budget further without sacrificing taste or quality. This makes sushi a more accessible and regular treat.
- Perfect Single Servings: Baked in a standard muffin tin, each cup is a perfectly portioned bite-sized delight. This makes them exceptionally convenient for meal prepping, ensuring you have satisfying and healthy lunches ready to go throughout the week. They are also ideal for serving as elegant, easy-to-handle appetizers at any party or social event, minimizing mess and maximizing enjoyment.
- Versatile & Customizable: While this recipe champions succulent shrimp, the underlying concept is incredibly flexible and adaptable. Easily swap out the protein for other seafood or even chicken, adjust the spice level of your mayo, or experiment with different vegetables, toppings, and sauces to create a personalized sushi experience every single time. The possibilities are truly endless!
- Satisfying & Flavorful: The combination of plump, savory shrimp with the rich, tangy kick of spicy mayo, the smooth creaminess of cream cheese, all nestled on a bed of perfectly seasoned rice and encased in a subtly crisp nori shell, creates an explosion of flavors and textures. This delightful medley will undoubtedly satisfy even the most intense sushi cravings, leaving you feeling fully content.
Crafting Your Shrimp Sushi Cups: A Step-by-Step Guide to Perfection
Creating these delectable shrimp sushi cups is a straightforward process that yields impressive and consistently delicious results. Follow these simple steps for homemade sushi perfection, ensuring each cup is as flavorful as it is visually appealing:
♨️ Step 1: Prepare Your Oven for Optimal Baking
Begin by preheating your oven to 400°F (200°C). Achieving the correct oven temperature from the start is paramount, as it ensures the shrimp cook thoroughly, the flavors meld beautifully, and the nori develops a desirable crispness without becoming overly brittle. A properly preheated oven is the first step towards culinary success with this recipe.
🍤 Step 2: Expert Shrimp Preparation
Take approximately 1/2 pound of jumbo shrimp (typically about 7 pieces, but adjust according to their size and your desired serving quantity). If you’re using frozen shrimp, it is crucial to ensure they are fully thawed before proceeding. Pat the shrimp thoroughly dry with several layers of paper towels. This step is critical; removing excess moisture is paramount as it prevents the shrimp from becoming soggy during cooking and allows them to absorb the marinade’s rich flavors more effectively, leading to a firmer, more succulent bite. Once dried, cut the shrimp into small, even-sized cubes. Uniformity in size is key for even cooking. Transfer the cubed shrimp to a clean mixing bowl and season them lightly with just a pinch of salt.
🥣 Step 3: Whisk Up the Irresistible Creamy Sauce
In a separate, medium-sized bowl, combine your softened cream cheese, mayonnaise, soy sauce, and an optional dash of sriracha for that signature spicy kick. The cream cheese must be at room temperature to ensure it blends smoothly and effortlessly into a creamy, lump-free consistency. Whisk all these ingredients together with vigor until they are thoroughly combined and boast a luxuriously creamy texture. This velvety sauce forms the rich, flavorful base that will enrobe the shrimp and infuse every bite with delightful zest. Once perfectly mixed, pour this creamy concoction directly over the cubed shrimp and gently fold until every single piece of shrimp is generously coated. Allow this mixture to marinate briefly while you prepare the remaining components.
🍚 Step 4: Perfecting Your Sushi Rice
Rinse the rice meticulously under cold running water until the water that drains away is completely clear. This crucial step serves to remove excess surface starch, which is vital for preventing the rice from becoming overly sticky or gummy during cooking. Cook the rice precisely according to the instructions provided on its package. While fragrant jasmine rice is a personal favorite for its delicate aroma and fluffy texture, traditional sushi rice or any short-grain rice will also yield excellent results due to their inherent stickiness, which is ideal for holding the cup shape. For maximum convenience and consistently perfect results, consider utilizing a rice cooker, and remember to add a pinch of salt to the cooking water to enhance the overall flavor profile of your rice.
🔪 Step 5: Preparing the Nori Base with Precision
While your rice is in its final stages of cooking, prepare the nori seaweed sheets. Lay two sheets of nori flat on a clean surface and, with precision, cut each sheet into three equal-sized squares. This will give you a total of six approximately 3.5-inch squares. These dimensions are perfectly designed to fit neatly into the cavities of a standard muffin tin, ensuring there is just enough overhang to facilitate easy removal of the finished sushi cups. Once your rice is cooked and still pleasantly warm, carefully place one generous tablespoon of the warm rice onto the center of each nori square. Gently but firmly press the rice into the nori. This action is beneficial as the warmth and moisture from the rice begin to soften the seaweed, making it more pliable and significantly reducing the risk of it becoming too brittle or cracking during the baking process. If you find the rice overly sticky on your fingers, lightly moisten your fingertips with a little water to prevent it from adhering.
🧁 Step 6: The Art of Assembling Your Sushi Cups
With your nori and rice bases ready, carefully transfer each square into the individual cavities of your muffin tin, gently pressing it down to form a neat cup shape. The softened nori, aided by the warm rice, will readily conform to the shape of the tin. Next, using a spoon, add a generous tablespoon of the cubed, marinated shrimp mixture directly on top of the rice in each nori cup. Ensure that the shrimp mixture is distributed evenly across all six cups, so each bite delivers a consistent burst of flavor and texture.
⏲️ Step 7: Baking to Golden Perfection
Place the filled muffin tin into your preheated oven and bake for approximately 15 minutes. During this time, the shrimp will cook through perfectly, and all the delightful flavors of the creamy mixture will meld and intensify. For an extra layer of textural delight and to achieve a wonderfully crispy, slightly browned top, I highly recommend activating your oven’s broiler for the final 60 seconds of cooking. It is crucial to monitor the sushi cups very closely during this short broiling period, as they can transition from golden perfection to burnt very quickly.
🍽️ Step 8: The Finishing Touch: Garnish and Serve
Once baked, carefully remove the muffin tin from the oven. Allow the shrimp sushi cups to cool slightly within the tin for a few minutes. This brief cooling period helps them set, making them easier to handle and preventing them from falling apart when transferred. Gently remove the warm sushi cups from the muffin tin and arrange them artfully on a serving plate. The ultimate finishing touch for these irresistible bites is a liberal drizzle of your favorite spicy mayo and a generous sprinkling of freshly chopped chives. The vibrant green of the chives not only adds a burst of fresh flavor but also provides a beautiful, contrasting pop of color that enhances their visual appeal.
The Modern Nonna’s Pro Tip for Perfectly Cooked Shrimp
Always ensure your shrimp is fully thawed if you are using a frozen variety, and, more importantly, pat it completely dry with several layers of paper towels before dicing and mixing. This step, though simple, is absolutely crucial. Removing any excess moisture from the exterior of the shrimp (and indeed, any seafood) is paramount. It prevents the final dish from becoming watery or mushy, allowing the delicate flavors to concentrate and ensuring the shrimp retains its firm, succulent texture. This seemingly small detail makes a significant and noticeable difference in the overall quality and enjoyment of your baked sushi cups!
Creative Variations and Smart Substitutions for Your Sushi Cups
One of the most appealing aspects of these shrimp sushi cups is their incredible adaptability and versatility. Feel free to unleash your culinary creativity and customize them to perfectly suit your personal taste, specific dietary preferences, or simply to utilize whatever delightful ingredients you happen to have on hand:
- Choose Your Protein Powerhouse: While succulent shrimp is an undeniably fantastic choice for these cups, the recipe is remarkably forgiving and open to various protein alternatives.
- You can use frozen, defrosted, or fresh shrimp 🍤. For optimal texture and size, I typically opt for about 1/2 pound of 7 extra-jumbo black tiger shrimp, but any size or variety will perform beautifully.
- Flaked Salmon: Diced cooked salmon (or even raw, if you plan to fully bake it within the cup) makes for a rich, buttery, and equally delicious alternative.
- Shredded Chicken: For a heartier option, consider using shredded cooked chicken or finely diced chicken breast, which can be easily mixed with the creamy sauce, much like my popular Chicken Bake Cups.
- Crab Delights: Flaked imitation crab meat or, for a more luxurious touch, real lump crab meat, will instantly evoke a classic sushi flavor profile that many adore.
- Plant-Based Tofu/Tempeh: For a delightful plant-based version, try finely crumbled and seasoned firm tofu or tempeh, which can be lightly baked or pan-fried until slightly crispy before being incorporated into the creamy sauce mixture.
- Spice It Up (or Dial It Down!) with Your Favorite Mayo: The spicy mayo is often considered a signature, irresistible component of these sushi cups, offering that perfect zing.
- My incredibly easy Homemade Spicy Mayo comes together in mere minutes and provides you with complete control over the exact heat level.
- Alternatively, readily available store-bought Sriracha Mayo🌶 offers a wonderfully quick and convenient substitute.
- If your palate leans towards milder flavors, simply use regular Japanese Kewpie mayo (renowned for its rich, umami depth) or even a good quality standard mayonnaise. For a different twist, you could mix in a touch of sweet chili sauce or a hint of grated fresh ginger for a unique flavor profile.
- Elevate Your Rice Game: The rice serves as the foundational element of these sushi cups, so choosing wisely can significantly impact the overall experience.
- While cooking the rice, you can ingeniously add a splash of rice wine vinegar 🍚 to infuse it with that authentic, subtly sweet, and tangy sushi rice flavor. A small pinch of sugar dissolved in the vinegar can further enhance this classic taste.
- For a healthier, nuttier option with added fiber, experiment with brown rice. Alternatively, for a low-carb solution, consider using finely processed cauliflower rice (though note that this may require adjustments to the moisture content in the recipe and might not hold its shape as firmly).
- Customize the Garnish for Freshness and Visual Appeal: The right garnish adds crucial freshness, a textural contrast, and significantly enhances the visual appeal of your finished sushi cups.
- Instead of only chives 🌱, consider garnishing with finely chopped fresh cilantro, vibrant thinly sliced green onions (scallions), or a delightful sprinkle of toasted sesame seeds (black or white, or a mix) for nutty crunch.
- A thin, elegant slice of creamy avocado placed delicately on top just before serving adds a wonderfully refreshing, creamy contrast to the savory filling.
- For an extra layer of umami depth and a pleasant crunch, a generous dash of furikake seasoning (Japanese rice seasoning) is an excellent addition.
- For those who appreciate a delightful briny pop and a vibrant burst of color, a tiny dollop of masago (capelin roe) or tobiko (flying fish roe) can be a truly exquisite finishing touch.
Similar Baked Sushi & Seafood Delights to Explore
Sushi Bake Recipe
25 mins
Salmon Sushi Cups
25 mins
Chicken Bake Cups
25 mins
Salmon Sushi Rolls
10 mins
Healthy Shrimp Bowl
12 mins
Elevate Your Meal: Best Served With These Accompaniments
While these baked shrimp sushi cups are absolutely delicious and satisfying on their own, pairing them with the right accompaniments can truly transform them into a complete and unforgettable meal or an even more impressive and cohesive appetizer spread for any occasion:
- An Extra Drizzle of Homemade Spicy Mayo: No sushi cup experience is truly complete without an additional, generous drizzle of rich and zesty Homemade Spicy Mayo. Its creamy texture and fiery kick perfectly complement the savory shrimp and seasoned rice, acting as a delicious bridge that ties all the vibrant flavors together into a harmonious bite.
- A Variety for Every Palate: If you’re hosting a party, catering to diverse tastes, or simply preparing a family meal, consider expanding your offering by making an additional batch with a different protein. My popular recipe for Chicken Bake Cups offers a hearty and equally delicious poultry alternative, ensuring there’s a delightful option for everyone to enjoy, whether they prefer seafood or chicken.
- Crisp & Vibrant Asian-Style Sides: For a balanced, nutritious, and visually appealing meal, serving your sushi cups alongside fresh, flavorful vegetables is an excellent choice. My recipe for Asian Style Green Beans adds a delightful crunch, a burst of fresh color, and a good serving of essential fiber, making for a wholesome and satisfying side dish. Other fantastic complementary options include a simple, refreshing cucumber salad, perfectly steamed edamame pods, or a light and comforting bowl of miso soup.
- Classic Dipping Sauces for Customization: In addition to the spicy mayo and fresh herbs for garnish, always provide small individual bowls of low-sodium soy sauce or tamari (for a gluten-free option) for dipping. This allows guests and diners to customize their flavor experience to their preference. For those who enjoy traditional sushi flavors, a side of thinly sliced pickled ginger (gari) and a small dab of vibrant green wasabi can further enhance the authentic sushi journey.
- Enhancing the Freshness Factor: To add an extra layer of textural intrigue and visual appeal, consider a final sprinkle of toasted sesame seeds (a mix of black and white looks particularly striking) or a few sprigs of delicate fresh microgreens over the top just before serving. These small touches elevate both the taste and presentation.
Common Questions & Expert Answers About Shrimp Sushi Cups
The primary secret to maintaining pliable nori is to assemble your sushi cups while the cooked rice is still warm. The residual warmth and moisture from the freshly cooked rice are essential for softening the nori, making it significantly more pliable and less prone to becoming overly crispy and cracking during the baking process. Pressing the warm rice firmly into the nori also contributes greatly to this softening effect, ensuring it holds its shape beautifully in the muffin tin.
Absolutely, this recipe is designed with incredible flexibility in mind! You can certainly substitute the shrimp with a variety of other delicious proteins. Excellent choices include cooked salmon, flaked crab meat (whether real or high-quality imitation), finely diced cooked chicken, or even well-seasoned crumbled firm tofu if you’re looking for a vegetarian or vegan option. The key is to ensure that whatever protein you select is already cooked and cut into small, uniform pieces to integrate seamlessly into the cups.
For achieving the optimal texture and consistency that helps these cups hold their shape, I highly recommend using jasmine rice, traditional sushi rice, or any short-grain rice variety. These types of rice are naturally stickier once cooked, which is crucial for the structural integrity of the sushi cups. In a pinch, if you’re short on time, you can even use instant or microwaveable rice, but for the most superior flavor and texture, freshly cooked short-grain rice remains the top choice.
Yes, absolutely! Customizing the spice level is easy. If you prefer a milder flavor profile, you can effortlessly substitute the spicy mayo with regular mayonnaise. Japanese ‘Kewpie’ mayo, known for its distinct rich, creamy, and tangy flavor, is an excellent choice. Alternatively, a good quality standard mayonnaise will also work wonderfully. For a slightly different twist that isn’t spicy, you could try mixing in a touch of honey, a dash of sesame oil, or some sweet chili sauce with your regular mayo.
You should always begin with raw shrimp for this recipe, as it will cook thoroughly in the oven. If your shrimp is frozen, it is imperative to ensure it is fully defrosted before you start. The single most critical preparatory step is to pat the shrimp meticulously dry with several layers of paper towels to eliminate any excess surface moisture. Following this, cut the shrimp into small, uniform cubes before gently combining it with the creamy sauce mixture. Proper drying ensures the best texture and flavor absorption.
Yes, you can certainly do some prep work in advance! You can prepare the seasoned shrimp mixture and cook the rice a day ahead of time. Store both components separately in airtight containers in the refrigerator. For the absolute best texture, especially to ensure the nori remains appealingly crisp, I recommend assembling and baking the sushi cups just before you plan to serve them. If you have leftovers, they can be stored in an airtight container in the fridge for up to 2-3 days and reheated gently in the oven or microwave, though the nori may lose some of its original crispness.
Shrimp Sushi Cups
If you love sushi but don’t know where to source or how to handle sushi-grade raw fish, these baked sushi cups are the perfect solution! Because all of the ingredients get fully cooked in the oven, you don’t need any special sushi-making skills.
Course: Appetizer, Snack
Cuisine: Asian
Makes: 6 servings
Author: The Modern Nonna
Prep Time: 10 minutes
Cook Time: 15 minutes
Total Time: 25 minutes
Facebook Share
Rate Recipe
Video
Equipment You’ll Need
- Nakiri Knife
- Measuring Cups + Spoons
- Cutting Board
- Mixing Bowls
- Muffin Pan
- Redmond Real Salt
- Rice Cooker
Ingredients for 6 Delicious Servings
- 7 jumbo shrimp, peeled, deveined and defrosted (if frozen) – about 1/2 pound total
- Pinch of salt
- ¼ cup cream cheese, softened to room temp
- 1 tablespoon mayo
- 2 teaspoons soy sauce (coconut aminos or tamari would also work beautifully)
- Dash of sriracha or any hot sauce (optional, adjust to your preferred spice level)
- ½ cup rice, such as jasmine, sushi, or short grain rice (for ideal stickiness)
- 2 sheets of nori (cut into 3.5-inch squares)
- Spicy mayo, for generous garnish
- Chopped fresh chives, for vibrant garnish
Step-by-Step Instructions
- Preheat your oven to 400°F (200°C) to ensure it’s ready for baking.
- Pat the shrimp thoroughly dry with paper towels to prevent sogginess. Cut the shrimp into small, uniform cubes. Add the cubed shrimp to a bowl and season with a pinch of salt.
- In a separate bowl, combine the softened cream cheese, mayo, soy sauce, and sriracha (if desired). Mix well until smooth and creamy. Pour this flavorful sauce over the shrimp and combine thoroughly, ensuring all shrimp are coated.
- Rinse the rice under cold water until the water runs clear to remove excess starch. Cook the rice according to package instructions (a rice cooker with a pinch of salt is highly recommended).
- While the rice cooks, cut 2 sheets of nori into 6 equal-sized squares (approximately 3.5-inch each), which will fit perfectly into a standard muffin tin.
- Once the rice is cooked and still warm, add 1 tablespoon of rice onto each nori square and gently press the rice into the nori. This step softens the nori and makes it pliable. (Lightly wet your fingers if the rice is too sticky.)
- Place each nori and rice square into a muffin tin cavity, forming a cup. Add a tablespoon of the marinated shrimp mixture on top of the rice in each cup.
- Bake for about 15 minutes. For an extra crispy top, broil for the last 60 seconds, watching carefully to prevent burning.
- Remove the muffin tin from the oven, allow to cool slightly for easier handling, then transfer the sushi cups to a plate. Garnish generously with spicy mayo and freshly chopped chives before serving immediately.
Nutrition Information (Approximate Per Serving)
Calories: 123kcal
Carbohydrates: 13g
Protein: 5g
Fat: 5g
Saturated Fat: 2g
Polyunsaturated Fat: 1g
Monounsaturated Fat: 1g
Trans Fat: 0.01g
Cholesterol: 40mg
Sodium: 289mg
Potassium: 64mg
Fiber: 0.2g
Sugar: 0.4g
Vitamin A: 214IU
Vitamin C: 0.3mg
Calcium: 27mg
Iron: 0.3mg
Nutrition information is automatically calculated and is intended to be used as an approximation only.