
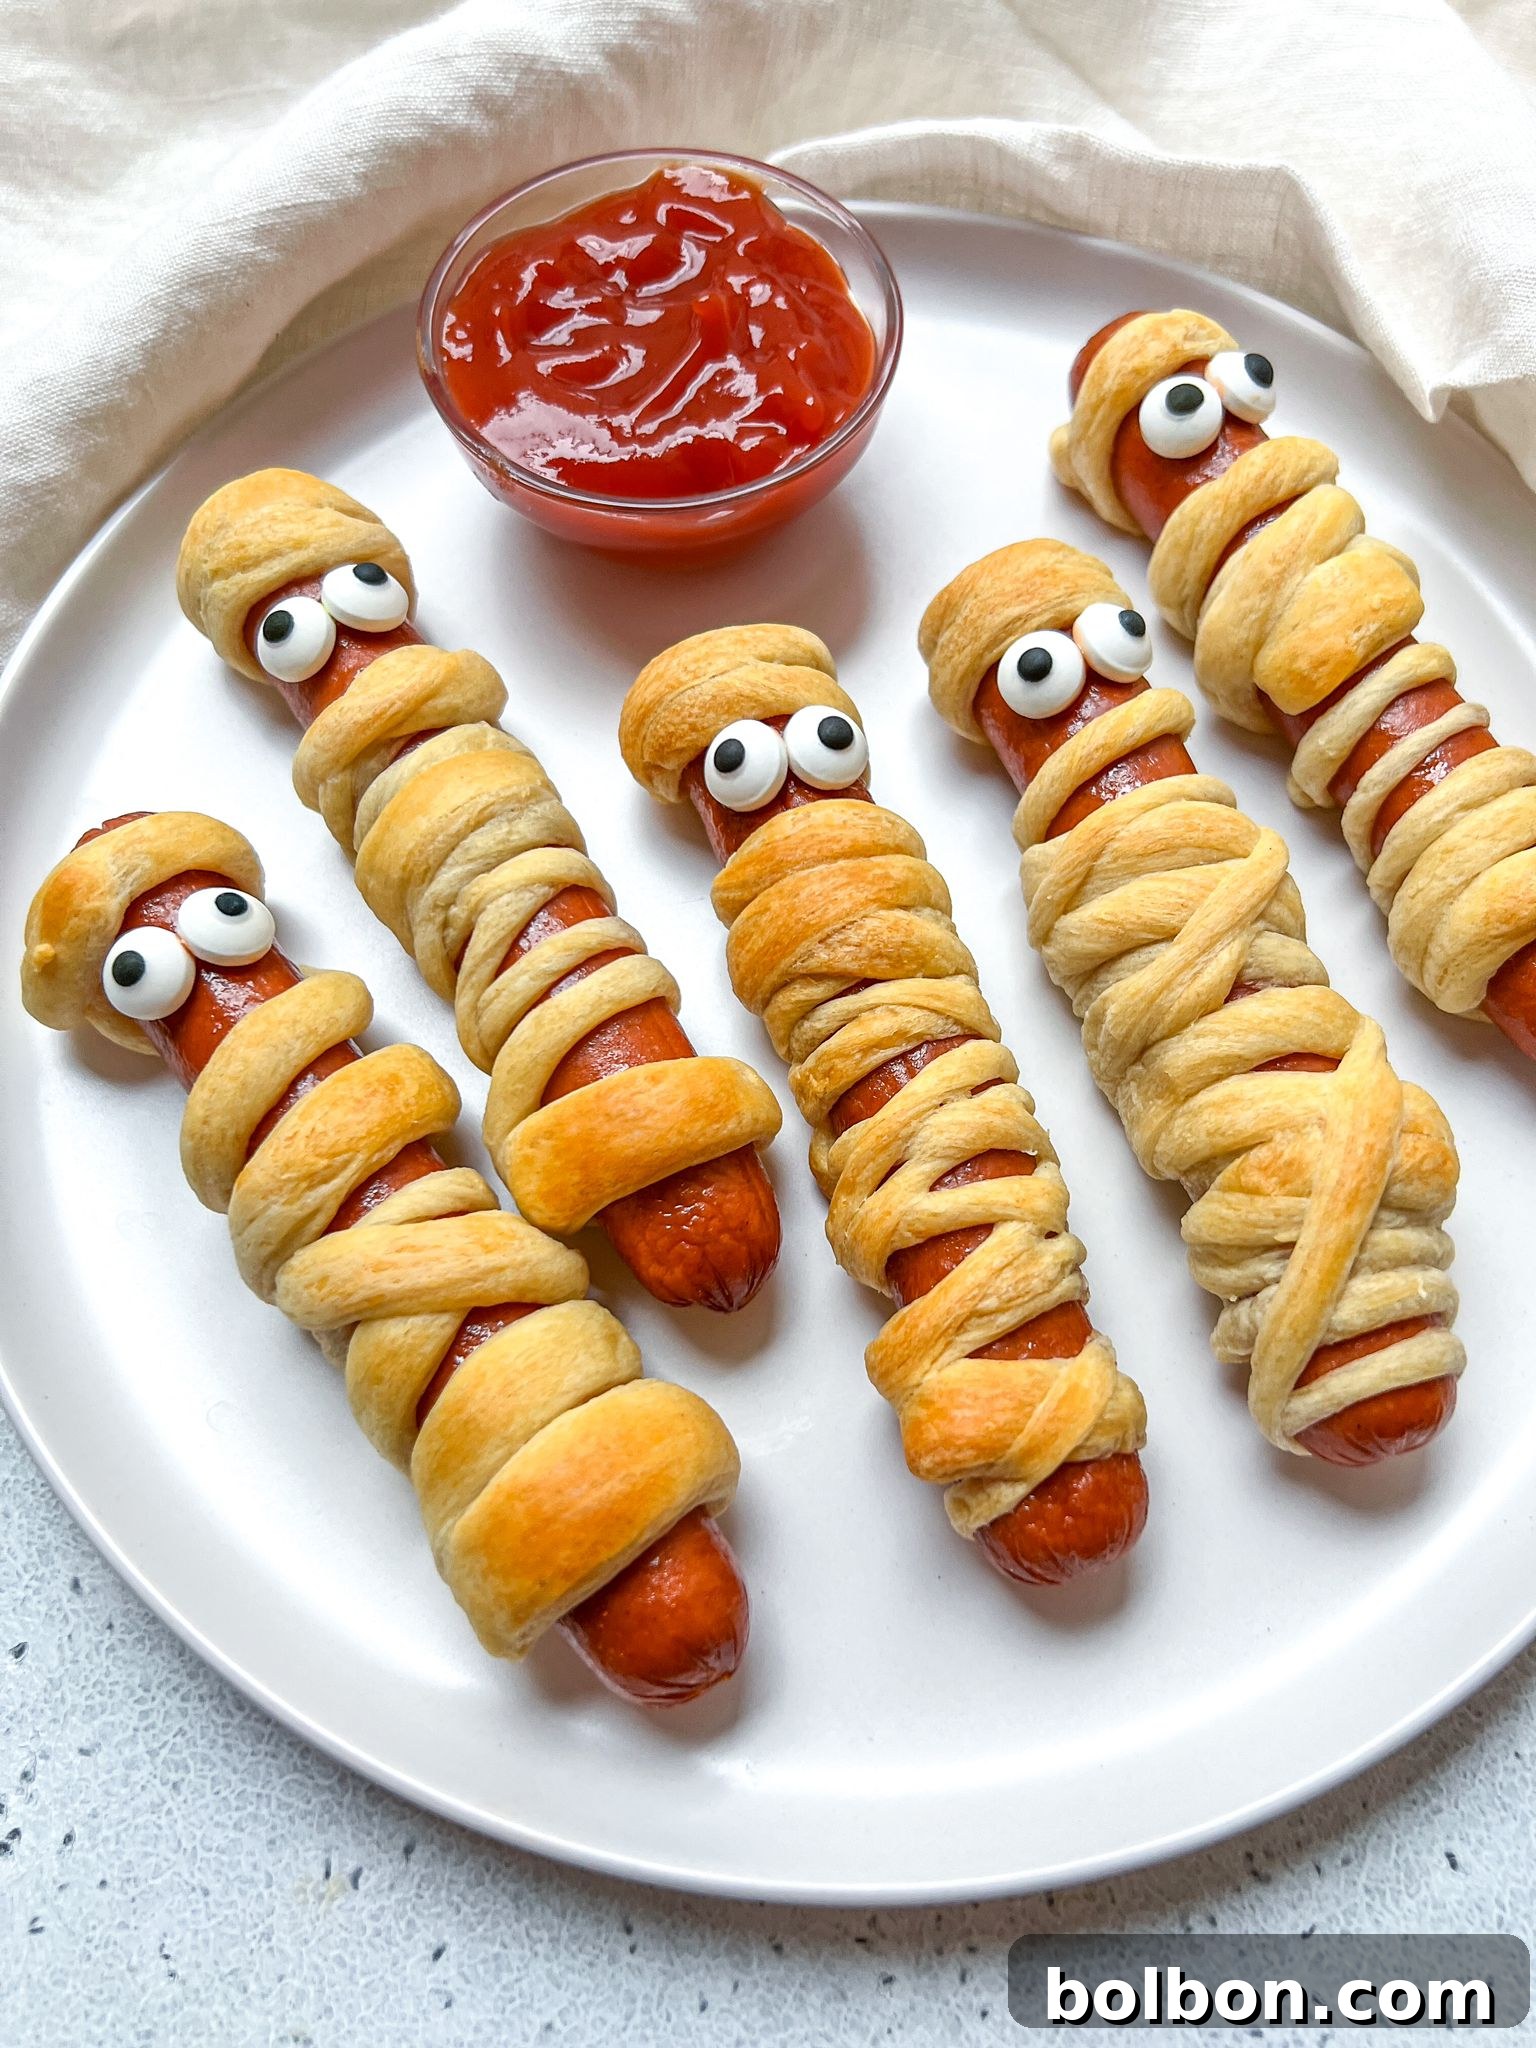
Unleash the festive fun of Halloween with an absolute crowd-pleaser: Mummy Hot Dogs! This creative and utterly delightful take on a classic comfort food is guaranteed to be the star of any spooky celebration. Imagine golden-brown strips of dough intricately wrapped around savory hot dogs, resembling adorable, edible mummies – complete with playful candy eyes that peek out from their bandages. These charming treats are incredibly easy to make, require minimal ingredients, and promise to bring smiles and laughter to both children and adults alike. Whether you’re hosting a grand Halloween bash, preparing a special lunchbox surprise, or simply seeking a quick and unique dinner idea, Mummy Hot Dogs are your go-to recipe for a ghoulishly good time. Get ready to transform ordinary hot dogs into extraordinary, memorable Halloween magic!
Why You’ll Adore These Halloween Mummy Hot Dogs
Mummy Hot Dogs aren’t just a meal; they’re an experience. Here’s why this recipe will quickly become a cherished part of your Halloween traditions:
- Effortlessly Festive and Fun: These aren’t your everyday hot dogs! The whimsical mummy design instantly captures the spirit of Halloween, making them a visual delight that excites everyone, especially the little ones. They add an undeniable charm and playful atmosphere to any gathering, serving as both a delicious snack and a conversation starter.
- Remarkably Quick and Easy Preparation: Forget complicated recipes that take hours. With just a few basic ingredients and straightforward steps, you can whip up a batch of Mummy Hot Dogs in under an hour. This makes them an ideal choice for busy parents, spontaneous gatherings, or when you need a last-minute festive treat.
- Unmatched Dough Flexibility for Customization: While crescent roll dough is a popular choice, this recipe is incredibly adaptable. You have the freedom to experiment with various types of dough, such as puff pastry, pizza dough, or even homemade pastry. This flexibility allows you to tailor the texture and flavor profile to your personal preferences or dietary needs, making each batch uniquely yours.
- The Ultimate Party Appetizer: Their individual, handheld nature makes Mummy Hot Dogs perfect for parties. They are easy to serve, require no utensils, and can be prepared in large quantities, ensuring all your guests get to enjoy a bite of spooky fun. They’re a guaranteed hit that caters to all ages and palates.
- Kid-Friendly & Engaging: Involving children in the wrapping process is a fantastic way to make cooking a fun, interactive activity. Kids love to help create these edible mummies, fostering creativity and making mealtime an adventure.
Mastering the Art of Halloween Mummy Hot Dogs: A Step-by-Step Guide
Crafting these adorable mummies is simpler than you might think. Follow these easy steps to bring your spooky snacks to life:
- Prepare Your Dough: Begin by carefully unwrapping your chosen dough. If using crescent rolls, gently unroll the sheet and, if necessary, pinch together any perforations to create a solid sheet. Using a pizza cutter or a sharp knife, cut the dough into thin strips, approximately ¼ to ½ inch wide. The pizza cutter offers the easiest and most consistent cuts for uniform “bandages.”
- Ready the Hot Dogs: It’s crucial to pat your hot dogs thoroughly dry with paper towels. Excess moisture can prevent the dough from adhering properly, leading to unraveling during baking. Once dry, place each hot dog on a clean surface, ready for wrapping.
- Wrap the Mummies: Take one strip of dough and begin wrapping it around a hot dog, starting from one end and spiraling towards the other. Mimic the look of bandages, leaving a small gap near the top for where the “eyes” will be placed. Don’t worry about perfection; slightly uneven wraps add to their rustic, mummy-like charm! Gently press the ends of the dough strips to secure them.
- Bake to Golden Perfection: Preheat your oven to a precise 375°F (190°C). Arrange the wrapped hot dogs on a baking sheet lined with parchment paper, ensuring there’s a little space between each one for even baking. Bake for 13-15 minutes, or until the dough turns a beautiful golden brown and the hot dogs are heated through. Keep a close eye on them to prevent overbaking.
- Add the Spooky Eyes: Once baked, let your mummy hot dogs cool for a few minutes. While still warm but cool enough to handle, use a lollipop stick, toothpick, or even a small piping bag to dab two small dots of ketchup or mustard onto the exposed “face” area to serve as the base for the eyes. Then, carefully attach your candy eyes onto these dots. The condiment acts as a natural “glue.”
- Serve and Delight: Your irresistible Mummy Hot Dogs are now ready to impress! Arrange them artfully on a platter with bowls of various dipping sauces, such as ketchup, mustard, barbecue sauce, or a spicy sriracha mayo. Watch as they become the centerpiece of your Halloween spread or a cherished lunchbox surprise.
Nonna’s Expert Spooky Tips
For the best results, always ensure your hot dogs are patted completely dry before wrapping. This step is vital for the dough to adhere correctly and bake evenly. When it comes to the candy eyes, remember they are primarily for presentation and can be quite firm. Feel free to explore other edible options for eyes, such as small black olive slices, tiny pieces of cheese, or even small dots of cream cheese for a softer, more integrated look. Don’t be afraid to get creative!
Exciting Substitutions and Creative Variations
This recipe is incredibly versatile, allowing you to tailor it to different tastes, dietary needs, or occasions. Here are some ideas to inspire your Mummy Hot Dog creations:
- Diverse Hot Dog Alternatives: For those seeking healthier options or simply a different flavor profile, the possibilities are endless. Consider using turkey or chicken sausages for a leaner protein choice. Vegetarian hot dogs or even savory tofu dogs work wonderfully for plant-based diets. For an unexpected twist, try wrapping roasted carrots (carrot dogs!) or cheese sticks for a truly unique veggie mummy.
- Creative Condiment and Eye Options: The dipping sauce world is your oyster! Beyond classic ketchup and mustard, offer barbecue sauce, a tangy honey mustard, a spicy Sriracha mayo, or a creamy ranch dressing. For the eyes, let your imagination run wild. Small olive slices (black or green), tiny bell pepper pieces, mini chocolate chips, or even dots of cream cheese or sour cream can replace candy eyes for a softer texture or different aesthetic.
- Mini Mummies for Party Perfection: When hosting a larger gathering, turn your mummies into irresistible bite-sized appetizers by using cocktail sausages or mini hot dogs. Simply cut your dough strips thinner to match their smaller size. These mini versions are incredibly easy to eat and always a hit at any party.
- Dough Dynamics: While crescent roll dough is super convenient, feel free to experiment with other pastry types. Puff pastry creates a flakier, richer mummy, while pizza dough offers a chewier, more substantial wrapper. For gluten-free guests, many brands now offer excellent gluten-free crescent roll or pizza dough alternatives.
- Add a Cheesy Surprise: For an extra layer of flavor and indulgence, before wrapping, place a thin strip of cheddar, mozzarella, or provolone cheese around the hot dog. As the mummies bake, the cheese will melt, creating a deliciously gooey interior.
- Spice It Up: Before baking, sprinkle a pinch of garlic powder, onion powder, paprika, or Italian seasoning over the wrapped dough for an enhanced savory flavor. For a slight kick, a tiny dash of chili powder can be added.
More Spooktacular Halloween Recipes to Try
If you’re looking to expand your Halloween culinary repertoire, check out these other fun and festive recipes:
- Mummy Hot Dogs (yes, you can make these again!)
- Frankenstein Kiwis – A healthy and adorable treat.
- Witch Finger Cookies – Spooky and delicious shortbread.
- Chocolate Bats – Easy and sweet chocolate delights.
- Pretzel Broomsticks – A magically simple snack.
- Halloween Cocktails – Festive drinks for adult gatherings.
Frequently Asked Questions About Mummy Hot Dogs
While the candy eyes are technically edible, they are often quite hard and made primarily for decorative purposes. For young children or those with dental concerns, it’s advisable to exercise caution. Many people choose to remove the candy eyes before eating the mummy hot dogs to ensure a smoother, safer eating experience. You can always replace them with softer edible alternatives like cream cheese dots or small olive slices if preferred.
Absolutely! The beauty of this recipe lies in its adaptability. While Pillsbury crescent dough is convenient, you can certainly use other types of dough. Pizza dough, puff pastry, or even a basic homemade pastry dough can work wonderfully. The key is to ensure you cut the dough into thin, manageable strips that can be easily wrapped around the hot dogs to achieve that iconic mummy appearance. Adjust baking times slightly if using a different dough, as thickness and composition can vary.
Yes, definitely! Customizing the eyes is a fantastic way to personalize your mummy hot dogs. Creative and edible alternatives include small slices of black or green olives, tiny pieces of roasted red pepper, small dots of cream cheese or sour cream (applied with a toothpick), or even mini chocolate chips for a sweet and savory contrast. These options can offer different flavors, textures, and even make the treat more suitable for younger children who might find candy eyes too hard.
Yes, you can! You can prepare the mummy hot dogs up to 24 hours in advance. Wrap the hot dogs with the dough and arrange them on a parchment-lined baking sheet. Cover them loosely with plastic wrap and refrigerate. When you’re ready to bake, simply place them directly into the preheated oven. You might need to add an extra minute or two to the baking time since they will be cold from the refrigerator. Add the candy eyes just before serving for the best presentation.
Leftover mummy hot dogs should be stored in an airtight container in the refrigerator. They will remain fresh for up to 2-3 days. To reheat, you can place them in a preheated oven at 350°F (175°C) for about 5-10 minutes, or until warmed through and the dough is crispy again. They can also be microwaved, but the dough might become softer.
Halloween Mummy Hot Dogs
Facebook Share
Rate Recipe
Print Recipe
Video
Essential Equipment
To successfully create your Mummy Hot Dogs, you’ll need just a few basic kitchen tools:
- Baking Sheet: Essential for baking the hot dogs evenly.
- Parchment Paper: Prevents sticking and makes cleanup a breeze.
- Pizza Cutter or Sharp Knife: For cutting the dough into thin, even strips.
- Paper Towels: To thoroughly dry the hot dogs before wrapping.
- Lollipop Stick or Toothpick: For dabbing on condiment “eyes.”
- Candy Eyes (Optional): For that extra spooky touch, readily available online or in baking supply stores.
Ingredients for Your Spooky Feast
- 16 hot dogs , approximately 1.5 standard packs of hot dogs, choose your favorite brand and type.
- 1 pack Pillsbury dough, or any similar crescent roll dough, puff pastry, or pizza dough.
- ketchup, or mustard, for drawing the base of the eyes and serving as dipping sauce.
- candy eyes, for decoration. See “Substitutions and Variations” for other edible eye options.
- skewer, toothpick or lollipop stick, for applying condiment dots for the eyes.
Detailed Instructions for Perfect Mummies
-
To begin, carefully peel the outside wrapper of the dough package and gently pop it open. Unroll the dough onto a clean surface or a piece of parchment paper. If you notice any natural separations in the dough (common with crescent rolls), firmly pinch them together to create a continuous, solid sheet. Using a pizza cutter, which is the easiest and most efficient tool for this task, or a sharp knife, cut the dough into long, thin strips, about ¼ to ½ inch wide. The consistency of these strips will help create a uniform mummy effect.
-
Next, take your preferred hot dogs and pat them thoroughly dry with paper towels. This crucial step prevents the dough from slipping or becoming soggy during baking. Place the dried hot dogs onto a baking sheet that has been lined with parchment paper. Now, take your prepared dough strips and carefully begin wrapping them around each hot dog. Start at one end and spiral the dough upwards, mimicking ancient bandages. Ensure you leave a small, unwrapped gap near the top portion of the hot dog – this will be the “face” where the eyes will eventually peek out. Gently press the ends of the dough strips to secure them onto the hot dog.
-
With all your mummies wrapped, it’s time to bake! Place the baking sheet with the wrapped hot dogs into a preheated oven set to 375°F (190°C). Allow them to bake for approximately 13-15 minutes, or until the dough has puffed up, turned a beautiful golden brown, and the hot dogs are perfectly heated through. Keep an eye on them towards the end of the baking time to prevent over-browning.
-
Once baked, remove the mummy hot dogs from the oven and let them cool for a few minutes on the baking sheet. They will be hot, so allow them to be handled comfortably. Take your lollipop stick or skewer, dip it lightly into ketchup or mustard, and dab two small dots onto the unwrapped “face” area of each mummy. These dots serve as the base for the eyes. Finally, gently press the candy eyes onto these condiment dots. Your adorable and delicious Mummy Hot Dogs are now ready to be served and enjoyed!
Nutrition Information
Nutrition information is automatically calculated and should only be used as an approximation. Individual values may vary based on specific ingredients and preparation methods.
Additional Recipe Info
Here’s a quick overview of the recipe details:
Mummy Hot Dogs are more than just a recipe; they are a tradition waiting to be made. Their irresistible combination of ease, fun, and deliciousness ensures they’ll be a highlight of your Halloween celebrations year after year. So, gather your ingredients, enlist your little helpers, and prepare to wrap up some spooky culinary magic. Happy Halloween, and happy cooking!