
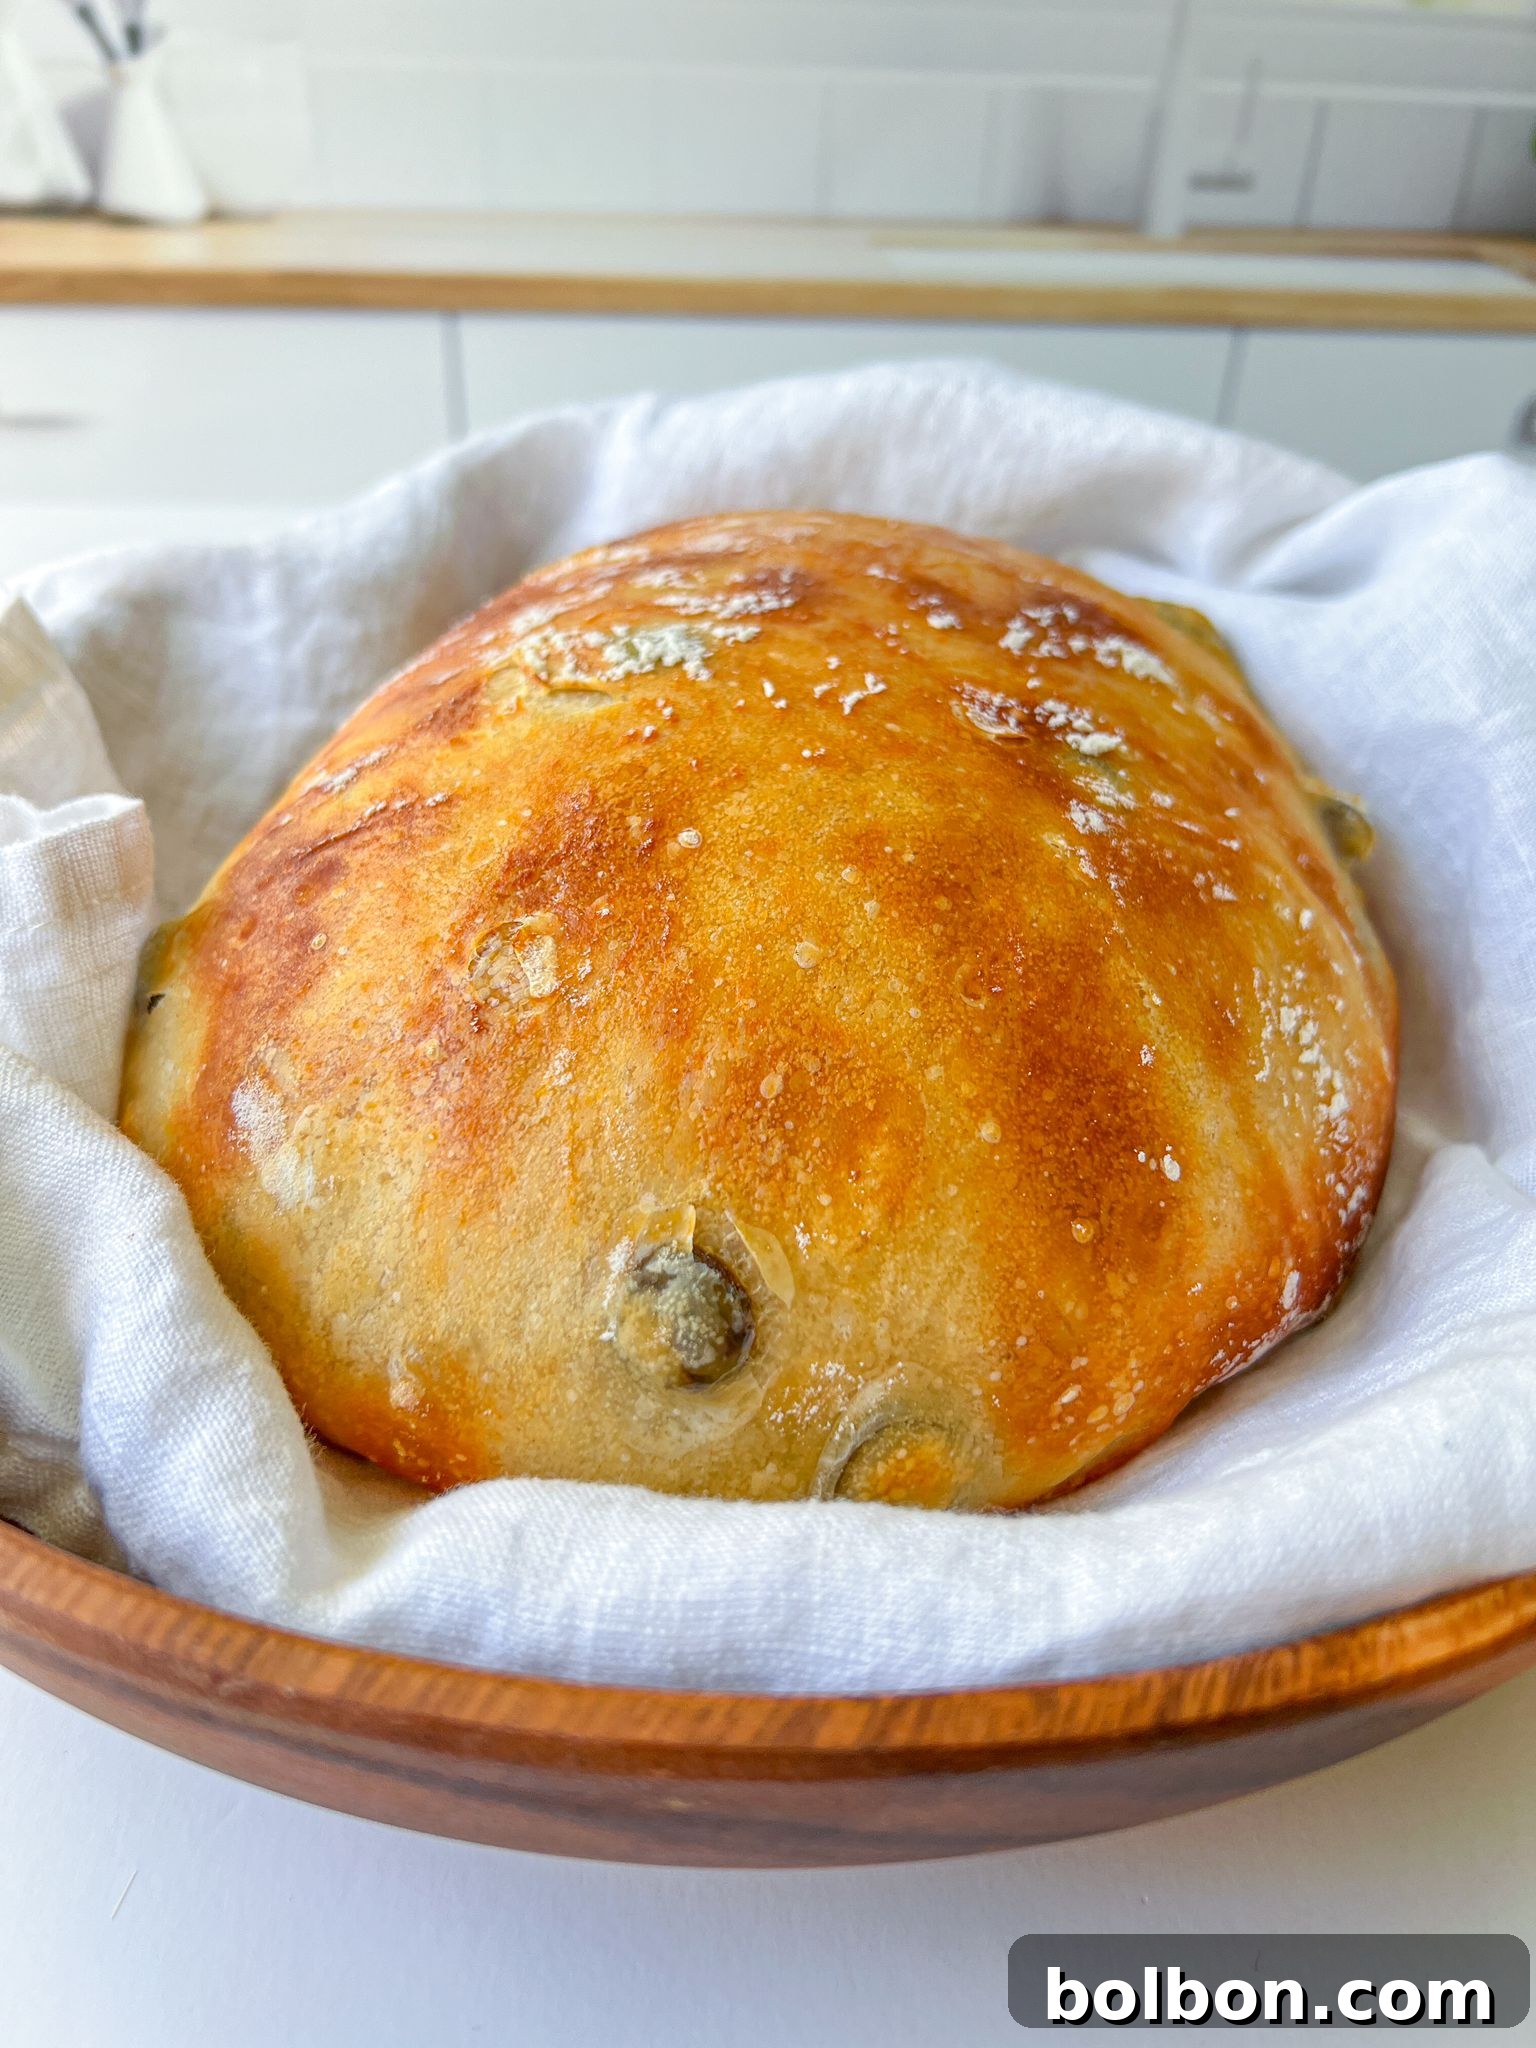
Step into the warmth of your kitchen and prepare to embark on a culinary journey with this incredible No-Knead Olive Bread. Imagine a loaf that boasts a perfectly crispy, golden crust, yielding to a delightfully warm, soft, and impossibly chewy interior. This isn’t just any bread; it’s a testament to simple, wholesome ingredients and time-honored baking traditions, requiring no laborious kneading, making it accessible to even the most novice of bakers. It’s the kind of bread that fills your home with an irresistible aroma and transports you back to a simpler time, much like the “peasant bread” my Bulgarian grandmother would lovingly prepare.
Growing up in Bulgaria, where resources were often scarce, my grandma, one of ten children, learned the art of making delicious, filling food with just a few basic ingredients. Flour, salt, water, and yeast were the pillars of sustenance, ensuring bellies were full and many mouths could be fed on the most modest of incomes. Measurements were often “na oko” – by eye – relying on intuition and consistency rather than strict cup and spoon figures. This intuitive approach fostered a deep connection to the food, an understanding that baking bread is less about precision and more about feeling the dough, understanding its needs, and letting time do its magic. This recipe embodies that spirit, inviting you to create something truly spectacular with minimal effort and maximum reward.
The beauty of this recipe lies in its utter simplicity. If you can combine a few ingredients in a bowl and stir them together, you are more than capable of creating a magnificent loaf of bread. This method strips away the intimidation often associated with bread making, proving that anyone can bake bread that tastes like it came from a professional artisan bakery. It’s a truly beginner-friendly approach, perfect for those taking their first steps into the satisfying world of homemade baking. Prepare to impress yourself and everyone lucky enough to share a slice of this rustic, flavorful olive bread.
Why You’ll Fall in Love with No-Knead Olive Bread
There are countless reasons why this No-Knead Olive Bread will become a cherished staple in your home. It’s more than just a recipe; it’s an experience that delivers exceptional results with surprising ease.
- Effortless Homemade Perfection: Say goodbye to the demanding task of kneading dough for extended periods. This revolutionary no-knead method allows you to achieve bakery-quality bread with minimal hands-on time, making homemade bread a realistic and enjoyable endeavor for everyone. It’s so simple, you genuinely can’t mess it up, making it the ultimate beginner-friendly recipe.
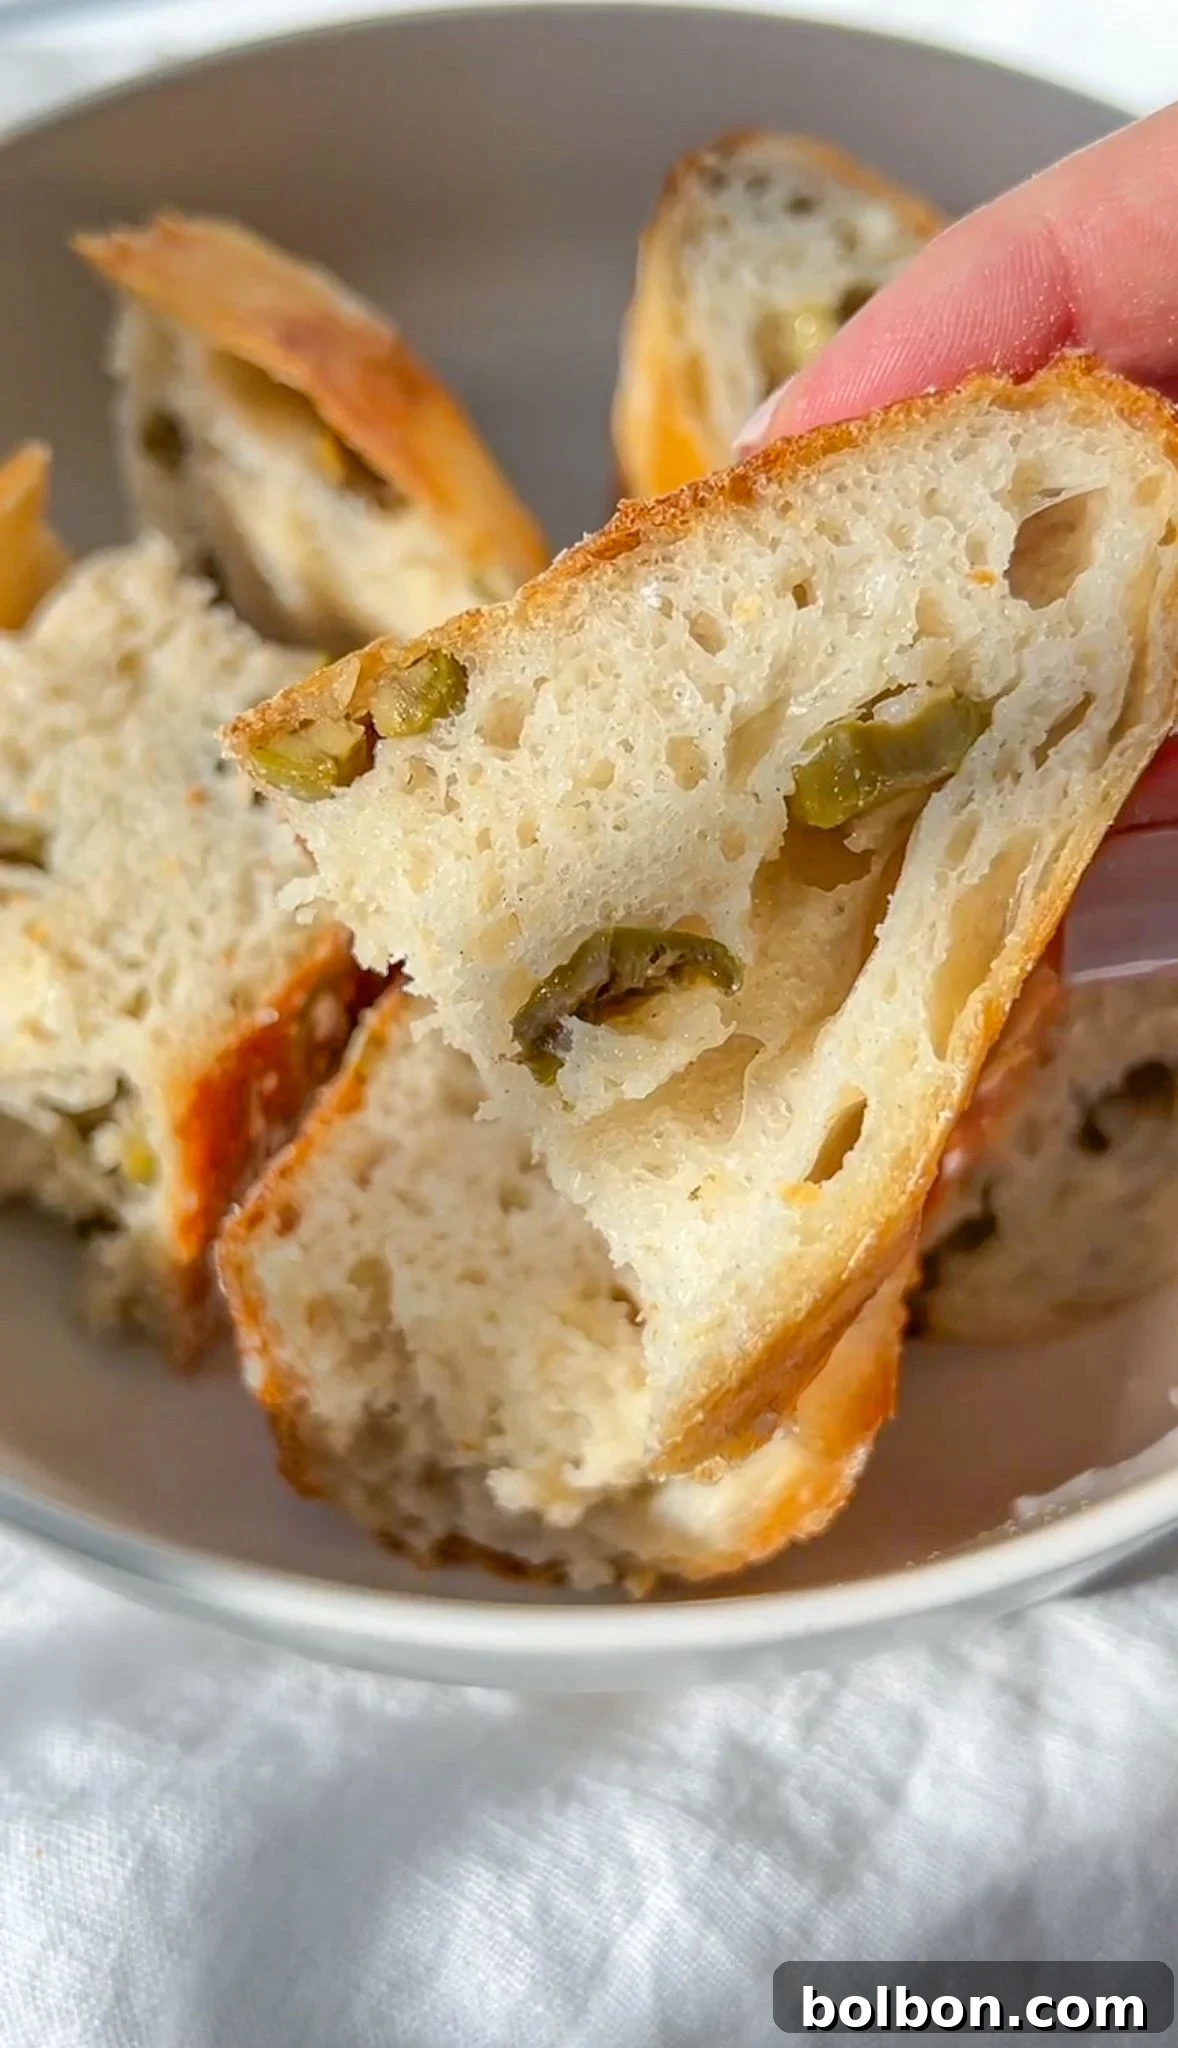
- Irresistible Texture: Experience the ultimate contrast in every bite. The bread boasts a wonderfully crispy, golden-brown crust that crackles as you slice into it. Inside, you’ll discover a warm, soft, and delightfully chewy crumb, a perfect harmony of textures that elevates this simple loaf to something extraordinary.
- A Family Favorite for All Ages: This versatile bread is universally loved. Its inviting aroma, comforting texture, and savory olive notes appeal to both children and adults, making it a guaranteed hit at any meal or gathering. It’s the kind of bread that brings people together around the table.
- Authentic Mediterranean Flavors: The addition of finely chopped olives infuses the bread with a rich, briny saltiness and a distinctly Mediterranean character. Whether enjoyed on its own, dipped in olive oil, or paired with your favorite dishes, the flavor profile is vibrant and utterly addictive. Choose your favorite variety of olives – Kalamata, green, or a mix – to tailor the taste to your preference.
- Wholesome and Satisfying: Made with basic, natural ingredients, this bread offers a wholesome alternative to store-bought options. It’s hearty, satisfying, and free from unnecessary additives, providing pure, unadulterated goodness in every slice.
Understanding the Ingredients
While the ingredients list for this No-Knead Olive Bread is wonderfully short and simple, understanding each component and its role is key to achieving the best results. Quality ingredients, combined with the “less is more” philosophy of no-knead baking, truly shine through.
- All-Purpose Flour: This forms the foundational structure of our bread. All-purpose flour is versatile and readily available, providing the right balance of protein for a tender crumb and a robust crust. For a heartier loaf with added nutritional benefits, you can experiment with whole wheat flour or a blend of all-purpose and whole wheat. Just remember that whole wheat absorbs more water, so you might need slight adjustments.
- Salt: Far more than just a seasoning, salt is critical for flavor development and yeast regulation. It slows down yeast activity, allowing for a longer, slower fermentation that translates into a more complex and nuanced flavor profile. Don’t skimp on the salt, as it truly brings out the best in the bread and the olives. I prefer a good quality sea salt or Redmond Real Salt for its rich mineral content.
- Active Dry Yeast: This magical ingredient is what makes our bread rise, creating its airy texture. Active dry yeast needs to be activated in warm water before being added to the dry ingredients. Ensuring your yeast is fresh and active is paramount to the success of your bread. A quick test (as detailed in Nonna’s Tip below) can save you from a flat loaf.
- Warm Water: The temperature of your water is crucial for activating the yeast. It should be between 100°F and 110°F (37°C to 43°C). Water that’s too hot will kill the yeast, while water that’s too cold won’t activate it properly, leading to a dough that doesn’t rise. Trust your instincts – it should feel warm, not scalding, to the touch.
- Chopped Pitted Olives: The star of the show! Olives contribute a wonderful savory, briny flavor and a pleasant texture throughout the bread. You can use any type of olive you love – Kalamata, Castelvetrano, green, or black. Ensure they are pitted and roughly chopped to ensure an even distribution in your loaf. The saltiness from the olives also complements the overall flavor beautifully.
- Additional Flour for Dusting: A generous dusting of flour on your work surface and on the dough itself prevents sticking and aids in shaping the loaf without needing to knead. It also contributes to the rustic look and crispy texture of the final product.
Simple Steps to Artisan-Quality Bread: How to Prepare Your No-Knead Olive Loaf
Creating this magnificent bread is surprisingly straightforward, relying on minimal intervention and the magic of time. Follow these steps for a perfect loaf every time.
-
Combine the Dry Ingredients and Olives: In a generously sized mixing bowl, combine the all-purpose flour and salt. Add the active dry yeast, ensuring it’s evenly distributed. Stir these dry ingredients together thoroughly. Next, fold in your chopped pitted olives, mixing them gently until they are well incorporated throughout the flour mixture. This ensures every slice will have delicious olive bits.
-
Add Warm Water and Mix to Form Dough: Pour the warm water (between 100-110°F or 37-43°C) into the bowl with the dry ingredients. Using a sturdy spatula or a wooden spoon, stir until all the ingredients come together and form a sticky, shaggy dough. There’s no need to overmix; just ensure all the flour is hydrated. The dough will be quite wet and sticky, which is exactly what you want for a no-knead bread. Avoid the temptation to add more flour at this stage, as a wetter dough leads to a better crumb.
-
Cover and Rest (The Magic Happens Here): Cover the bowl tightly with plastic wrap or a clean kitchen towel. Place the bowl in a warm, draft-free spot at room temperature. A microwave or a cold oven works perfectly. Allow the dough to rest and ferment for a minimum of 5 hours, or ideally, overnight (8-18 hours). During this extended resting period, the yeast will work its magic, developing deep flavors and creating the airy internal structure without any kneading required. The dough should significantly rise, doubling or even tripling in size, and develop small bubbles on its surface.
-
Shape the Dough (No Kneading!): Once the dough has risen beautifully, generously flour your clean countertop or a large cutting board. Gently scrape the sticky dough out of the bowl onto the floured surface. Sprinkle the top of the dough generously with more flour. Using floured hands, gently pat and fold the dough into a round loaf shape. The key here is not to knead. Just gently manipulate it enough to form a cohesive, oval or round loaf. If the dough feels too sticky, add a little more flour to your hands and the surface, but try to use as little as possible to maintain the dough’s hydration.
-
Bake to Golden Perfection: Carefully transfer your shaped dough into an oven-safe dish (such as a Dutch oven or Corning Ware dish) that has been lined with parchment paper. This prevents sticking and makes for easy cleanup. Place the lid securely on the dish. Crucially, place the covered dish containing the dough into a COLD oven (do not preheat the oven). Once the bread is inside, turn the oven on to 450°F (230°C). Bake with the lid on for 30 minutes. This traps steam, creating that coveted crispy crust. After 30 minutes, carefully remove the hot lid and continue baking for another 25-30 minutes, or until the bread achieves a deep golden-brown color and sounds hollow when tapped on the bottom. Keep an eye on it during this phase, as oven temperatures can vary.
-
Cool and Savor: Once baked to perfection, remove the bread from the oven. Carefully lift it out of the baking dish using the parchment paper and transfer it to a wire rack to cool for at least 15-20 minutes. While it’s tempting to dig in immediately, allowing it to cool helps the internal structure set and improves the texture. Once slightly cooled, slice into your magnificent homemade olive bread and enjoy its incredible flavors and textures. This bread is always best served warm the same day it’s baked.
Nonna’s Essential Bread Tip
Always ensure your yeast is active and fresh! You can easily test its viability by dissolving it in a small amount of the warm water specified in the recipe. If, after 5-10 minutes, the mixture becomes foamy and bubbly, your yeast is active and ready to use. If there’s no foam, your yeast is likely expired, and you’ll need to start again with a fresh packet to guarantee a successful rise.
Substitutions and Creative Variations
This Bulgarian-inspired No-Knead Olive Bread is deeply rooted in tradition, but its adaptability allows for wonderful creative twists. Feel free to experiment and make this recipe truly your own:
- Flour Alternatives: While all-purpose flour provides a classic crumb, you can easily substitute it with whole wheat flour for a denser, more nutritious loaf with a nutty flavor. Alternatively, a 50/50 blend of whole wheat and all-purpose flour offers a fantastic compromise, adding depth without making the bread too heavy. For those with dietary restrictions, a 1-to-1 gluten-free flour blend can also be used to create a delicious gluten-free version.
- Aromatic Herbs and Spices: Elevate the flavor profile by incorporating fresh or dried herbs directly into the dough. Rosemary, thyme, oregano, and basil are excellent choices that complement the olives beautifully. For an extra savory kick, consider adding a teaspoon of garlic powder, onion powder, or a pinch of red pepper flakes for a subtle heat.
- Seeds and Nuts for Texture: Enhance the texture and nutritional value by mixing in various seeds or chopped nuts. Sesame seeds, poppy seeds, sunflower seeds, or even chopped walnuts can be folded into the dough before the final rise. You can also sprinkle them generously on top of the loaf just before baking for an appealing visual and an extra crunch.
- Explore Different Shapes: Don’t limit yourself to a round loaf! This versatile dough can be shaped into baguettes for elegant servings, dinner rolls perfect for individual portions, or even a rustic focaccia by pressing it into a baking sheet and dimpling the top. For a truly unique experience, consider making a stuffed bread with cheese, sun-dried tomatoes, or extra herbs.
- Sourdough Sensation: For sourdough enthusiasts, replace the active dry yeast with one cup of active sourdough starter. Adjust the resting time, allowing for a longer fermentation (at least 6-12 hours, or even longer depending on your starter’s activity and ambient temperature) to achieve that signature sourdough tang and texture.
- Cheesy Indulgence: Fold in a half cup of your favorite shredded or cubed cheese, such as Parmesan, sharp cheddar, or crumbled feta, along with the olives. The cheese will melt into delicious pockets, adding a rich, savory dimension to the bread.
Perfect Pairings: Best Served With
This No-Knead Olive Bread is incredibly versatile and pairs wonderfully with an array of dishes, making it a fantastic addition to almost any meal. Its rustic charm and savory flavor make it a perfect companion.
- Hearty Soups and Stews: There’s nothing quite like tearing off a warm piece of this bread and dipping it into a steaming bowl of soup. Its robust flavor and chewy texture stand up beautifully to rich broths and creamy purees. Some favorites include:
- Pastina Soup
- Greek Lemon Soup
- The Best Lentil Soup
- Hidden Veggie Orzo Soup
- Healthy Cream of Broccoli Soup
- Healthiest Cream of Hidden Veggie Soup
- Hidden Veggie Meatball Soup
- Chicken Noodle Soup
- Elegant Cheese and Butter Boards: Elevate your entertaining with this bread as the star of your cheese or butter board. Its distinctive olive flavor provides a lovely contrast to creamy cheeses, savory charcuterie, and sweet preserves. It’s an ideal vessel for spreading luscious butters, soft cheeses, or rich dips.
- Dipped in Olive Oil: Sometimes, simplicity is best. A fresh slice of warm olive bread, dipped in high-quality extra virgin olive oil and perhaps a sprinkle of black pepper, is a pure delight.
- With Salads: Serve alongside a fresh, crisp green salad or a vibrant Mediterranean salad. The bread adds substance and a savory counterpoint to the fresh vegetables and vinaigrette.
- As a Side to Main Courses: This bread is an excellent accompaniment to various main courses, from roasted chicken and grilled fish to pasta dishes. It’s perfect for soaking up delicious sauces and gravies.
Explore More No-Knead Wonders
If you’ve fallen in love with the simplicity and incredible results of this no-knead method, there’s a whole world of other no-knead recipes waiting for you to explore. Expand your baking repertoire with these equally effortless and delicious options:
- No-Knead Gluten-Free Bread
- My Viral No-Knead Peasant Bread
- No-Knead Focaccia
- No-Knead Cheddar Bread
Common Questions & Expert Tips for Success
Even with a simple recipe, questions can arise. Here are some common queries and expert tips to ensure your No-Knead Olive Bread turns out perfectly every time.
Where can I find the baking dish you use?
A similar oven-safe dish to the one I use in this recipe, such as a sturdy Corning-Ware dish or a Dutch oven, can often be found in kitchenware stores or online. For convenience, you can find a suitable option linked HERE.
Why is the water temperature between 100-110°F (37-43°C) so important?
Maintaining this precise water temperature range is absolutely crucial because it provides the optimal environment for active dry yeast to activate properly. Water that is too hot will kill the delicate yeast organisms, preventing your dough from rising. Conversely, water that is too cold will hinder yeast activation, leading to a sluggish or non-existent rise. Always use a kitchen thermometer to ensure accuracy for the best results.
How can I measure the consistency of the dough without traditional measurements?
Embracing the traditional “na oko” or “by eye” method, as my grandmother did, is part of the charm of this rustic recipe. When adding water, do so gradually until you achieve a very thick and sticky dough. It should be shaggy and cohesive, but still quite wet. The stickiness is key for developing gluten without kneading. Don’t worry if it seems too wet; resist the urge to add too much extra flour at this stage, as a higher hydration level contributes to the bread’s incredible chewy texture.
What should I do if I’m unsure whether my yeast is still active?
A simple yeast test is highly recommended, especially if your yeast has been sitting in the pantry for a while. Add your yeast to a small amount of the warm water (from the recipe) and let it sit for about 5 to 10 minutes. If the mixture becomes foamy and bubbly, your yeast is active and ready to be incorporated into the flour and salt. If it remains flat with no signs of activity, it’s best to discard it and use new, fresh yeast to avoid a failed loaf.
What if the dough turns out too wet or too dry?
Adjusting dough consistency is part of intuitive baking. If your dough feels excessively wet and soupy, sprinkle in a tablespoon of flour at a time, mixing until it reaches that desired thick and sticky consistency. If, on the other hand, the dough is too dry and crumbly, add warm water a teaspoon at a time until the dough becomes tacky and cohesive. Small adjustments can make a big difference.
Can I use any baking dish for this bread?
Yes, absolutely! Any oven-safe baking dish that can comfortably accommodate a loaf of bread and has a lid will work beautifully. A sturdy Dutch oven, a Corning-Ware dish, or a ceramic casserole dish with a tight-fitting lid are all excellent choices. The lid is essential for trapping steam during the initial baking phase, which helps create that fantastic crispy crust.
How do I use a Dutch oven to bake the bread?
If using a Dutch oven, the process is slightly different to achieve optimal results. Preheat your Dutch oven along with its lid inside the oven at 450°F (230°C) for at least 30 minutes before placing the dough inside. Once preheated, carefully (using oven mitts!) remove the hot Dutch oven, gently place the shaped dough into it (lined with parchment paper if preferred), replace the lid, and bake for 30 minutes. Then, remove the lid and continue baking for an additional 15-20 minutes until golden brown. The preheated Dutch oven helps achieve an even crisper crust.
Can I use a different type of yeast?
While this recipe specifically calls for active dry yeast, you can also use instant yeast. If using instant yeast, you can typically mix it directly with the dry ingredients without prior activation in water. However, always refer to the yeast package instructions, as specific brands might have slightly different recommendations.
Why is it important to scoop and level off the flour?
For best results, especially when beginning, scoop flour into your measuring cup and then level it off with a straight edge (like the back of a knife) rather than scooping directly from the bag. This method ensures more precise measurements, preventing you from inadvertently adding too much flour, which can lead to a dense, dry loaf.
Can I use aluminum foil instead of a dish lid for baking?
While a tight-fitting lid is ideal for trapping steam, heavy-duty aluminum foil can serve as a substitute. Ensure it’s crimped tightly around the rim of your baking dish to create a good seal, mimicking the effect of a lid. I have not explicitly tested this, but it should work in a pinch.
Can I use whole-wheat flour instead of all-purpose flour?
Yes, you certainly can! Whole-wheat flour will yield a denser loaf with a more pronounced, nutty flavor and increased nutritional value. You might find that whole wheat flour absorbs a bit more water, so be prepared to adjust the liquid slightly to achieve the correct sticky dough consistency.
Can I make a gluten-free version of this recipe?
Absolutely! You can use a 1-to-1 gluten-free flour blend specifically designed for baking. Be aware that gluten-free flours behave differently, so the dough’s texture might vary slightly. Alternatively, you can refer to my dedicated No-Knead Gluten-Free Bread recipe for optimized instructions.
How long should the dough rest?
The dough should rest for a minimum of 5 hours at room temperature, but a longer rest (8-18 hours or even overnight) is highly recommended. The extended fermentation time is crucial for developing complex flavors and a superior texture in no-knead bread. Ensure the dough rests in a warm, draft-free environment.
How does temperature affect the dough’s rising time?
Ambient temperature significantly impacts rising time. In warmer climates or during hot summer months, the dough may rise much faster. To prevent over-proofing, I advise placing it in a cooler room or limiting the initial rise to a maximum of 2 to 3 hours. Once the dough has visibly doubled or tripled in size and appears bubbly, it should be baked immediately to avoid deflation and a less desirable texture.
Can I use this recipe at higher altitudes?
Baking at higher altitudes often requires adjustments to recipes due to differences in air pressure and humidity. This specific recipe has not been extensively tested at higher altitudes, so adjustments to flour-to-liquid ratios, yeast amounts, or rising times may be necessary. It’s often a process of trial and error to find the perfect balance in such conditions.
What should the consistency of the dough be like?
The dough’s consistency is key for no-knead success. It should be neither watery nor overly dry. Aim for a thick, shaggy, and very sticky consistency. It will be challenging to handle with bare hands until floured, but this high hydration is what contributes to the bread’s open, airy crumb and chewy texture. Resist the urge to add too much flour during the initial mixing phase.
No Knead Olive Bread
This No-Knead Olive Bread is the epitome of rustic baking: crispy on the outside, warm, soft, and chewy on the inside. Inspired by my Bulgarian grandma’s “peasant bread,” it requires no complex measurements or kneading, making homemade bread accessible and delicious for everyone.
Course: Bread
Cuisine: American, Bulgarian
Makes: 10 Slices
Author: The Modern Nonna
Prep Time: 5 minutes
Cook Time: 1 hour
Resting Time: 5 hours
Total Time: 6 hours 5 minutes
Equipment
- Mixing Bowls
- Corning Ware Dish (or Dutch Oven)
- Measuring Cups + Spoons
- Parchment paper
Ingredients
- 3 cups all-purpose flour
- 1 teaspoon salt
- ½ teaspoon active dry yeast
- 1 ¾ cups warm water (100-110°F / 37-43°C)
- ½ cup chopped pitted olives (Kalamata or green work well)
- Additional flour for dusting the counter and the top of the bread
Instructions
- In a large mixing bowl, combine the all-purpose flour, salt, and active dry yeast. Stir well to combine. Add the chopped olives and mix them into the dry ingredients.
- Pour in the warm water (ensure it’s between 100-110°F or 37-43°C to activate the yeast properly). Mix with a spatula or wooden spoon until all ingredients are just combined and form a sticky, shaggy dough. Do not knead.
- Cover the bowl tightly with plastic wrap or a clean kitchen towel. Let the dough rest at room temperature in a draft-free place (like a cold oven or microwave) for at least 5 hours, or preferably overnight (8-18 hours). The dough should significantly rise and appear bubbly.
- Once the dough has tripled in size, generously flour your countertop or work surface. Gently scrape the dough out of the bowl onto the floured surface. Sprinkle the top of the dough generously with more flour.
- With floured hands, gently shape the dough into a round or oval loaf. Do NOT knead it. Just lightly manipulate it until it holds a cohesive shape. If it sticks, add a little more flour to your hands and the surface.
- Line an oven-safe baking dish (with a lid) with parchment paper. Carefully transfer the shaped dough into the prepared dish. Place the lid on the dish.
- Place the covered dish into a COLD oven (do not preheat). Turn the oven on to 450°F (230°C). Bake with the lid on for 30 minutes.
- After 30 minutes, carefully remove the hot lid. Continue baking for an additional 25-30 minutes, or until the bread is deeply golden brown and sounds hollow when tapped on the bottom. Baking times may vary depending on your oven.
- Remove the bread from the oven and transfer it to a wire rack to cool for at least 15-20 minutes before slicing. This allows the internal structure to set.
- To store leftover bread, ensure it has cooled completely. Wrap it tightly in plastic wrap, beeswax wrap, or a clean kitchen towel and store it at room temperature. This bread is always best served warm the same day it’s baked.
Notes
Ensure your yeast is fresh and active. If in doubt, perform a quick yeast test by dissolving a small amount in warm water to check for foam.
Nutrition
Carbohydrates: 29g,
Protein: 4g,
Fat: 1g,
Saturated Fat: 0.2g,
Polyunsaturated Fat: 0.2g,
Monounsaturated Fat: 1g,
Sodium: 341mg,
Potassium: 44mg,
Fiber: 1g,
Sugar: 0.1g,
Vitamin A: 27IU,
Calcium: 11mg,
Iron: 2mg
Nutrition information is automatically calculated, so should only be used as an approximation.
Course: Bread
Cuisine: American, Bulgarian