
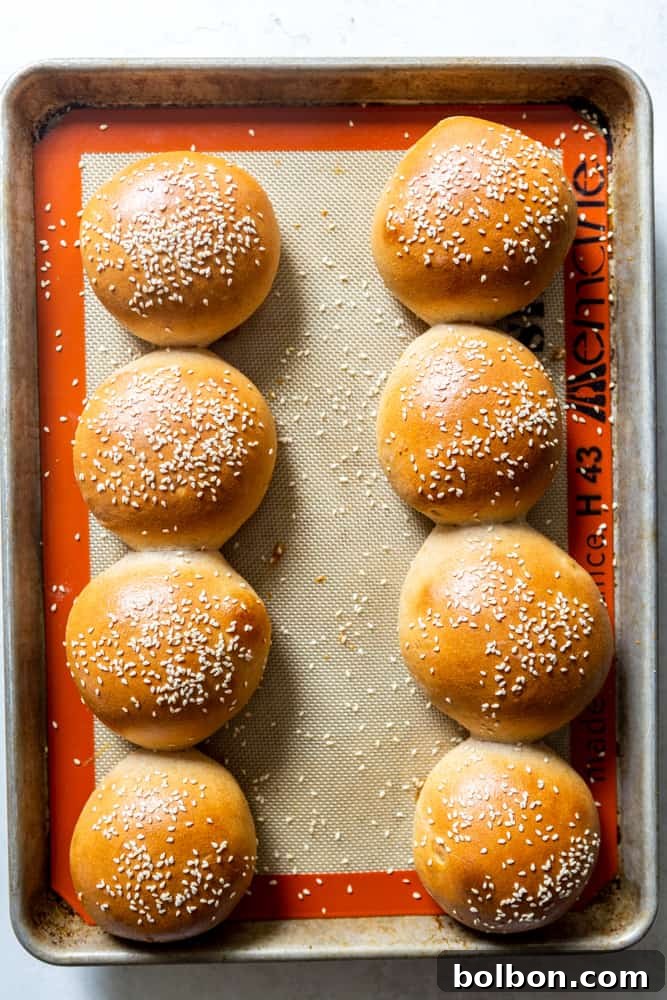
Unlock the secret to the ultimate burger experience with these incredible homemade whole wheat hamburger buns. Soft, irresistibly fluffy, and packed with delightful flavor, these buns are a game-changer for any burger night. Beyond their mouth-watering taste, they offer the wholesome goodness of whole grains, making your favorite meal a little healthier. Forget the bland, store-bought alternatives; crafting your own burger buns from scratch is surprisingly easy and can be accomplished in just a few hours, transforming your everyday meals into extraordinary culinary moments.
Elevate Your Burgers with a Healthier Homemade Bun
There’s nothing quite like a juicy, perfectly grilled cheeseburger. But what truly elevates this classic dish from good to absolutely phenomenal is the bun it’s served on. While many turn to quick solutions, our quest for the perfect burger led us to develop a healthier, homemade alternative that doesn’t compromise on taste or texture. For years, a speedy 40-minute hamburger bun recipe was our go-to, but the desire for a more nutritious option sparked a new culinary adventure: creating the ultimate whole wheat burger bun. After numerous rounds of testing and tweaking, we perfected this recipe to ensure it consistently delivers soft, fluffy results, all while enriching your meal with the fiber and benefits of whole grains.
Opting for whole wheat isn’t just a trend; it’s a choice for enhanced nutrition. Unlike refined white flour, whole wheat flour retains the bran and germ of the wheat kernel, which are rich in dietary fiber, B vitamins, iron, magnesium, and other essential nutrients. This means that with every bite of these delicious buns, you’re not just enjoying incredible flavor and texture, but also contributing positively to your digestive health and overall well-being. These buns prove that healthy eating can be incredibly satisfying and delicious, making them a staple in any health-conscious kitchen.
Mastering the Art of Healthy Whole Wheat Hamburger Buns
Baking with yeast might seem daunting at first, especially for novice bakers. However, with a few key tips and a careful approach, you’ll be creating fluffy, golden-brown homemade hamburger buns with confidence and ease. We’ll walk you through each stage of the process, ensuring you understand not just what to do, but why each step is important for achieving perfect results. Pay close attention to the visual cues throughout this guide, as they will serve as your best indicators of progress.
- Activate the Yeast (Bloooming): This crucial first step ensures your yeast is alive and ready to make your buns light and airy. Begin by combining lukewarm milk (ideally around 100-110 degrees F, or just warm to the touch—too hot will kill the yeast, too cold won’t activate it), a touch of honey, and Dry Active Yeast in a bowl. Gently stir the mixture, then let it rest for 5 to 10 minutes. During this time, the yeast will “bloom” – you should observe the mixture becoming foamy and developing small bubbles on the surface. This bubbly froth is a positive sign of active yeast, indicating it’s ready to work its magic. If your mixture remains flat and lacks foam, it’s likely your yeast is inactive (perhaps old or exposed to incorrect temperatures). In this case, it’s best to discard it, acquire fresh yeast, and start again to guarantee a successful rise.
2. Mixing and Kneading the Dough: Once your yeast is actively bubbling, it’s time to build your dough. Incorporate the oil and egg into the yeast mixture, stirring well to ensure they are fully combined. Next, add both types of flour (whole wheat and all-purpose) and the salt. Mix these ingredients until no dry flour spots are visible and a shaggy dough begins to form. Then, transition to kneading. For optimal texture and ease, knead the dough for about 5 minutes. This dough tends to be quite sticky, which is why a stand mixer equipped with a dough hook is highly recommended, making the process almost effortless. However, if you don’t have a stand mixer, you can absolutely knead by hand; simply be prepared for a slightly stickier experience. The key here is not to be tempted to add excessive amounts of additional flour, as this can result in dense, heavy buns rather than the light, airy texture we’re aiming for. Use just enough flour on your kneading surface and hands to prevent sticking. After kneading, transfer the dough to a lightly oiled bowl, turning it once to coat, then cover it tightly with plastic wrap. Allow the dough to rise at room temperature for 1-2 hours, or until it has visibly doubled in size. A warm, draft-free environment will encourage a faster, more robust rise.
3. Shaping the Buns: Once your dough has majestically doubled in size, gently remove it from the bowl and place it onto a lightly floured surface. Turn the dough once or twice to lightly coat it in flour, making it less sticky and easier to manage. Carefully pat or roll the dough into a uniform disk. Now, with precision, cut the disk into 8 equal pieces. For the most consistent bun size, a bench scraper is an invaluable tool for this step, allowing for clean, even divisions. If you don’t have one, a sharp knife will also work effectively. Take each individual piece of dough and meticulously form it into a smooth, round ball. The goal is to create a taut surface on top and pinch the seams together at the bottom. Place these beautifully shaped dough balls onto a baking sheet that has been lined with either parchment paper or a silpat baking mat, ensuring the seam side is facing down. This creates a smooth top for your finished buns.
4. Second Rise and Baking: Once the buns are neatly arranged on the baking sheet, lightly press down on the top of each bun with the palm of your hand to slightly flatten them into the traditional burger bun shape. This gentle flattening helps prevent them from becoming too dome-like. Cover the baking sheet with a clean kitchen towel and allow the buns to undergo their second rise for approximately one hour. During this period, the buns should visibly puff up, becoming soft and airy. While they are proofing, preheat your oven to 375 degrees F (190 degrees C). Just before baking, prepare an egg wash by whisking one large egg with a tablespoon of water in a small bowl. Gently brush this egg wash over the tops of each puffed bun. This wash will give your buns a beautiful golden sheen and act as a glue for toppings. Sprinkle generously with sesame seeds for that classic look and an added nutty flavor. Finally, bake the buns for 15-18 minutes, or until they achieve a gorgeous golden brown color. The aroma filling your kitchen will be incredible!
Why Choose Whole Wheat for Your Burger Buns?
Beyond the undeniable satisfaction of homemade bread, choosing whole wheat flour for your hamburger buns brings a multitude of health advantages. Whole wheat flour contains the entire wheat kernel—bran, germ, and endosperm—unlike refined white flour, which only uses the endosperm. This comprehensive composition means you’re getting all the natural goodness that wheat has to offer.
Firstly, the fiber content in whole wheat is significantly higher. Dietary fiber is crucial for digestive health, aiding in regular bowel movements and preventing constipation. It also contributes to satiety, helping you feel fuller for longer, which can be beneficial for weight management. Moreover, fiber plays a role in regulating blood sugar levels, preventing the sharp spikes and crashes often associated with refined carbohydrates. Regularly consuming whole grains like whole wheat can also lower the risk of heart disease, type 2 diabetes, and certain cancers.
Secondly, whole wheat flour is a richer source of essential vitamins and minerals. It provides B vitamins (like niacin, thiamine, and folate) vital for energy metabolism, iron for oxygen transport, magnesium for muscle and nerve function, and selenium, an important antioxidant. While white flour is often enriched, these nutrients are added back, whereas in whole wheat, they occur naturally.
Finally, the complex carbohydrates in whole wheat provide sustained energy, unlike simple sugars that lead to a quick burst and then a slump. This makes whole wheat buns a more nourishing choice, powering you through your day long after your burger is gone. Embracing these whole wheat hamburger buns means choosing a more wholesome, flavorful, and energizing foundation for your favorite burger or sandwich.
Helpful Equipment for Baking Fluffy Whole Wheat Burger Buns
Having the right tools can make all the difference in your baking journey, especially when working with yeast dough. While some steps can be done by hand, certain equipment can greatly simplify the process and ensure more consistent results for your easy whole wheat hamburger buns:
- Stand Mixer: An absolute lifesaver for sticky doughs like this one. The dough hook attachment kneads the dough efficiently, developing gluten without the mess or effort of hand-kneading. It ensures even mixing and proper gluten development, crucial for light, fluffy buns.
- Baking Sheet: A sturdy, heavy-gauge baking sheet promotes even heat distribution, preventing the bottoms of your buns from burning while the tops are still pale.
- Silpat Baking Mat or Parchment Paper: These non-stick surfaces are essential for preventing your buns from sticking to the baking sheet, ensuring easy removal and a perfectly shaped base. Silpat mats are reusable and a great eco-friendly investment.
- Bench Scraper: While not strictly essential, a bench scraper is incredibly useful for dividing dough evenly and for cleaning up your work surface. It helps in creating uniform bun sizes, leading to a more professional-looking batch.
- Pastry Brush: Perfect for applying the egg wash to your buns, giving them that beautiful golden sheen and helping the sesame seeds adhere. A soft-bristled brush ensures an even, delicate coating.
Tips for Baking Perfect Whole Wheat Hamburger Buns Every Time
Achieving bakery-quality whole wheat hamburger buns at home is entirely possible with a few expert tips. These insights will help you navigate the nuances of yeast baking and ensure your buns are consistently soft, fluffy, and delicious.
- Accurate Ingredient Measurement: For baking, especially with yeast, precision is key. While cup measurements are provided, using a kitchen scale to measure flour and liquids by weight (grams) offers the most accurate results. This prevents issues like adding too much flour, which can lead to dense buns.
- Yeast Temperature is Crucial: The milk used for blooming yeast must be lukewarm, not hot or cold. Too hot will kill the yeast, rendering it inactive, while too cold will prevent it from activating properly. Aim for 100-110°F (38-43°C), which feels like warm bathwater.
- Don’t Skimp on Kneading: Kneading develops the gluten in the flour, which is what gives bread its structure and chewiness. Even if the dough feels sticky, resist the urge to add too much extra flour. A sticky dough is often a sign of proper hydration. Continue kneading for the recommended time; the dough will become smoother and more elastic.
- The Perfect Proofing Environment: Yeast dough loves warmth and humidity. A warm, draft-free spot is ideal for rising. If your kitchen is cool, you can create a makeshift proofing box by placing the covered bowl in a slightly warm (but turned off) oven with a bowl of hot water inside, or near a sunny window.
- Gentle Handling: Once the dough has risen, handle it gently to avoid deflating all the precious air bubbles. When shaping, try to maintain as much of the airy texture as possible.
- Even Shaping for Even Baking: Take the time to shape each bun into an even ball. Uniform sizes will ensure all buns bake at the same rate, preventing some from over-browning while others are underdone.
- Egg Wash Benefits: The egg wash not only provides a beautiful golden-brown color and a slight sheen but also helps any toppings, like sesame seeds, adhere securely to the buns during baking.
- Cooling is Essential: While it’s tempting to tear into a warm bun straight from the oven, allowing them to cool completely (or at least mostly) before slicing and serving is important. This allows the internal structure to set, preventing a gummy texture.
Customizing Your Whole Wheat Burger Buns
While the classic whole wheat hamburger bun is undeniably delicious, there’s plenty of room for creativity to make them uniquely yours. Experimenting with different additions can add exciting new dimensions of flavor and texture to your homemade burger buns, perfectly complementing various burger recipes or sandwich fillings.
- Seed Variations: Beyond sesame seeds, consider poppy seeds, black sesame seeds, or a blend of “everything bagel” seasoning for a gourmet touch. Sprinkle them on before baking, after applying the egg wash.
- Herb Infusion: Incorporate dried herbs into the dough during the mixing stage. A teaspoon of dried oregano, basil, or a blend of Italian herbs can add a savory depth, perfect for Italian-inspired burgers or chicken sandwiches.
- Sweetness Adjustment: While honey adds a lovely subtle sweetness and aids yeast activation, you can adjust the amount slightly. For a sweeter bun, suitable for pulled pork or BBQ chicken sandwiches, add an extra teaspoon of honey or a sprinkle of brown sugar.
- Cheese Please: For a truly decadent bun, fold in a quarter cup of shredded cheddar or Parmesan cheese during the last minute of kneading. The cheese will melt into pockets of savory goodness, especially delicious with beef burgers.
- Garlic & Onion: A teaspoon of garlic powder or onion powder (or both!) can transform these into incredibly aromatic buns, ideal for any savory filling.
- Texture Boost with Grains: For an even heartier texture and more nutritional boost, try adding a tablespoon or two of quick oats or flax seeds to the dough.
These simple modifications allow you to tailor your whole wheat hamburger buns to any occasion or personal preference, ensuring that every bite is not just good, but perfectly aligned with your culinary vision.
What Goes Well with Homemade Whole Wheat Burger Buns?
These versatile whole wheat hamburger buns are not just for traditional beef burgers! Their soft texture and wholesome flavor make them the perfect canvas for a wide array of delicious fillings and side dishes. Here are some fantastic pairings to inspire your next meal:
- Juicy Turkey Burger: A lighter, yet equally satisfying option that pairs beautifully with the whole grain goodness of the buns.
- Grilled BBQ Burger: The hearty bun stands up wonderfully to the rich and tangy flavors of a BBQ-infused burger.
- Asian Bison Burger: A unique and flavorful choice, where the mild sweetness of the bun complements the exotic spices.
- Baked Sweet Potato Fries: A healthier and delicious side dish that offers a contrasting sweetness and crisp texture.
- Watermelon Feta Salad: A refreshing and light salad that provides a perfect balance to the richness of a burger.
- Summer Corn Salad: A vibrant and flavorful side, adding a touch of seasonal freshness to your meal.
- Pulled Pork or Chicken Sandwiches: The sturdiness of these buns makes them ideal for soaking up flavorful sauces without falling apart.
- Veggie Burgers: A fantastic foundation for plant-based patties, offering a satisfying bite and texture.
- Grilled Chicken Sandwiches: Elevate a simple grilled chicken breast with these homemade buns, adding a touch of gourmet to your meal.
Storage and Freezing Instructions
One of the many benefits of making your own whole wheat hamburger buns is having a fresh supply whenever the craving strikes. Proper storage ensures your hard work pays off for days or even months.
- At Room Temperature: Once completely cooled, store your buns in an airtight container or a large zip-top bag at room temperature for up to 3-4 days. While they are at their absolute best on the day they are baked, they retain excellent quality for a few days.
- Refrigeration: While it might seem intuitive, refrigerating bread can actually cause it to go stale faster due to a process called retrogradation of starches. It’s generally not recommended for short-term storage.
- Freezing for Long-Term: For longer storage, freezing is an excellent option. Once the buns have cooled completely, place them in a single layer on a baking sheet and freeze until solid (about 1-2 hours). This prevents them from sticking together. Then, transfer the frozen buns to a freezer-safe zip-top bag, removing as much air as possible to prevent freezer burn. They can be frozen for up to 6 months.
- Reheating from Frozen: To enjoy frozen buns, simply remove them from the freezer and allow them to thaw at room temperature for a couple of hours. For best results, once thawed, you can lightly toast them in a toaster oven, a regular oven (at 350°F for 5-7 minutes), or even on a grill for a few minutes until warmed through and slightly crisp. This brings back much of their fresh-baked goodness.
Having a stash of these healthy homemade buns in your freezer means you’re always just minutes away from a fantastic burger or sandwich, even on busy weeknights.
Troubleshooting Common Whole Wheat Baking Issues
Baking with yeast, especially whole wheat, can sometimes present challenges. Don’t be discouraged if things don’t go perfectly on your first try! Here’s how to troubleshoot some common issues:
- Yeast Didn’t Bloom: If your yeast mixture didn’t become foamy, your yeast might be expired, the milk was too hot (killed the yeast) or too cold (didn’t activate it). Discard the mixture and start again with fresh yeast and milk at the correct lukewarm temperature (100-110°F).
- Dough Didn’t Rise: This is usually related to inactive yeast or a too-cold environment. Ensure your yeast bloomed correctly. If it did, check your proofing spot; it might be too cold. Try moving the dough to a warmer location, or use a warm (turned off) oven trick mentioned earlier. Be patient, whole wheat dough can sometimes take a bit longer to rise than white flour dough.
- Buns Are Dense/Heavy: This is a common issue with whole wheat bread. It usually happens for a few reasons:
- Too much flour: Resist adding excessive flour during kneading, even if the dough is sticky. Sticky dough is often well-hydrated.
- Insufficient kneading: Gluten development is key for a light texture. Ensure you knead for the full recommended time.
- Under-proofing: If the dough didn’t rise enough, the buns will be dense. Give it more time in a warm spot.
- Over-proofing: Conversely, if the dough rises too much and then collapses, it can also lead to a dense texture because all the gas has escaped.
- Buns Are Dry: This can be due to baking them for too long or at too high a temperature. Keep an eye on the oven; buns should be golden brown, not dark brown.
- Buns Collapsed After Baking: This might indicate over-proofing or that the buns weren’t baked through. Ensure they pass the “tap test” (sound hollow when tapped on the bottom) before removing from the oven.
Practice makes perfect in baking. Each attempt teaches you more about how your ingredients behave and how your kitchen environment affects the process. Don’t be afraid to experiment and adjust!
Whole Wheat Hamburger Buns
By Meghan McMorrow | Fox and Briar
Servings: 8 Buns

Ingredients
Main Dough
- 200 grams Whole Wheat Flour (approximately 1.5 cups plus 1 tablespoon)
- 200 grams All-Purpose Flour (approximately 1 and 1/3 cup plus 1 tablespoon)
- 300 grams milk, lukewarm (100-110 degrees F) (about 1 and 1/4 cup)
- 14 grams canola oil (1 tablespoon)
- 1 large egg
- 21 grams honey (1 tablespoon)
- 9 grams kosher salt (1 and a half teaspoons)
- 7 grams active dry yeast (1 packet or 2 and 1/4 teaspoons)
Egg Wash
- 1 large egg, beaten
- 1 tablespoon water
Topping
- Sesame seeds
Instructions
- In a large bowl, combine the lukewarm milk, honey, and yeast. Stir gently to mix, then let the mixture sit for 5 to 10 minutes until it becomes frothy and bubbly, indicating the yeast is active.
- Once the yeast is bloomed, whisk in the oil and the large egg until well combined. Gradually add both the whole wheat and all-purpose flours, along with the kosher salt. Mix until a soft, shaggy dough forms and no dry spots of flour remain.
- Knead the dough for 5 minutes. This dough is naturally sticky, so using a stand mixer with a dough hook is highly recommended. If kneading by hand, use as little flour as possible on your work surface and hands to prevent the buns from becoming dense. The dough should be soft and slightly tacky.
- After kneading, lightly oil a clean bowl and place the dough inside, turning it once to coat. Cover the bowl tightly with plastic wrap or a clean kitchen towel. Allow the dough to rise at room temperature for 1-2 hours, or until it has visibly doubled in size.
- Once the dough has doubled, gently remove it from the bowl onto a lightly floured surface. Turn the dough once or twice to lightly coat it, making it easier to handle. Form the dough into a disk, then use a bench scraper or a sharp knife to cut it into 8 equal pieces.
- Take each piece of dough and shape it into a smooth, round ball. Place these dough balls onto a baking sheet lined with parchment paper or a silicone baking mat, ensuring the seam side is down.
- Lightly press down on the top of each bun with your palm to flatten them slightly. Cover the baking sheet with a clean kitchen towel and allow the buns to rise for a second time, for about one hour, or until they look noticeably puffy.
- During the last 15-20 minutes of the second rise, preheat your oven to 375 degrees F (190 degrees C). In a small bowl, whisk together the beaten egg with 1 tablespoon of water to create an egg wash.
- Gently brush the tops of the puffed buns with the egg wash, then generously sprinkle with sesame seeds.
- Bake the buns in the preheated oven for 15-18 minutes, or until they are beautifully golden brown on top and sound hollow when tapped on the bottom.
- Remove the baking sheet from the oven and transfer the buns to a wire rack to cool completely before slicing and serving.
Notes
Allow buns to cool completely before slicing. This helps the internal structure set and prevents a gummy texture.
These homemade whole wheat hamburger buns will keep for 3-4 days at room temperature when stored in an airtight container. For longer storage, they can be frozen for up to 6 months. Thaw at room temperature and refresh with a quick toast for best results.
Nutrition
Serving: 1 bun | Calories: 244kcal | Carbohydrates: 42g | Protein: 9g | Fat: 5g | Saturated Fat: 1g | Polyunsaturated Fat: 1g | Monounsaturated Fat: 2g | Trans Fat: 0.01g | Cholesterol: 46mg | Sodium: 468mg | Potassium: 201mg | Fiber: 4g | Sugar: 5g | Vitamin A: 125IU | Vitamin C: 0.02mg | Calcium: 67mg | Iron: 2mg
Nutrition information is automatically calculated, so should only be used as an approximation.
Did you like this recipe?
Please comment, rate, and share! And don’t forget to tag me on Instagram @foxandbriar AND #foxandbriar so I can see what you made!