
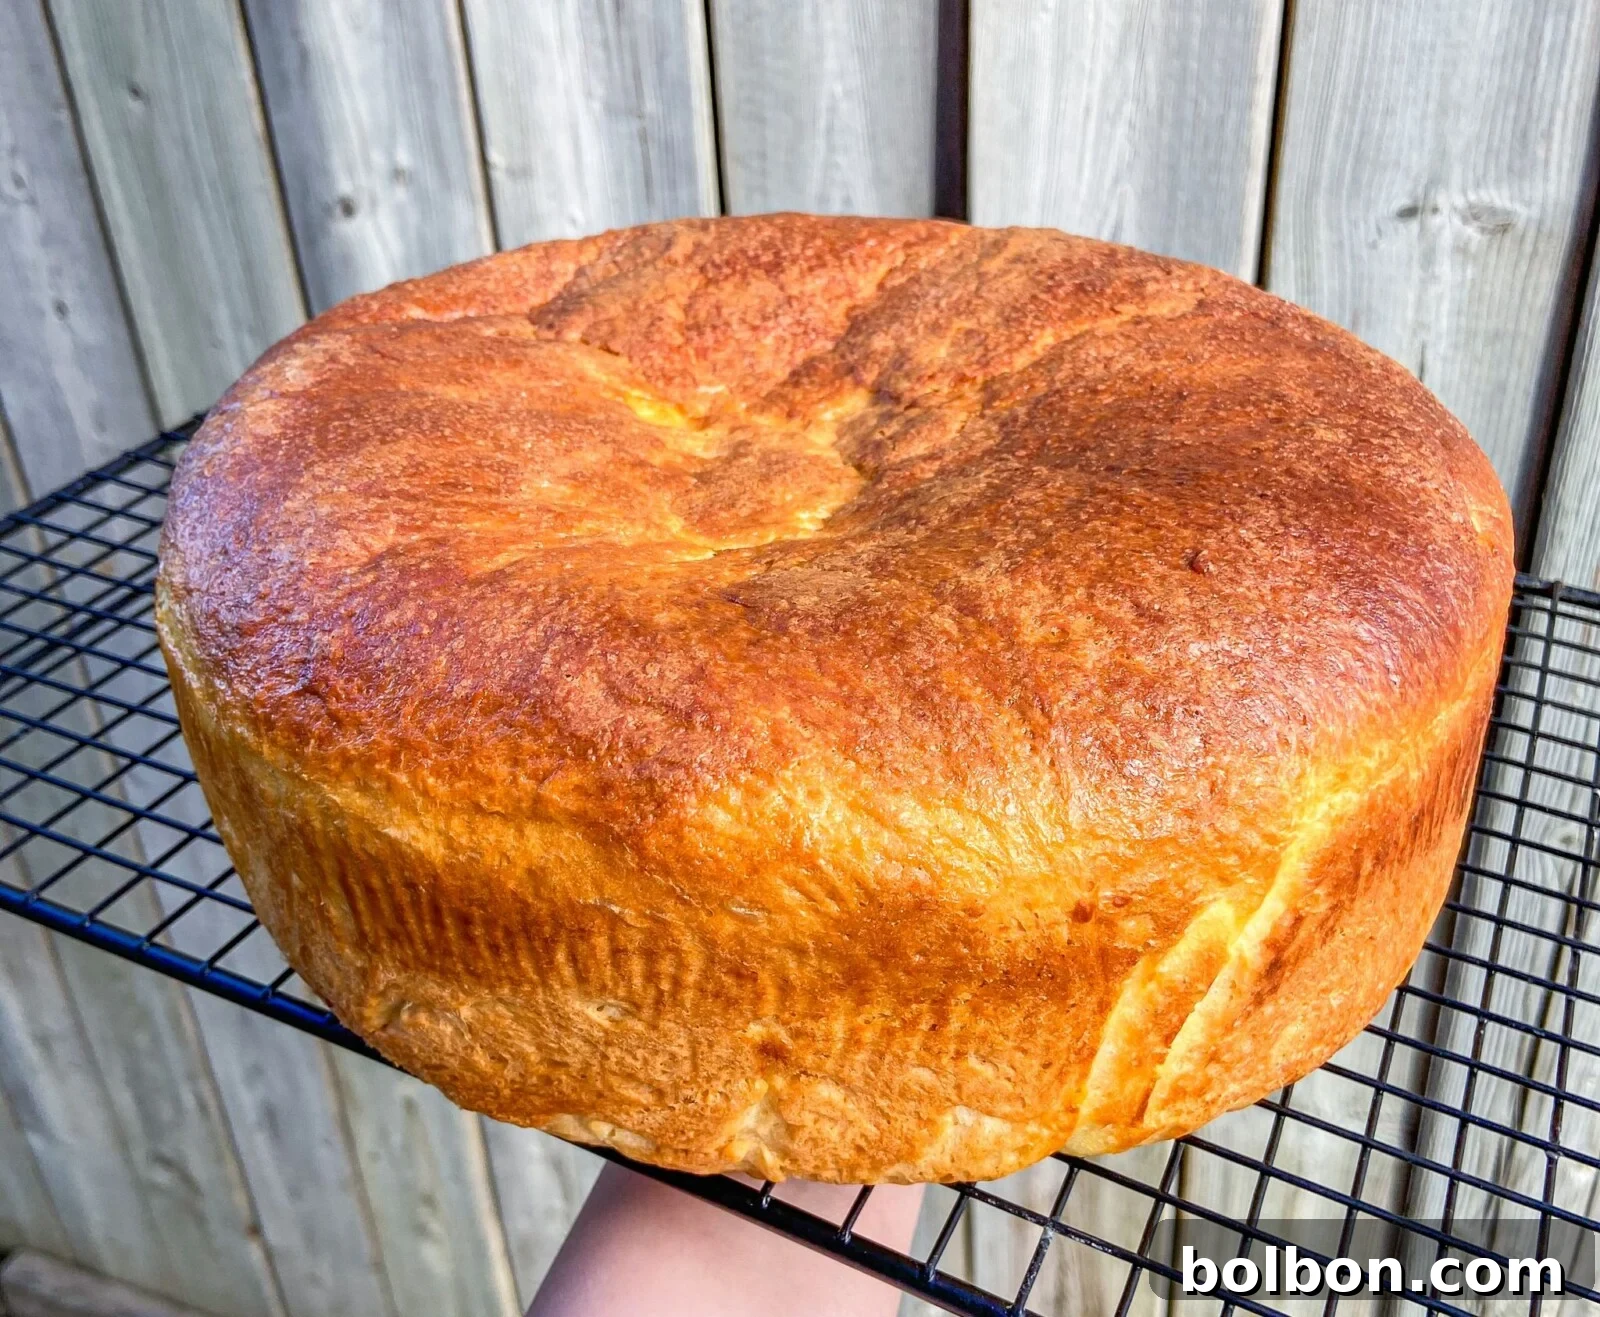
Homemade Portuguese Sweet Bread (Massa Sovada): A Fluffy, Lemony Delight
Journey into the heart of traditional baking with this cherished recipe for Portuguese Sweet Bread, known affectionately as Massa Sovada. Across countless cultures, sweet bread holds a special place, often reserved for holidays or shared as a comforting treat. This particular recipe offers my interpretation of this beloved Portuguese classic: a bread that is incredibly fluffy, delicately sweet, and imbued with a subtle citrus note from fresh lemon zest. It’s remarkably versatile, pairing wonderfully with a morning coffee, a dollop of plain yogurt (a nod to how we enjoy it in Bulgaria), or even transformed into decadent French toast the following day. This recipe focuses on creating a beautifully rounded, unbraided loaf. Should you prefer the elegance of a braided sweet bread, I invite you to explore my other sweet Easter bread recipe.
Baking homemade sweet bread is more than just following steps; it’s an experience that fills your kitchen with an irresistible aroma and your soul with warmth. This Massa Sovada recipe makes it accessible for bakers of all levels, promising a truly delicious result that will become a family favorite.
Why You’ll Adore This Portuguese Sweet Bread Recipe
There’s an undeniable charm in traditional recipes like Portuguese Sweet Bread that have been lovingly passed down through generations. These culinary legacies are often classics for good reason, embodying simplicity, using humble ingredients, and employing tried-and-true techniques that, with a little practice, anyone can master. This Massa Sovada recipe is a testament to that timeless appeal.
What truly sets this sweet bread apart is its exquisite texture – a beautifully tender crumb that practically melts in your mouth. Coupled with a delicate, subtle sweetness perfectly balanced by the bright, aromatic zest of fresh lemon, it creates a flavor profile that is both comforting and captivating. It’s not overwhelmingly sugary, making it adaptable for various meal times and pairings. The act of baking this bread itself is a joyful process, transforming simple ingredients into something extraordinary. Imagine the enticing scent wafting through your home as it bakes, promising a delightful culinary experience that nourishes both body and spirit.
This recipe celebrates the art of slow baking, allowing the yeast to develop and the dough to rise, resulting in a bread that is not just food, but a labor of love. It’s a versatile canvas for your culinary imagination, ready to be enjoyed in countless ways, making it a staple you’ll want to bake again and again.
Mastering the Art of Portuguese Sweet Bread: A Step-by-Step Guide
Crafting this delicious Portuguese Sweet Bread is a rewarding experience. Follow these detailed steps to achieve a perfectly fluffy and flavorful loaf:
- Activate the Yeast: In the bowl of your stand mixer, combine the active dry yeast, warm water (ensure it’s around 105-115°F / 40-46°C – too hot will kill the yeast, too cold won’t activate it), and a teaspoon of sugar. Stir gently, then allow this mixture to rest for 5 to 10 minutes. You’re looking for a foamy, bubbly layer to form on the surface, indicating the yeast is active and alive. If no foam appears, your yeast may be expired or the water temperature was off; you’ll need to discard it and restart with fresh yeast.
- Prepare the Liquids: While your yeast is activating, gently warm the butter and milk in a pot over low heat on the stove. The goal is to make it lukewarm, not hot. It should be warm to the touch but not scalding, as excessive heat will kill the yeast.
- Combine Wet Ingredients: Once your yeast mixture is beautifully foamy, indicating full activation, add the avocado oil, the vibrant zest of one lemon, the remaining sugar, vanilla extract, and three room-temperature eggs to the stand mixer bowl. Room temperature eggs integrate more smoothly and contribute to a better rise.
- Incorporate Warm Milk and Butter: With the mixer on low speed, slowly whisk in the warm butter and milk mixture. Ensure everything is well combined.
- Gradually Add Flour: Begin adding the all-purpose flour, one cup at a time, to the mixture. Continue adding flour gradually until you’ve incorporated approximately 6 cups. The exact amount can vary slightly depending on factors like humidity and the size of your eggs. Pay close attention to the dough’s consistency: it should become cohesive and begin to pull away cleanly from the sides of the bowl, feeling tacky but not excessively sticky. Avoid the urge to add too much flour, as this can result in a dense, dry bread.
- Shape the Dough: Lightly oil your hands to prevent sticking. Carefully remove the dough from the bowl and gently shape it into a smooth, round ball. Return the dough ball to the clean stand mixer bowl (or another large bowl).
- First Rise (Bulk Fermentation): Cover the bowl with a clean kitchen towel or plastic wrap. Place it in a warm, draft-free spot in your kitchen to rise for approximately 2 hours. A warm environment helps the yeast work efficiently. The dough should significantly increase in size, roughly doubling.
- Divide and Shape Loaves: Once the dough has risen beautifully, gently punch it down to release the air. Turn it out onto a lightly floured surface and divide it into two equal halves. Shape each half into a smooth, round ball.
- Prepare for Second Rise: Line two baking dishes (approximately 10 inches round, or any similar size you have) with parchment paper. Carefully place one shaped dough ball into each prepared dish.
- Second Rise (Proofing): Cover the sweet bread loaves again with a clean kitchen towel or plastic wrap and allow them to rise for another hour. This second rise, or proofing, ensures a light and airy texture in the final baked bread.
- Egg Wash and Bake: Preheat your oven to 350°F (175°C). In a small bowl, whisk together one egg and one teaspoon of water to create an egg wash. Gently brush the top of each loaf with this egg wash. If desired, sprinkle a little extra sugar on top for a delightful crystalline crust.
- Bake to Golden Perfection: Place the uncovered loaves in the preheated oven and bake for 45 minutes, or until they turn a beautiful golden brown and sound hollow when tapped on the bottom.
- Check for Doneness: For absolute certainty that your loaves are fully baked through, insert an instant-read thermometer into the center of a loaf. The bread is perfectly done when its internal temperature reaches 190°F (88°C).
- Cool and Enjoy: Once baked, remove the bread from the oven and transfer it to a wire rack to cool completely. This step is crucial, as slicing warm bread can lead to a gummy texture.
Nonna’s Baking Wisdom: Tips for Perfect Sweet Bread
While this recipe yields two lovely round loaves, feel free to get creative with your shaping! You can opt to bake one large loaf of bread, which will be impressive and generous. Alternatively, divide the dough into smaller portions to create individual buns, perfect for breakfast or snacks. You could even attempt small braids if you’re feeling adventurous. Remember that the bake time will vary significantly depending on the size and shape of your sweet bread, so it’s always best to rely on an instant-read meat thermometer to accurately check for doneness. Aim for an internal temperature of 190°F (88°C) to ensure your bread is baked through to perfection, regardless of its form.
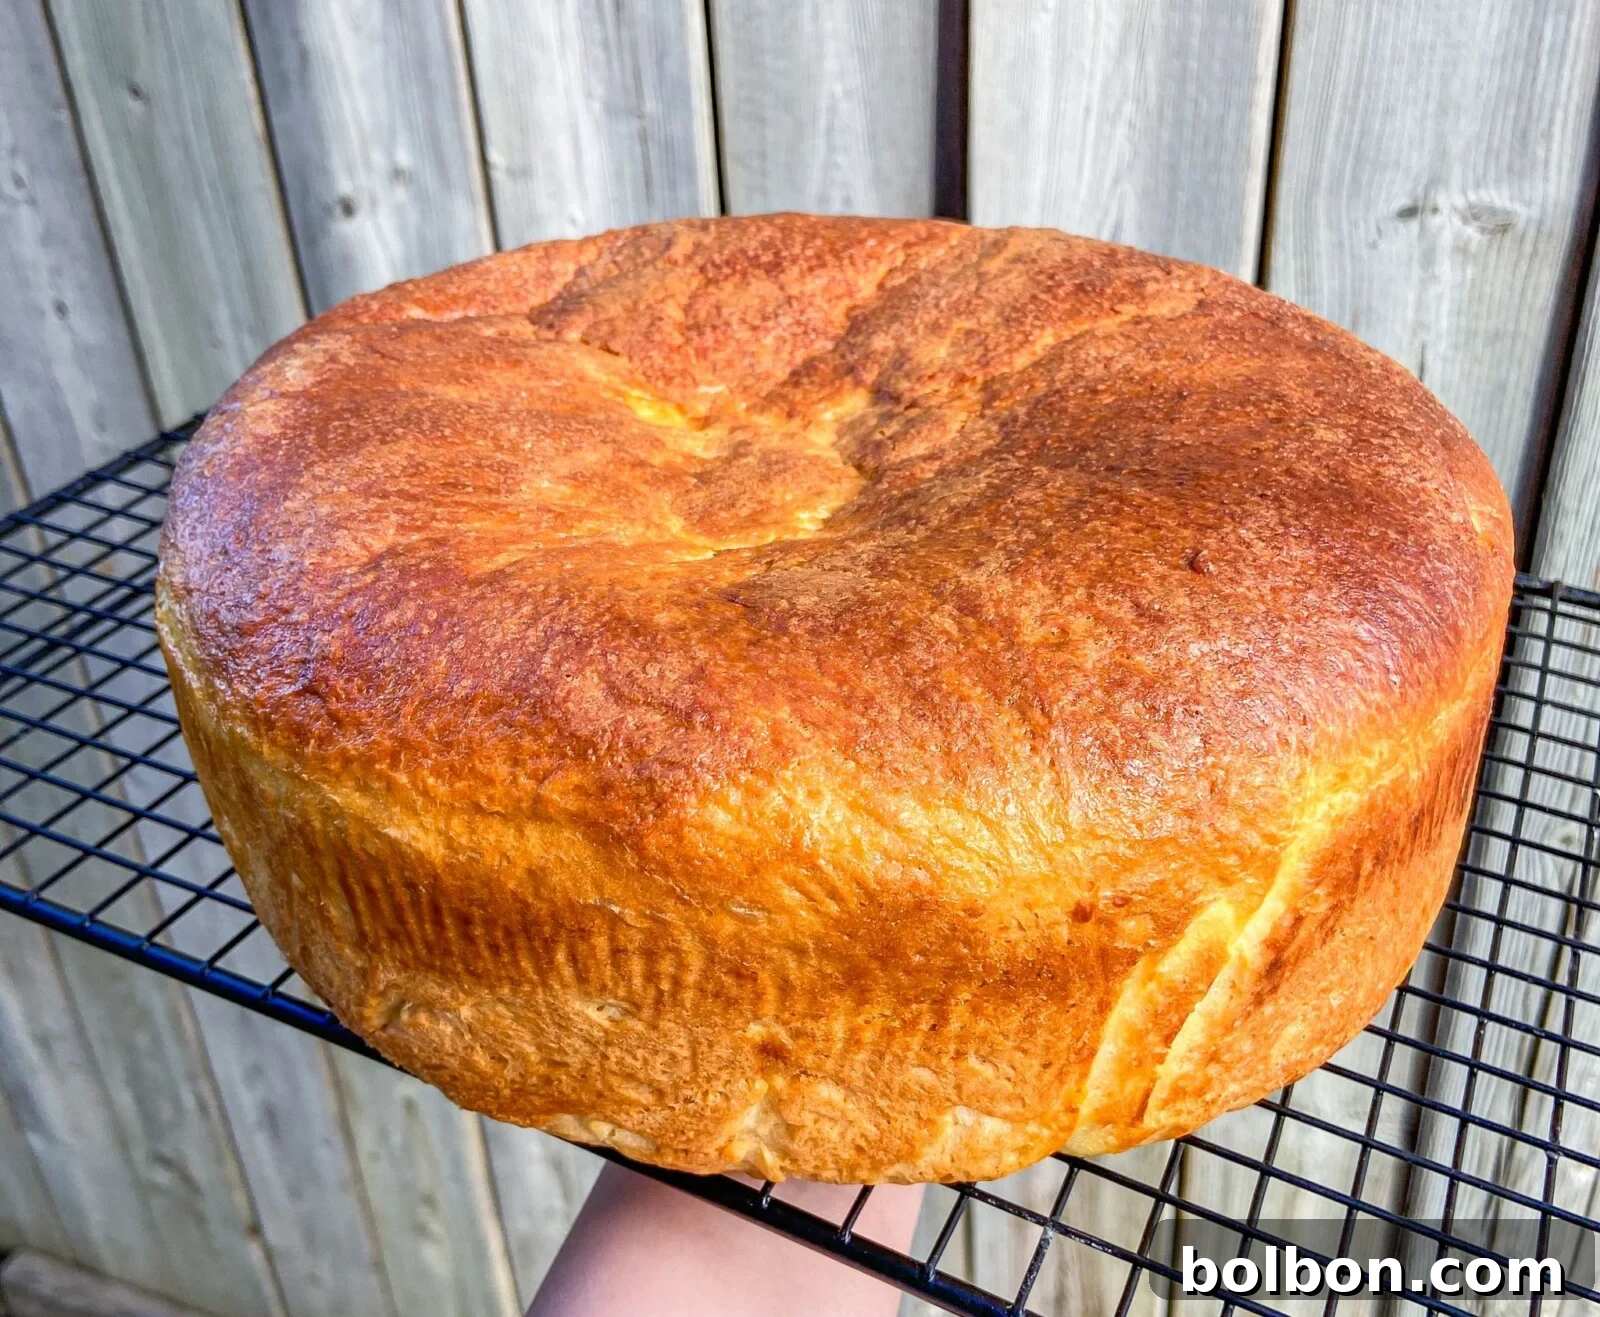
Creative Twists & Adaptations: Variations and Substitutions for Portuguese Sweet Bread
This Portuguese Sweet Bread recipe is wonderfully flexible, allowing for various adaptations to suit your preferences or ingredient availability. Don’t hesitate to experiment and make it your own!
- Instant Yeast for Convenience: If you prefer to streamline your baking process, you can absolutely use instant yeast instead of active dry yeast for this Portuguese Sweet Bread. The beauty of instant yeast is that it does not require proofing; simply add it directly to your dry ingredients along with all the other elements in your mixer, and begin the kneading process. This can shave a few minutes off your prep time while still yielding excellent results.
- Working with Fresh Yeast: For those who appreciate the robust flavor and aroma that fresh yeast imparts, this recipe can be easily adapted. I recommend using approximately 1 tablespoon (around 9-10 grams) of fresh yeast. When using fresh yeast, it’s particularly important to ensure the dough ♨️ rises in a consistently warm spot, completely away from any drafts. A clever trick is to place your covered bread dough in a turned-off oven with the door closed. The residual warmth and enclosed space create an ideal environment for a perfect rise.
- The Art of Hand Kneading: While a stand mixer offers unparalleled convenience, you are more than welcome to knead everything by 🤲 hand if you don’t own a stand mixer. Indeed, hand kneading is the deeply traditional way to make sweet bread, a meditative process that connects you more intimately with your dough. Knead the dough vigorously on a lightly floured surface for 10-15 minutes until it becomes smooth, elastic, and passes the “windowpane test” (where a small piece of dough can be stretched thin enough to see light through it without tearing).
- Exploring Gluten-Free Options: For those with gluten sensitivities or dietary restrictions, a gluten-free flour blend should work as a substitution, though I have not personally tested it with this specific recipe. If you choose to use one, it’s crucial to select a high-quality 1-to-1 gluten-free baking flour blend, as these are formulated to mimic the properties of conventional all-purpose flour. Be aware that gluten-free doughs can sometimes be stickier and may not rise as high or develop the same elastic texture as traditional wheat-based doughs. You might need to adjust the liquid slightly to achieve the right consistency.
- Flavor Enhancements: Beyond lemon zest, consider other aromatic additions. Orange zest can provide a sweeter, less tart citrus note. A pinch of nutmeg or cardamom can add a warm, comforting spice. For a richer bread, you could incorporate dried fruits like golden raisins or chopped apricots during the final kneading stage.
Explore More Delicious Bread Recipes
Sweet Bread with Milk
10 mins
Sweet Easter Bread
2 hrs 45 mins
Easter Bunny Bread
35 mins
Easy Bagel Recipe
30 mins
Elevate Your Meal: Best Ways to Serve Portuguese Sweet Bread
The beauty of Portuguese Sweet Bread lies in its versatility. Its subtle sweetness and tender texture make it a delightful companion for a wide range of meals and occasions. Here are some of the best ways to enjoy your freshly baked Massa Sovada:
- A Perfect After-Dinner Treat: Serve slices of this exquisite sweet bread as a light dessert or an after-dinner treat. It pairs magnificently with a robust cup of freshly brewed coffee, a comforting mug of herbal tea, or even a glass of sweet wine. The bread’s gentle sweetness complements the bitterness of coffee and the subtle notes of tea beautifully.
- Breakfast Bliss: Transform your morning routine with Portuguese Sweet Bread. For a classic and comforting breakfast, serve it toasted or fresh with a generous slather of creamy butter and your favorite fruit jam or marmalade. For an extra touch of indulgence, spread it with clotted cream, cream cheese, or a drizzle of honey. It’s also fantastic alongside a bowl of fresh 🍓 fruit, providing a wonderful contrast in textures and flavors.
- Savory Lunch Companion: Because this Portuguese Sweet Bread isn’t overly sweet, it surprisingly lends itself well to savory pairings, making it an excellent addition to a light lunch. Enjoy it alongside a simple 🥚 scrambled egg, serve it with my flavorful Zucchini Egg Bake, or pair it with an assortment of cold cuts and cheeses for a delightful European-inspired sandwich experience. Its soft crumb provides a lovely balance to rich or salty fillings.
- French Toast Transformation: One of the most cherished ways to enjoy day-old Portuguese Sweet Bread is by turning it into an extraordinary French toast. The slightly denser texture of leftover bread absorbs the custard mixture beautifully, resulting in a rich, custardy interior and a perfectly golden-brown exterior. Serve with maple syrup, fresh berries, and a dusting of powdered sugar for an unforgettable brunch.
Your Baking Queries Answered: Common Questions about Portuguese Sweet Bread
Baking can sometimes bring up questions, especially when working with yeast. Here are some common queries and their helpful answers to ensure your Portuguese Sweet Bread turns out perfectly every time:
The most common reason for a lack of rise is inactive yeast. Please double-check that your yeast is not expired. Active dry yeast has a shelf life, and if it’s past its prime, it won’t be able to properly leaven your bread. When you proof the yeast (step 1), you should see a foamy layer form. If the yeast mixture does not foam up or activate after 5-10 minutes, do not proceed to the next step. You need to start that step all over again with fresh, active yeast to ensure your bread rises beautifully.
To ensure your loaves are perfectly cooked through, the most reliable method is to insert an instant-read thermometer into the very center of the loaf. The bread is fully ready when its interior temperature reaches 190°F (88°C). Visually, the crust should be a rich golden brown, and the loaf should sound hollow when gently tapped on the bottom.
The butter and milk mixture should be warm, not hot and certainly not cold. The ideal temperature is lukewarm, similar to body temperature. This warm liquid helps activate the yeast without shocking or killing it. If it’s too hot, it will kill the yeast; if it’s too cold, it will inhibit activation and slow down the rise.
The amount of flour can vary slightly based on factors like the humidity in your kitchen and the exact size of your eggs. Always add the flour gradually, paying close attention to the dough’s consistency. The dough should eventually pull away from the sides of the bowl cleanly. It shouldn’t be excessively sticky, but it also shouldn’t be dry. The ideal texture is slightly tacky and smooth, indicating proper hydration and gluten development.
Yes, you can absolutely prepare the dough in advance! If you wish to make the dough the night before, complete the initial mixing and kneading steps. After shaping the dough into a ball, cover it tightly with plastic wrap and place it in the refrigerator for its first rise. The cold temperature will slow down the yeast activity. In the morning, take the dough out of the fridge and let it come to room temperature for about 30-60 minutes, then proceed with shaping (e.g., into loaves or braids) and allow it to complete its second rise for approximately 1 hour before baking as instructed.
Yes, Portuguese Sweet Bread freezes beautifully! Once baked and cooled completely, wrap the loaf (or individual slices) very well in plastic wrap, ensuring no air exposure. Then, place the wrapped bread into a freezer-safe Ziplock bag or an airtight container. It can be frozen for up to 2-3 months. To enjoy, thaw at room temperature, and if desired, gently warm in the oven for a freshly baked taste.
Absolutely! While a stand mixer simplifies the kneading process, you are more than welcome to knead everything by hand. This is, in fact, the traditional way to make Portuguese Sweet Bread (Massa Sovada). Be prepared for a good arm workout, as hand kneading typically takes about 10-15 minutes to develop the gluten adequately, resulting in a smooth, elastic dough.
Portuguese Sweet Bread
Facebook Share
Rate Recipe
Print Recipe
Bread, Dessert
European
2
loaves
The Modern Nonna
2 hours
10 minutes
50 minutes
3 hours
Equipment
Ingredients
1x
2x
3x
2x
3x
- 1 packet active dry yeast
- ½ cup warm water
- 1 teaspoon sugar
- ½ cup avocado oil
- 1 lemon, zested
- ¾ cup sugar
- 3 eggs, room temperature
- 1 teaspoon pure vanilla extract
- ½ cup butter, melted
- 1 cup warm milk
- 6 cups all-purpose flour
Egg Wash
- 1 egg
- 1 teaspoon water
Metric
Instructions
-
Combine the active dry yeast, warm water, and 1 teaspoon of sugar in your stand mixer bowl. Let this mixture sit for about 5 minutes until the yeast activates and becomes foamy. While the yeast is activating, gently warm the butter and milk in a pot on the stove until lukewarm.
-
Important: If the yeast does not activate or foam up, it is not fresh. Discard the mixture and restart this step with fresh yeast to ensure a proper rise.
-
Once your yeast mixture is actively foamy, add the avocado oil, lemon zest, remaining sugar, vanilla extract, and room temperature eggs to your mixer bowl. Slowly whisk in the warm butter and milk mixture until well combined.
-
Gradually add the all-purpose flour, one cup at a time, until you reach approximately 6 cups. Observe the consistency of the dough; it should become cohesive and pull away cleanly from the sides of the bowl. It should be tacky but not overly sticky.
-
Lightly oil your hands, then remove the dough from the bowl and shape it into a smooth ball. Place the dough ball back into the cleaned bowl.
-
Cover the bowl with a clean kitchen towel or plastic wrap and let the dough rise at room temperature, away from drafts, for 2 hours, or until doubled in size. Once risen, gently punch down the dough, divide it into 2 equal parts, and shape each part into a smooth ball. Place each sweet bread ball into baking dishes lined with parchment paper. (My baking dishes were 10 inches round, but any similar size will work.)
-
Note on Shaping: You can also choose to make one large loaf of bread or divide the dough into smaller buns or even braids. Adjust baking time accordingly.
-
Cover the sweet bread loaves again and let them rise for another hour for the second proofing.
-
Preheat oven to 350°F (175°C). Whisk together 1 egg and 1 teaspoon of water for an egg wash. Brush each loaf with the egg wash, and optionally sprinkle with a little sugar on top for a glittering crust. Bake uncovered for 45 minutes or until golden brown.
-
To confirm doneness, insert an instant-read thermometer into the center of a loaf. The bread is fully baked when it reaches an internal temperature of 190°F (88°C).
-
If you opt for one large loaf, the baking time will likely be at least an hour. Once baked, remove from oven and let it cool completely on a wire rack before slicing. Slicing warm bread can make it dense and slightly “wet” in texture.
Nutrition
Carbohydrates: 371g,
Protein: 56g,
Fat: 117g,
Saturated Fat: 41g,
Polyunsaturated Fat: 12g,
Monounsaturated Fat: 55g,
Trans Fat: 2g,
Cholesterol: 464mg,
Sodium: 550mg,
Potassium: 757mg,
Fiber: 11g,
Sugar: 84g,
Vitamin A: 2099IU,
Vitamin C: 0.01mg,
Calcium: 273mg,
Iron: 19mg
Nutrition information is automatically calculated, so should only be used as an approximation.
Additional Info
Bread, Dessert
European